- Web templates
- E-commerce Templates
- CMS & Blog Templates
- Facebook Templates
- Website Builders
CherryFramework 4. How to add custom HTML content to footer
September 14, 2015
This tutorial shows how to add custom HTML content to footer in CherryFramework 4.
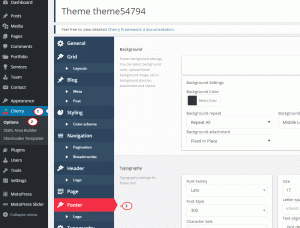
CherryFramework 4. How to add custom HTML content to footerSometimes you need to include some extra areas to the footer of your website. CherryFramework 4 allows implementation of such changes avoiding working with files. Default cherry options can be used on this point. Navigate to Cherry> Options >Footer section first:

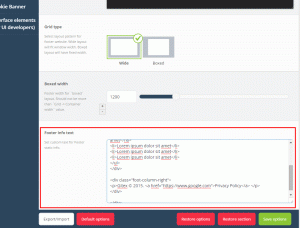
Use ‘Footer Info Text’ box to place some custom HTML code:

You can use simple HTML code there to apply some text, images, or lists. More complex HTML code structures can be also used within ‘Footer Info Text’ box, for example custom classes.
Note: make sure the CSS for the custom classes is placed under Appearance> Editor> style.css file.
Click ‘Save options’ in the bottom of the page once finished with changes. Refresh the site’s frontend; it should be updated with custom content now.
Feel free to check the detailed video tutorial below:
CherryFramework 4. How to add custom HTML content to footer


.jpg)
