- Web templates
- E-commerce Templates
- CMS & Blog Templates
- Facebook Templates
- Website Builders
CherryFramework 4. How to change font icons
October 13, 2015
This tutorial shows how to change font icons in CherryFramework 4.
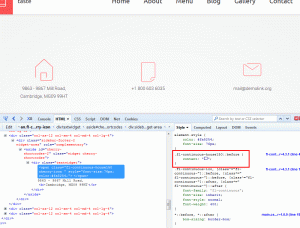
CherryFramework 4. How to change font iconsThere are several types of iconic fonts that might be used in CherryFramework 4. They are Font Awesome and Material Design icons. Use ‘Inspect element’ tool to check the specific one in your case. The font reference shows up under ‘font-family’ css line:
Font Awesome
Font Awesome is usually used for the icons. You can replace original icons with new ones using Dashboard options:
-
Open the post/page where icon should be replaced.
NOTE: make sure to use Visual editor for editing.
-
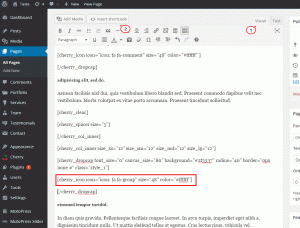
Scroll down the content to locate required piece of text where Font Awesome is used. The reference to the used icon will be within [cherry_icon] shortcode, for example: [cherry_icon icon="icon: fa fa-group" size="48" color="#ffffff"]
Click ‘Insert shortcode’ button on top of the page to replace default icon with another one:

-
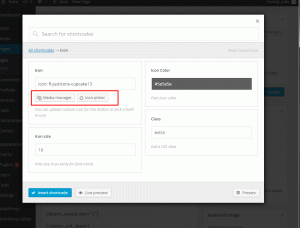
Select ‘Icon’ type there. You will get a form with the ‘Icon picker’ to use. This tab specifically opens a list of available Font Awesome icons. Select the one you prefer to be used in a page:

‘Media manager’ button allows you to upload custom image to be used as an icon.
Update icon settings (icon size, color, CSS style class), so they match required layout of your page. Click ‘Insert shortcodes’ button once done editing. This places new icon to the page content.
-
Delete the shortcode for the old icon and update changes to the page.
Flat Icons
There are icons created with different font than Font Awesome. Use ‘Inspect element’ tool to check the used font. Let’s use fl-continuous font icons as an example:
Icons of this type are updated in a different way:
-
Use ‘Inspect Element’ tool first and locate CSS class for the specific icon. Copy the CSS class:

-
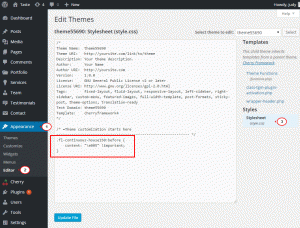
Open Dashboard> Appearance> Editor> theme####> style.css file. Paste the copied CSS class there. Put it to the bottom of the file, below the content it currently contains.
-
Now open server files (use hosting cPanel or FTP for that). Locate /wp-content/themes/theme#####/assets/css/ folder there. You’ll see CSS files for the custom iconic fonts. Open the one for fl-continuous – "fl-continuous.css" file.
-
List of the available icons and content for them shows up. Locate the icon you’d like to use there and copy its content value.
-
Get back to the style.css file in Dashboard. Replace the previous icon content with the new one.
Note: make sure to use ‘!important’ at the end of the line to apply the change:

-
Update changes to the file. Get back to the site’s front-end to view the result.
Custom Icon Fonts
In case you’d like to place some custom icon font, some additional steps are required.
-
Download the files for the new icons font and upload them to the following directory: ‘wp-content/themes/themeXXXXX/assets/fonts’.
-
Upload CSS file of the custom iconic font to the ‘wp-content/themes/themeXXXXX/assets/css’ folder in the server.
-
Open ‘wp-content/themes/themeXXXXX/functions.php‘ file. Locate the following piece of code:
add_filter( 'cherry_custom_font_icons', 'themeXXXX_custom_font_icons' ); function themeXXXXX_custom_font_icons($icons) { $icons['themeXXXXX_flat_icon_continuous'] = get_stylesheet_directory_uri() . '/assets/css/fl-continuous.css'; $icons['themeXXXXX_flat_icon_justicons'] = get_stylesheet_directory_uri() . '/assets/css/fl-justicons.css'; $icons['themeXXXXX_flat_icon_arrows'] = get_stylesheet_directory_uri() . '/assets/css/arrows.css'; return $icons; } - Edit that with the line for the custom iconic font:
$icons['themeXXXXX_custom_font_name] = get_stylesheet_directory_uri() . '/assets/css/path-to-icon-font.css';
custom_font_name should be replaced with the actual name of the new font.
path-to-icon-font.css should be replaced with the actual name for the CSS file from the ‘assets/css’ folder.
-
Update changes to the file. Next you can use the new iconic font in the same way as for the Flat Icons.
Feel free to check the detailed video tutorial below:
CherryFramework 4. How to change font icons


.jpg)
