


- Web templates
- E-commerce Templates
- CMS & Blog Templates
- Facebook Templates
- Website Builders
FAQs
General Tutorials
MonsterONE Subscrioption


Your Internet browser’s cache stores certain information (snapshots) of webpages you visit on your computer or mobile device so that they’ll load more quickly upon future visits and while navigating through websites that use the same images on multiple pages. However, occasionally your browser’s cache can prevent you from seeing updated content, or cause functional problems when stored content conflicts with live one. You can fix many browser problems simply by clearing your cache. This tutorial will show you how to clear the cache for all major browsers.
If you are unsure of what browser version you are currently using, you can visit whatbrowser to find out.
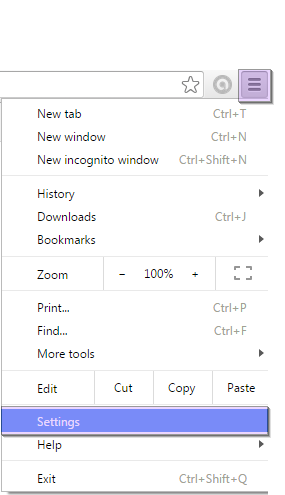
Click the menu icon in the browser upper right corner. Click Settings on the bottom of the menu.
From settings, click Show advanced settings…. It’s located at the very bottom of the settings section.
Scroll to the privacy section and click Clear browsing data.

Select Cached images and files. Uncheck all other options to avoid deleting browser history, cookies and other things you may wish to retain. Change Obliterate the following items from to the beginning of time.
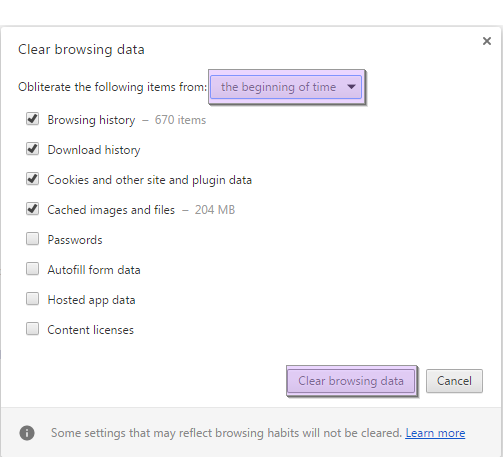
Press Clear browsing data. You are done!
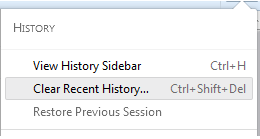
Click the Firefox menu in the top left corner.

Select the right arrow next to History, and click Clear Recent History.
Make sure Details is expanded, then select Cache from the list. Uncheck everything else.
In the Time Range to Clear drop down, select Everything.

Select Clear Now. Your computer will work for a moment, and the process will be completed. You’ve successfully cleared Firefox’s Cache!
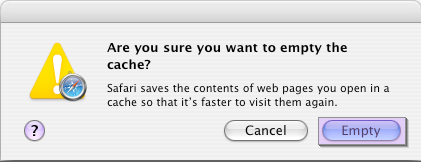
Once your browser is open, click the Safari menu and select Empty Cache…

Click Empty. You are done!
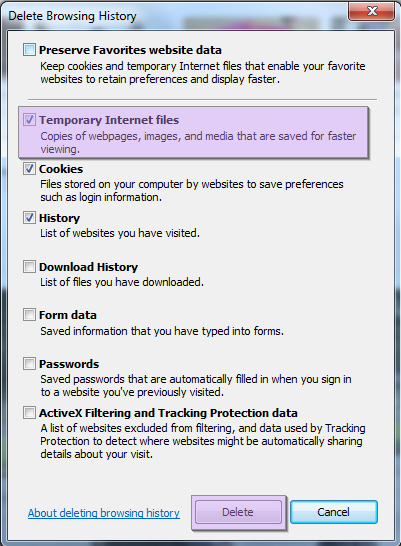
Once your browser is open, click the gear icon at the top right to open the Settings menu. Then, select Safety and Delete Browsing History.

Select Temporary Internet Files. You will also need to uncheck all of the other boxes, especially Preserve Favorites website data. This option makes the window also delete objects from websites in your Favorites folder, which is necessary to completely clearing your cache.
Click the Delete button next to the bottom of the window to perform the operations (i.e. clear your cache by deleting temporary files).
Your computer will work for a moment, and then the process will be completed. You’ve successfully cleared Internet Explorer’s Cache!
Once your browser is open, select the Settings menu and click History.

Click on Clear browsing data on the right top corner.
Select Cached images and files. Uncheck all other options to avoid deleting browser history, cookies and other things you may wish to retain. Change Obliterate the following items from to the beginning of time.

Press Clear browsing data button.
Feel free to check the detailed video tutorial below:
How to clear cache in different browsersAlso, to understand how the browsers work better, review the collection of our new website templates with live demos.
