


- Web templates
- E-commerce Templates
- CMS & Blog Templates
- Facebook Templates
- Website Builders
FAQs
General Tutorials
Featured templates
MonsterONE Subscrioption


This tutorial will show you how to create favicon for your website using Photoshop.
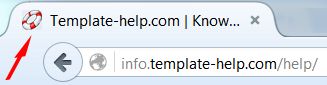
How to create .ico favicon with PhotoshopFavicon is a small but significant way of promoting your brand on your website. This is how it may look on your website:
Photoshop is a great and flexible graphics editing program for creating custom favicons.
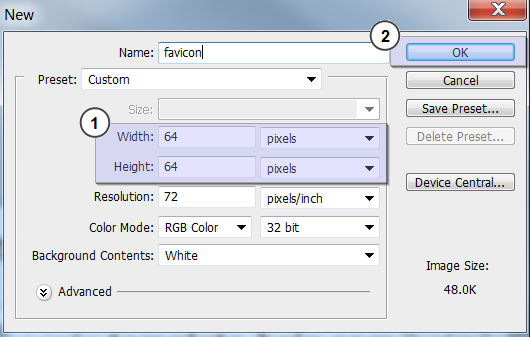
Favicon is usually 16×16 mini logo you can use on your website, but if you need a little more space to work with, you can start out with a document that is 64×64 pixels, and then scale it down later.
Let’s create a new document in Photoshop. Open ‘File’ > ‘New’ menu:
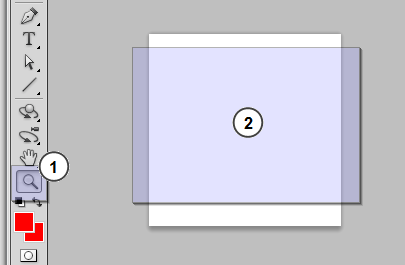
Use ‘Zoom’ tool to increase the document for editing:
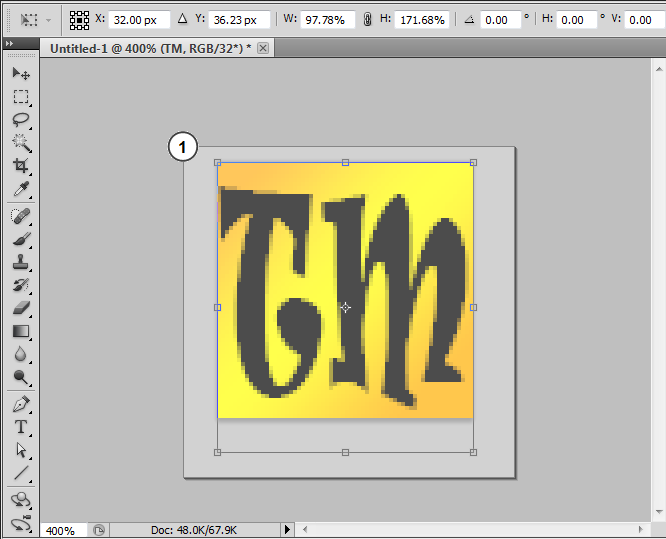
For our example favicon, we’ll create a simple gradient background with 2 letters ‘TM”’ (TradeMark).
Apply ‘Gradient Tool’ to your document. Feel free to use any color presets available by default or create new ones:

Use ‘Horizontal Type Tool’ to add your own text. Set the font family, font size, font color:

Using ‘Transform Tool’ (Ctrl + T) adjust text position:
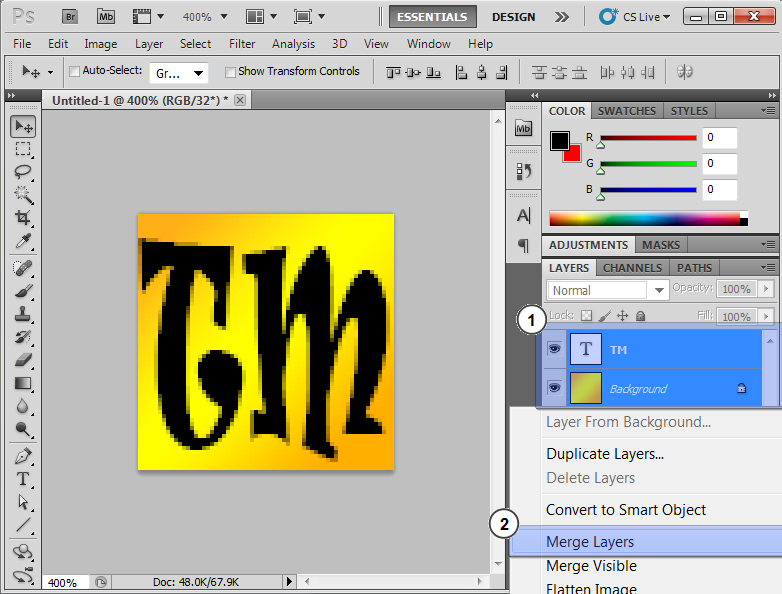
Merge layers as shown on the screenshot below:
Go to ‘File’ > ‘Save As’, open up the drop-down menu and select the .PNG (*.PNG) option. Hit the ‘Save’ button:

You’ve successfully created your own favicon image. It was saved as ‘favicon.png’ file on your hard drive.
Favicons are saved as .ICO files, a file format that saves multiple images at different sizes for scaling purposes. Therefore, the last step would be converting image format from .PNG into .ICO. This will be the easiest step in the whole tutorial.
Open any online Image Converting Website in your browser. We will use this website.
Drop your ‘favicon.png’ file into ‘Upload’ area (as shown on the screenshot). Convertion starts automatically. The process takes 1 – 2 seconds:

Hit the ‘Download’ button to get ‘favicon.ico’ file to your hard drive.
And you’ve done it! We’ve created a unique favicon for your website using Adobe Photoshop software. Feel free to upload your favicon to your server.
Feel free to check the detailed video tutorial below:
How to create .ico favicon with PhotoshopIf your budget is limited and you can’t afford to pay for Adobe subscription every month, you can try this Online Photoshop Editor that is available absolutely for free and can help even beginner users cope with designing logos and icons. If you don’t perceive Photoshop as your main tool for creating custom favicons, have a closer look at these handy free favicon generators that perfectly fit such a task.
1. Genfavicon
This is a wonderful instrument that you can use to turn any image into a working favicon for your site. Primarily, you need to crop and resize your image (both tools are available here) and then save the result in the .ico format. There is a handy preview function, so you can see how your favicon will look before you click the “Save” button.
2. RealFaviconGenerator
You are unlikely to find a more universal and flexible tool for generating favicons. The biggest upside of RealFaviconGenerator is the possibility to test your new favicon, by entering the website’s address and learning how efficient the favicon is.
The service collects the reviews and sorts them by platform, so you can find out how your favicon will look in different browsers and OS. With this info in mind, you can improve your favicon to make it appealing to a broader range of people.
3. Xiconeditor
A truly remarkable generator for quick and effortless favicon creation from scratch. Looking through the available toolset, you are bound to be amazed, since there are all the necessary instruments for the task – a type tool, an eraser, a brush, a pencil tool and many other instruments shared absolutely for free.
If you have already created a kind of a base for your favicon, you can import it and adjust by altering the size. The preview feature adds to the popularity of this service, since it is always nice to know how your favicon will look like before importing the result.
4. Logaster
This is probably one of the fastest and simplest favicon generators. The total number of logos created with the help of Logaster goes over 6,000,000 items.
The process is very straightforward. Select “Create Logo”, enter your company’s name and pick the proper activity type. There is a plethora of ready-made templates, which you can use with slight customization. Once you are done with settings, click “Start” and enjoy the result.
5. Favicon-Generator
This is a handy tool favored by people using Android, Microsoft and iOS apps, as well as those trying to create a catchy and well-optimized favicon for online sources. It supports such formats as JPG, PNG and GIF, so upload an image in any of these formats and turn it into the .ico file. If there isn’t any suitable image at hand, look through the integrated icon collection.
You can search for the proper image by letters, colors and numbers. After you’ve selected a suitable file, start editing it and save the favicon you get to the root directory of your website.
