- Web templates
- E-commerce Templates
- CMS & Blog Templates
- Facebook Templates
- Website Builders
Joomla 3.x. How to install a template
November 19, 2013
This installation method can be used if you already have a Joomla website and just want to change the website appearance installing a Joomla template.
Joomla 3.x. How to install a template
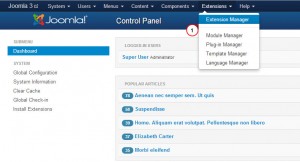
1. Open Joomla administration panel and go to “Extensions > Extensions Manager” screen in the top menu.
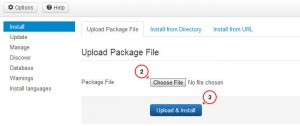
2. Using the Package File “Browse” button browse for the “theme###.zip” file in the “joomla” directory of your template package. Click the button to install the Joomla template.
3. Install all the modules from ‘sources_XXX.zip’ folder (make sure to unzip that folder according to the instructions provided in the ‘info.txt’ file).
4. The next step is sample data installation.
To install sample data you need to complete two simple steps:
Step 1. Upload sample images.
Access your server, using any ftp client. To upload sample images, please open your template package directory and go to the “sources” folder.
There you should see the “to_the_root_directory” directory. It contains files that should be placed in your Joomla installation root.
Step 2. Import the SQL file.
The final and most important step of the sample data installation is the import of the SQL file. The SQL file can be imported using your database management tool (phpMyAdmin).
The template SQL file – “dump.sql” is located in the “sources” directory of the template package.
Please DO NOT import SQL file if you have a live website as it will totally replace your website database and all your data will be lost!
Beware: before importing the SQL file please make sure your database table prefix matches the table prefix in the SQL file.
You can check the table prefix directly in the database through the database management tool. Check for the tables names. The prefix is a set of symbols before the table name. (e.g. table “jos_assets” prefix is “jos_”). You can also find the database prefix in the “configuration.php” file in your Joomla root directory. Search for the line 19: public $dbprefix = 'jos_'; (where the prefix is “jos_”)
If the table prefixes don’t match, open the “dump.sql” file with your code editor and using the Search & Replace tool (CTRL+F or CTRL+H hotkeys) replace the “jos_” table prefix (used in the SQL file) with the one that matches your database. You can check the detailed video tutorial on how to change database prefix in SQL file.
You can also check the detailed tutorial on how to import SQL file using phpMyAdmin tool
Refresh your browser window to see the changes. This is the end of the tutorial. Let us know if you have any questions.
Feel free to check the detailed video tutorial below:


.jpg)
