- Web templates
- E-commerce Templates
- CMS & Blog Templates
- Facebook Templates
- Website Builders
JS Animated. How to manage Swiper Slider
February 26, 2016
Our Support team is ready to present you a new tutorial that shows how to work with Swiper Slider in Website templates.
JS Animated. How to manage Swiper Slider“Swiper.js” script is used to implement slider functionality to our Website templates. This slider has an extended data-API for interaction, so its editing is relatively easy and no javascript files editing is required. In order to edit the slider, please perform the following:
-
Connect to your FTP or open hosting cPanel File manager tool to reach site files.
-
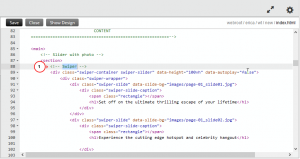
Open your *.html file to locate slider code on the page (in most cases it’s index.html file). Use Ctrl+F to perform search by ‘swiper’ keyword or simply scroll down the page to see slider section:

-
Feel free to specify slider parameters in data-parameter data attributes, where ‘parameter’ is an option you need to change, e.g., data-height for slider height changing. Below you can find the list of attributes available for changing (for target item with “swiper-slider” class):
-
data-height – controls slider height, can take its value in *px (defines static height, it will stay unchanged on screen resize); *% (defines slider height as a percent of its width); *vh (defines slider height as a percent of window height).
-
data-min-height – defines slider height minimum similarly to data-height attribute.
-
data-autoplay – determines slider autostart, can be set to true/false to allow/prevent autosliding. It also accepts time values in milliseconds to define a period for slides switching, e.g. data-autoplay=”3000″.
-
data-loop – defines if slider will stop on the last slide, can take true/false values, e.g. data-loop=”false”.
-
data-direction – defines sliding direction, can take horizontal/vertical values, e.g. data-direction=”horizontal”.
-
data-slide-effect – determines sliding effect, can take fade/slide/coverflow/cube values, e.g. data-slide-effect=”slide”.
For example:
			<div class="swiper-container swiper-slider" data-height="80vh"  data-min-height="30px" data-autoplay="true" data-loop="false" data-direction="vertical" data-slide-effect="coverflow">
				Slider content
			</div>
-
-
In order to change slides content, just edit path to slide image at the data-slide-bg attribute and update caption below. Feel free to refer to the example:
			<div class="swiper-slide" data-slide-bg="images/page-01_slide01.jpg">
				<div class="swiper-slide-caption">
					<span class="rectangle"></span>
					<h1>The first slide goes here</h1>
				</div>
			</div>
where “images/page-01_slide01.jpg” is a slide image, and all the content in the block with “swiper-slide-caption” class is a slide caption.
-
Save changes and re-upload file back to server after editing if you’re using FTP. Next, refresh site page to see changes applied.
Feel free to check the detailed video tutorial below:
JS Animated. How to manage Swiper Slider


