- Web templates
- E-commerce Templates
- CMS & Blog Templates
- Facebook Templates
- Website Builders
Magento. How to edit the Orders and Returns page
August 6, 2015
This tutorial shows how to edit the Orders and Returns page in Magento.
Magento. How to edit the Orders and Returns page
-
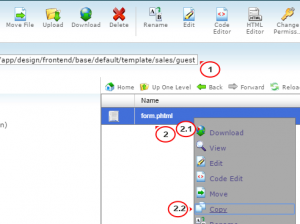
Navigate to app/design/frontend/base/default/template/sales/guest/form.phtml inside your site directory on the server via FTP or on your hosting cPanel and copy the form.phtml file to app/design/frontend/default/themeXXX/template/sales/guest. If you do not have the guest folder, you need to create it first.
We strongly recommend that you back up the file before editing it:
-
There you can edit the form code:
-
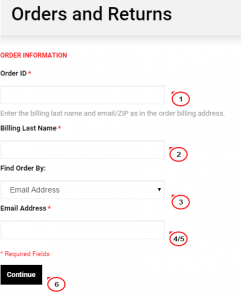
The Order ID field is set by this code:
<li>
<div class="input-box">
<label for="oar_order_id" class="required"><?php echo Mage::helper('sales')->__('Order ID') ?> <em>*</em></label>
</div>
<div class="input-box">
<input type="text" class="input-text required-entry" id="oar_order_id" name="oar_order_id" style="width:300px;"/>
</div>
</li>
If you want the field not to be required, you need to take away the “required” class from the item. For example:
<label for="oar_order_id">
instead of
<label for="oar_order_id" class="required">
-
The Billing Last Name code:
<li class="wide"> <div class="input-box"> <?php echo Mage::helper('sales')->__('Enter the billing last name and email/ZIP as in the order billing address') ?>. </div> </li> <li> <div class="input-box"> <label for="oar_billing_lastname" class="required"><?php echo Mage::helper('sales')->__('Billing Last Name') ?> <em>*</em></label> </div> <div class="input-box"> <input type="text" class="input-text required-entry" id="oar_billing_lastname" name="oar_billing_lastname" style="width:300px;"/> </div> </li> -
The code for Find Order By:
<li> <div class="input-box"> <label class="required"><?php echo Mage::helper('sales')->__('Find Order By:') ?></label> </div> <div class="input-box"> <select name="oar_type" id="quick_search_type_id" class="select guest-select" title="" onchange="showIdentifyBlock(this.value);"> <option value="email">Email Address</option> <option value="zip">ZIP Code</option> </select> </div> </li> -
The code that shows the Email address field when it is selected from Find Order By: is the following:
<li id="oar-email"> <div class="input-box"> <label for="oar_email" class="required"><?php echo Mage::helper('sales')->__('Email Address') ?> <em>*</em></label> </div> <div class="input-box"> <input type="text" class="input-text validate-email required-entry" id="oar_email" name="oar_email" style="width:300px;"/> </div> </li> -
The code that shows the Billing ZIP Code field when it is selected from Find Order By: is the following:
<li id="oar-zip" style="display:none;"> <div class="input-box"> <label for="oar_zip" class="required"><?php echo Mage::helper('sales')->__('Billing ZIP Code') ?> <em>*</em></label> </div> <div class="input-box"> <input type="text" class="input-text required-entry" id="oar_zip" name="oar_zip" style="width:300px;"/> </div> </li> -
And the Continue button is set with the help of this code:
<div class="buttons-set">
<p class="required"><?php echo Mage::helper('sales')->__('* Required Fields') ?></p>
<button type="submit" title="<?php echo Mage::helper('sales')->__('Continue') ?>" class="button"><span><span><?php echo Mage::helper('sales')->__('Continue') ?></span></span></button>
</div>
-
-
You can remove the fields if needed. When all the necessary changes are made, click Save and refresh the site to see the changes.
You may also need to clear the cache.
Feel free to check the detailed video tutorial below:


