


- Web templates
- E-commerce Templates
- CMS & Blog Templates
- Facebook Templates
- Website Builders
FAQs
General Tutorials
Featured templates
MonsterONE Subscrioption


This tutorial shows how to manage "TemplateMonster Parallax" module in OpenCart. Such module is included in the template by default and allows applying fullwidth parallax background within required page. There are a few stages to create the one.
OpenCart 2.x. How to manage “TemplateMonster Parallax” moduleOpen site’s admin panel and navigate to Extensions> Modules section.
Search for TM Parallax module in the list of available ones.
Click ‘Edit’ button next to the default TM Parallax module to create a new banner.
Fill in the fields required:
name of the new banner;
its content (that is optional; you may keep content area empty to display single image only);
using ‘Image’ tab select picture for the parallax background;
specify size of the parallax area – its width and height (values are in px);
use ‘CSS Class’ tab to apply specific CSS rules for this parallax area (that is optional; you may keep field empty to apply standard styles only);
make sure to update ‘Status’ of the banner. Select ‘Enabled’ to get new banner activated:

Save banner once its configuration is complete.
Once new banner is created, the page for its display should be selected. Layer section is used for that; assign new parallax banner to one of the site pages.
You can either use link to the Layout section from the message on top:
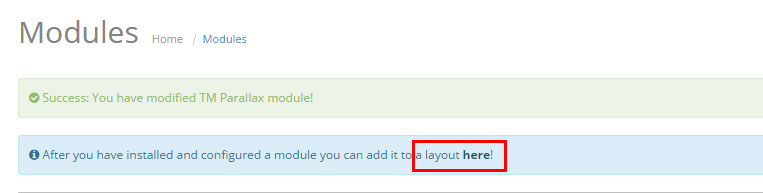
or open the same section manually: Designs> Layouts.
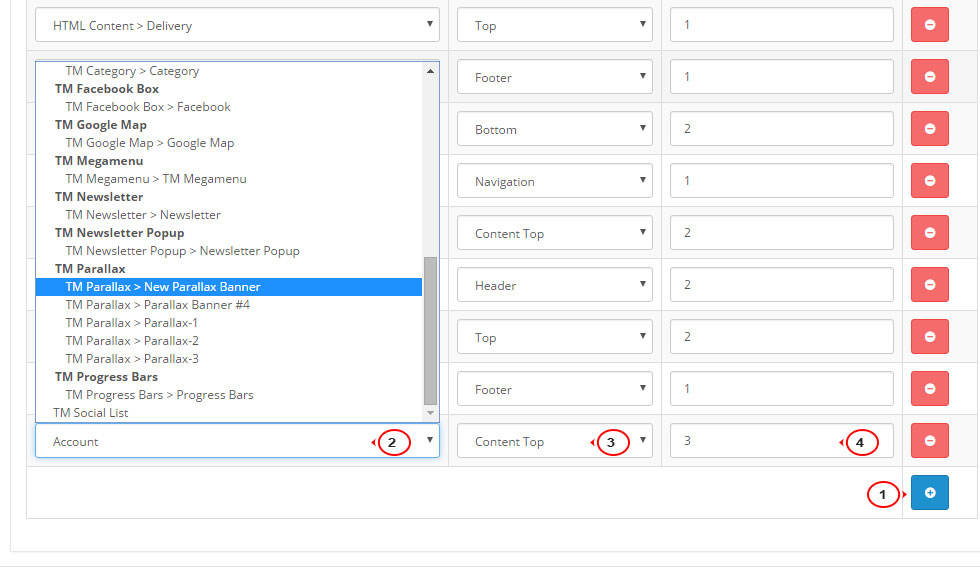
Select page template to put new parallax banner.
Click ‘Add Module’ button at the bottom.
Select newly created parallax banner from the list of available ones.
Define position for it to appear in.
Set Sort Order as well and save changes to the page layout:
While creating parallax banner there was an option to input specific CSS class for this banner only. If that tab has been filled in, stylesheet.css file should be updated:
Create specific CSS rules for the banner. They should define layout peculiarities of the item.
Open server files (using either FTP, or hosting cPanel) and locate /catalog/view/theme####/stylesheet/stylesheet.css file there. Open it for editing.
Copy-paste created CSS classes to the stylesheet.css file. Make sure to have the corresponding class names (class titles should be the same as the one used in the parallax banner settings). Save CSS changes.
The following class name has been used in our case under ‘CSS Classes’: parallax-4 . Therefore, CSS rules that can be used to manage styling of the new banner can be as follows:
/* for new parallax banner #4 - OPTIONAL */
div.parallax-4 {
  padding: 144px 0 146px;
  text-align: center; }
  div.parallax-4 .container h2 {
    font: bold 48px/58px "PT Serif", serif;
    margin-bottom: 32px; }
  div.parallax-4 .btn-primary {
    font-size: 16px;
    line-height: 19px;
    font-family: "Montserrat", sans-serif;
    padding: 14px 41px 13px;
    color: #fff;
    background: none;
    border: 2px solid #fff;
    -webkit-border-radius: 25px;
    -moz-border-radius: 25px;
    border-radius: 25px; }
    div.parallax-4 .btn-primary:visited {
      color: #fff;
      background: none;
      border: 2px solid #fff; }
    div.parallax-4 .btn-primary:hover, div.parallax-4 .btn-primary:active, div.parallax-4 .btn-primary:focus, div.parallax-4 .btn-primary:active:focus {
      color: #fff;
      background: #ce987c;
      border-color: #ce987c; }

@media (max-width: 767px) {
  div.parallax-4 {
    padding: 90px 0; }
    div.parallax-4 .container h2 {
      font-size: 26px;
      line-height: 31px; }}

@media (max-width: 479px) {
  div.parallax-4 {
    padding: 70px 0; }
    div.parallax-4 .container h2 {
      font-size: 21px;
      line-height: 25px; }}
Feel free to use those rules as an example for creating your own style rules.
Save CSS changes to the ‘stylesheet.css’ file.
Get back to the website. Refresh it to view the result. New parallax area appears in the corresponding position within the selected page.
Now you know how to manage "TemplateMonster Parallax" module.
Feel free to check the detailed video tutorial below:
OpenCart 2.x. How to manage “TemplateMonster Parallax” module