


- Web templates
- E-commerce Templates
- CMS & Blog Templates
- Facebook Templates
- Website Builders
FAQs
General Tutorials
Featured templates
MonsterONE Subscrioption


This tutorial will guide you trough OpenCart store settings.
Login to your OpenCart admin panel. In your browser address bar type http://yourdomain.com/admin. If you have installed your Opencart under a subfolder “store” for an example the above URL will change to http://yourdomain.com/store/admin
Login using your username and password.
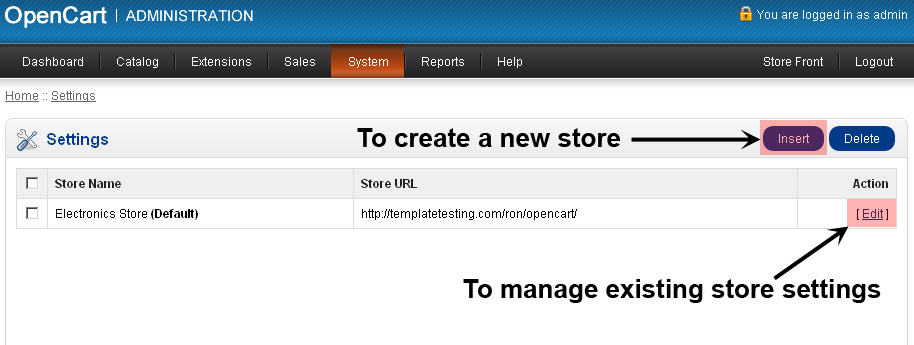
Navigate to System > Settings. Click Edit button to manage existing store settings or click Insert button to add new store.
Store settings are divided into several tabs

Store Name – The name of your store.
Store Owner – The store owner’s name, or can also be the name of the store. This value will be in the “from” field of any email that is sent from the website, such as one that is sent to the customer after purchasing.
Address – The address of your store. This will be displayed on the contact page and on invoices.
E-Mail – The store general email address used for receiving. This will be the destination for any emails sent through the website, such as through the feedback form or notification emails sent by the website as notification of new orders. This should be a SINGLE email address only.
Telephone – The contact telephone number of your store. This will be displayed on your contact page.
Fax – The contact fax number of your store. This will be displayed on your contact page.
Title – Meta Title displayed as the title in search engine results, and in the top bar of the browser.
Meta Tag Description – Meta Tag Descriptions are used by search engines to describe the content of your web site in the search engine results page.
Template – If you have uploaded additional templates, select a template for your store.
Default Layout – If you have uploaded additional sub-templates for your store, select the main one here.
Country – The default country your store is located in.
Region/State – The region or state your store is located in. This will be used to decide via geo zones if taxes should be added to your products.
Language – The default language your store uses.
Administration Language – The default language you see in your store administration.
Currency – The default currency your store uses.
Auto Update Currency – If set to yes your store will automatically get currency rates and update the values daily.
Length Class – The default length class your store uses.
Weight Class – The default weight class your store uses.
Default Items Per Page (Catalog) – How many catalog items are shown per page (products, categories, etc.)
Default Items Per Page (Admin) – How many admin items are shown per page (orders, customers, etc.)
Display Prices With Tax – If you are required to display prices with tax. If set to no then taxes will only be included in the order totals on the checkout confirmation page.
Invoice Prefix – Set the invoice prefix (e.g. INV-2011-00). Invoice ID’s will start at 1 for each unique prefix.
Customer Group – Default customer group when customers register. Can change if, for example, you only sell to wholesale, employees, or other group you have created.
Login Display Prices – Only show prices when a customer is logged in.
Approve New Customers – Don’t allow new customer to login until their account has been manually approved by store owner.
Guest Checkout – Allow customers to checkout without creating an account. Not available if a downloadable product is in the shopping cart.
Account Terms – Forces people to agree to terms before an account can be created.
Checkout Terms – Forces people to agree to terms before a customer can check out.
Affiliate Terms – Forces people to agree to terms before an affiliate account can be created.
Affiliate Commission (%) – The default affiliate commission percentage.
Display Stock – Display stock quantity on the product information page.
Show Out Of Stock Warning – Display out of stock message on the shopping cart page if a product is out of stock but stock checkout is yes. (Warning always shows if stock checkout is no)
Stock Checkout – Allow customers to still check out if the products they are ordering are not in stock.
Out of Stock Status – Set the default out of stock status selected in product edit.
Order Status – Set the default order status when an order is processed.
Complete Order Status – Set the order status the customers order must reach before they are allowed to access their downloadable products and gift vouchers.
Return Status – Set the default return status when a returns request is submitted.
Allow Reviews – Enable/Disable new review entry and display of existing reviews
Allow Downloads – Set your store to allow downloads. If customers make orders with that have downloadable products this setting will stop them from being able to access their downloads.
Allowed Upload File Extensions – If you allow customers to upload a file, which file extensions are allowed to be uploaded. Use comma separated values.
Display Weight on Cart Page – Show the cart weight on the cart page
Store Logo – The logo you want to display in the header of your store.
Icon – A Favicon icon to display in the browser window next to the store address. Should be a PNG that is 16px x 16px.
Product images are automatically resized by OpenCart, so you only need to upload one product image and it will resize to the sizes you specify below:
Category Image Size – image which is displaying on category pages.
Product Image Thumb Size – product thumbnail image
Product Image Popup Size – product image which is displaying in lightbox
Product Image List Size – product image to display in listing
Additional Product Image Size – additional product images
Related Product Image Size – related products images
Compare Image Size – images which are displayed when compairing products
Wish List Image Size – wish list images
Cart Image Size – product images to display in cart
Mail Protocol – Leave at ‘Mail’ UNLESS your host has disabled the php mail function.
Mail Parameters – When using ‘Mail’, additional mail parameters can be added here (e.g. “-femail@storeaddress.com”).
SMTP Host – If your host requires you to use SMTP mail, get this from your web host.
SMTP Username – If your host requires you to use SMTP mail, get this from your web host.
SMTP Password – If your host requires you to use SMTP mail, get this from your web host.
SMTP Port – If your host requires you to use SMTP mail, get this from your web host.
SMTP Timeout – If your host requires you to use SMTP mail, get this from your web host.
New Order Alert Mail – Send a email to the store owner when a new order is created.
New Account Alert Mail – Send a email to the store owner when a new account is registered.
Additional Alert E-Mails – Any additional emails you want to receive the alert email, in addition to the main store email. (comma separated)
Use MaxMind Fraud Detection System – Yes to use or No to not use.
MaxMind License Key – Register for an account at maxmind.com and enter the key code they give you here.
MaxMind Risk Score – Enter a number from 0 to 100, with 0 being zero percent chance of an order being fraudulent and 100 being 100% chance. See their website for additional risk score information.
MaxMind Fraud Order Status – Orders over the risk score you set will not be allowed to complete, and will be set to this status (Denied or Canceled).
Use SSL – If you did not install store with SSL, check with your host to have an SSL certificate is installed, then add the SSL address in your catalog and admin config files.
Use SEO URL’s – To use Search Engine Friendly SEO URL’s with product or page names instead of page numbers, first Apache module mod-rewrite MUST be installed (ask your web host) and you must rename the htaccess.txt to .htaccess. Read the htaccess.txt file for more informations
Maintenance Mode – Prevents customers from browsing your store. They will instead see a maintenance message. If logged in as admin, you will see the store as normal.
Encryption Key – Please select any secret random number that will be used to encrypt private information when processing orders.
Output Compression Level – GZIP for more efficient transfer to requesting clients. Compression level must be between 0 – 9.
Display Errors – Turn on or off error displaying.
Log Errors – enable or disable error logging
Error Log Filename – Default is error.txt
Google Analytics Code – Log in to your Google Analytics account and after creating your web site profile copy and paste the analytics code into this field.
