


- Web templates
- E-commerce Templates
- CMS & Blog Templates
- Facebook Templates
- Website Builders
FAQs
General Tutorials
Featured templates
MonsterONE Subscrioption


The following tutorial is going to show how to import/export data in CSV files in PrestaShop 1.6
PrestaShop 1.6.x. How to export/import data in CSV files
NOTE: In PrestaShop you can export and import categories, products, customers, addresses, manufacturers, suppliers, combinations and aliases. This is useful if you want, for example, to export categories and products from one store and import them into another. The export and import process is done with the help of CSV (comma-separated values) files.

Log into your Prestashop dashboard.
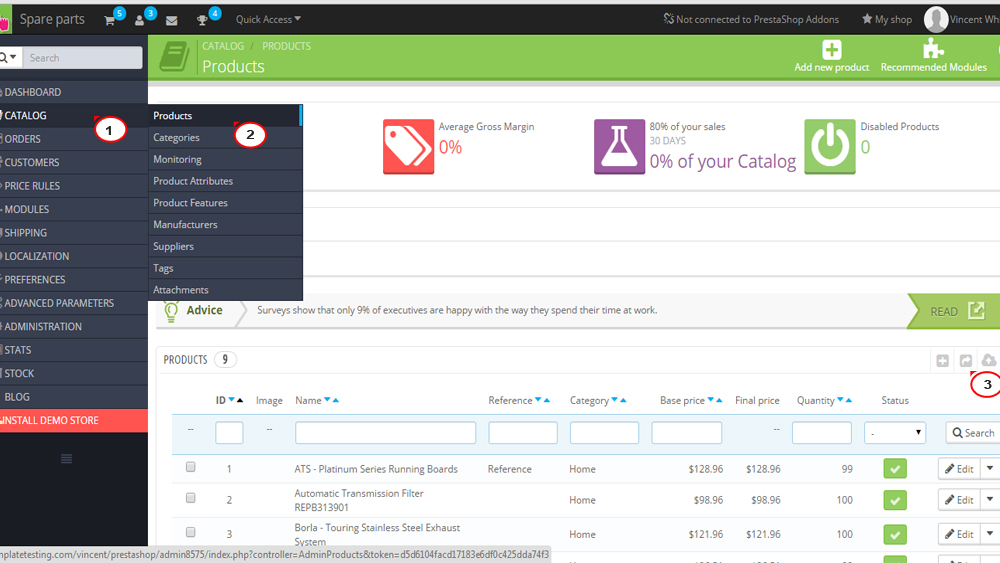
You can export information from the page in the admin panel where you can manage that particular information. For example, to export the products, go to Catalog->Products in the admin panel and click on the Export button in the top right corner:
A small window will pop out where you can save the products into a CSV file on your local computer.
If you want to export your categories, go to Catalog->Categories and use the Export button. In the same way if you want to export the customers, go to Customers->Customers and use the Export button; for the addresses this will be Customers->Addresses->Export button, etc.
Once you have the CSV file(s) with the exported information on your local computer, you can import it into another PrestaShop instance or in the same one. If necessary, you can edit the file before importing it.
Before you import anything into your PrestaShop, we recommend that you make a BACKUP of that shop, unless it’s empty and you have nothing to lose.
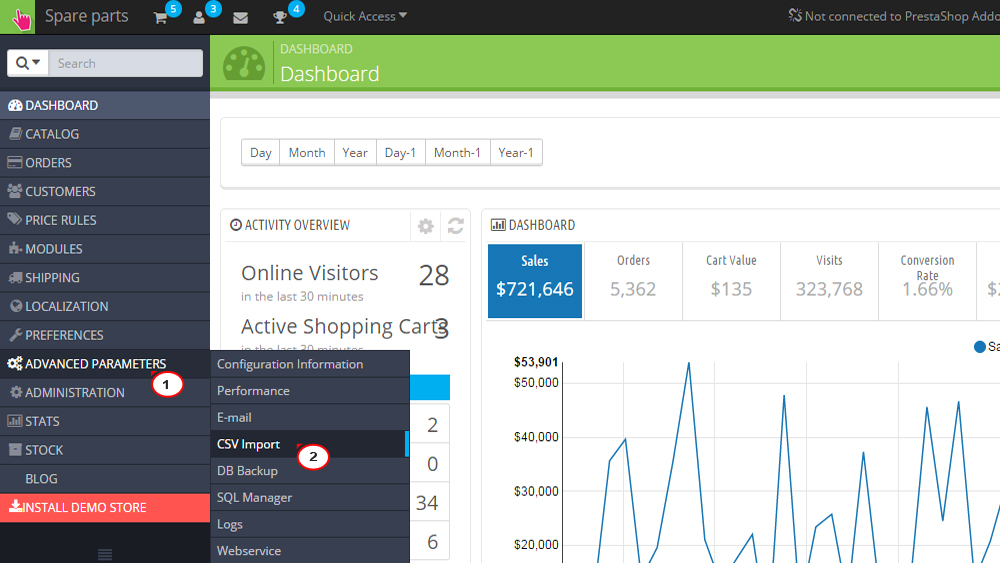
To import a CSV file, regardless of whether it’s for categories, products, customers, etc., log into the admin panel and go to Advanced Parameters ->CSV Import:
An alternative is to go to the page for managing whatever you want to import and click on the Import button there. For example, if you want to import categories, you can go to Catalog ->Categories and click on the Import button. This will automatically redirect you to the same CSV Import page in the admin panel.
On the CSV Import page there are the following options:
What kind of entity would you like to import? – from this drop-down menu you can select whether the CSV file that you’re about to import contains categories, products, customers, address, etc. When you select an entity you’ll see the fields for that entity in the area on the right.
Select your CSV file – from this option you can upload the CSV file that’s about to be imported. Click Upload as file button and use the window that pops out to locate the CSV file that you have previously exported on your local computer. Choose from history/FTP button allows to upload CSV file directly from FTP (adminXXX/import directory of the Prestashop installation).
Language of the file – from this drop-down menu you can select the language of the CSV file.
ISO-8859-1 encoded file? – If the file is in that encoding, you should enable this option.
Field separator – usually the field separator in CSV files is a semicolon.
Multiple value separator – by default, this is a comma.
Delete all … before import – if you enable the option, the existing data will be deleted.
Use product reference as key – this option is available only when you’re importing products. It’s disabled by default which means that the product key that will be used is automatically selected by PrestaShop. If you want to force PrestaShop to use the product reference option as the product key, enable this option.
Force all ID numbers – by default, this setting is disabled which means that PrestaShop will assign its own IDs to the imported data. If you want to keep the original IDs, enable this option:
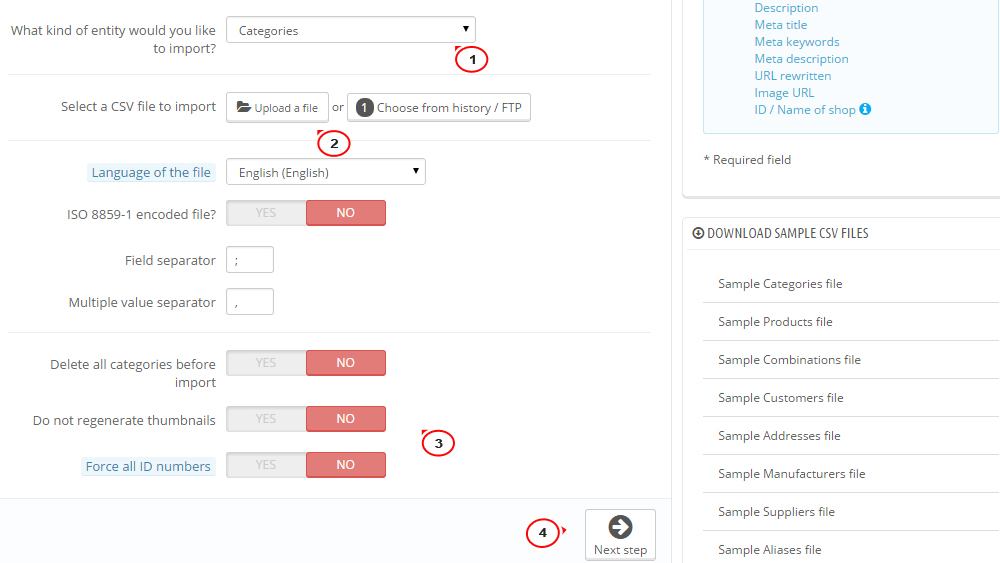
When you’re done with the settings, click the Next step button below.
On the page that opens you’ll see a table with the data that’s about to be imported. You can use it to make sure that the headers of the CSV file that you’re going to import match the headers required by PrestaShop. At the top of the table there are drop-down menus showing which header PrestaShop expects at each particular position of the table, and under them you’ll see the headers of the columns as they exist in the CSV file:
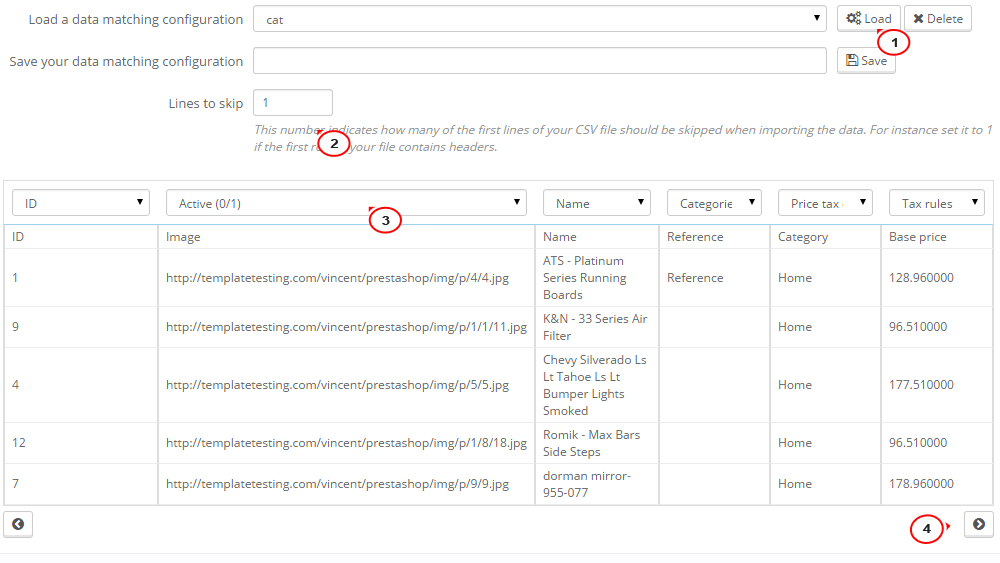
When you’re ready, click Import CSV data button.
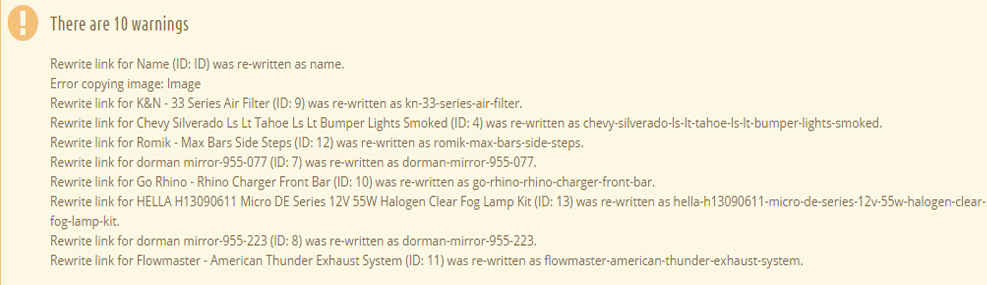
When the data from the file is imported, you’ll be brought back to the CSV Import page. If there was some problem with the import, there will be a message(s) on the red background. There might be some other non-critical warning messages which doesn’t mean the import wasn’t successful. Such messages are shown on the brown background:
That is the end of the tutorial. Now you know how to import/export data in CSV files in PrestaShop 1.6.
Feel free to check the detailed video tutorial below:
