- Web templates
- E-commerce Templates
- CMS & Blog Templates
- Facebook Templates
- Website Builders
PrestaShop 1.4.x. TMSlider
March 21, 2012
The tutorial explains how to edit tmslider module in template
To add/remove/update slides we should edit slider source file which is located in modules/tmslider folder. The file name is tmslider.tpl
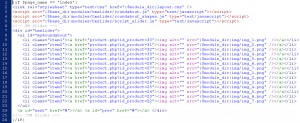
Please open the file using Adobe Dreamweaver in code view. You should see the following code
Each line of code represents 1 slide
<li class="item1"><a href="product.php?id_product=33"><img alt="" src="{$module_dir}img/img_1.png" /></a></li>
product.php?id_product=33 is the URL for the slide. We can link each slide to any page on our site or even to external site. Just update the URL here.
{$module_dir}img/img_1.png is the path to the slide image. {$module_dir} means /modules/tmslider folder. You can update it to your own image path.
Please note that you should clean smarty cache after applying any changes to source file.
Go to tools/smarty/compile folder and remove all the files except index.php
Feel free to check the detailed video tutorial below:


