Introduction What you can find in this package and how you can use it
Thank you for purchasing an OpenCart template. This manual consists of several parts which show the entire process of setting up and managing an OpenCart site from scratch. We did our best to make this manual as clear and easy to follow as possible.
What is OpenCart?
OpenCart is a free open source ecommerce platform for online merchants. OpenCart provides a professional and reliable foundation for building a successful online store. This foundation appeals to a wide variety of users ranging from seasoned web developers looking for a user-friendly interface to shop owners launching their business online for the first time. OpenCart has an extensive amount of features that give you full control over the customization of your store. With OpenCart tools you can make your online shop live up to its fullest potential. Learn More
File structure
The following items are included in the template package:
- documentation - contains a detailed manual on template and engine installation;
- index_en.html - the main documentation file. That's where you are right now :)
- screenshots - contains screenshots of the theme;
- sources - contains the Adobe Photoshop source file;
- themeXXX - contains:
- themeXXX(full).zip - the archive that contains the OpenCart engine, the template and the template sample data (intended for clean installation);
- themeXXX(update).zip - the archive that contains the template with no sample data included (intended for installation over the existing store);
- unzip.php - the file used to extract files from the full/update package .zip archive when uploaded to the hosting server.
- info.txt - contains information about the archive;
- fonts_info.txt - contains information about the fonts used in the template.
Prepare What you need to make this work
In order to run an OpenCart store you need to make some preparations.
Editing software
To feel comfortable working with an OpenCart theme, we recommend downloading all the applications required. You can see the list of required software on the template preview page.
The requirements may vary for different templates so here we will tell you what is needed in general:
- You may need the Adobe Photoshop application. You can use it to edit .PSD source files and will definitely need it if you want to edit template design graphics and images.
- To edit the template source code files, you'll need some code editor like Adobe Dreamweaver, Notepad++, Sublime Text, etc.
- To upload files to the hosting server, you may need an FTP Manager like FileZilla, CuteFTP, etc.
- Please check the following tutorials on how to extract files from the archives with WinZip(PC) and StuffitExpander(MAC).
Hosting
As OpenCart is a PHP/MySQL based application, you need to prepare a hosting environment to run OpenCart.
If you have live hosting, please make sure it matches System requirements and is ready to be used for OpenCart websites.
You can also run OpenCart locally on your computer using the local server. To create a local hosting server, please use the localhost applications such as WAMP, AppServ, MAMP, etc. Any of those can be easily installed as any other program and used to run OpenCart.
Please check the tutorials below on how to configure a local development environment:
Getting Started What to click to make this work
Full Installation
This installation option is used if you do not have any OpenCart installations on your server. The 'themeXXX(full).zip' archive used in this guide contains the OpenCart engine and the theme with sample data, so you don not need to upload the OpenCart engine separately. The sample data will make your OpenCart website appear the same as on the template preview page, with all the sample products, modules and site testing installed.
Update Installation
Use this option if you already have an OpenCart based website and just want to change its appearance by installing a new theme.
Full Installation
The complete installation method can be used if you want to set up an OpenCart website from scratch. We assume that you have completed all the preparation steps and already have all the necessary stuff.
Creating a Database
When you are done uploading files to the hosting server you can prepare a new database for your OpenCart website. You can create the database using the database management tool from your hosting control panel (usually PhpMyAdmin).
With the phpMyAdmin tool you will be able to create a new database in 3 simple steps (check the slides below):
- Click the Database button in the top navigation menu to access the database listing.
- Input the database name into the "Create new database" field.
- Click the Create button on the right.
You can now see your database in the database listing. Click on its name to get access to the database.
-
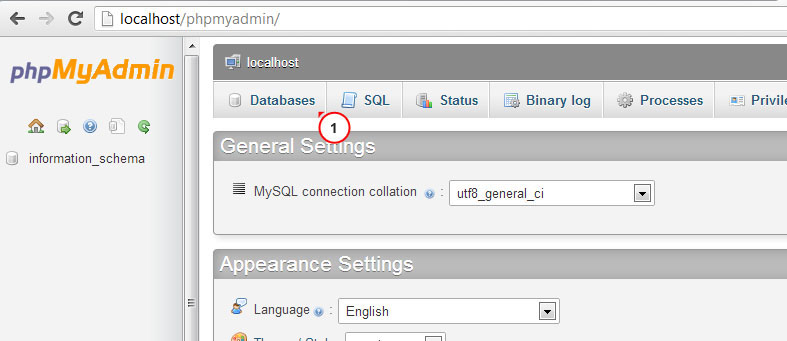
1. Click the Database button to access the database listing.
-
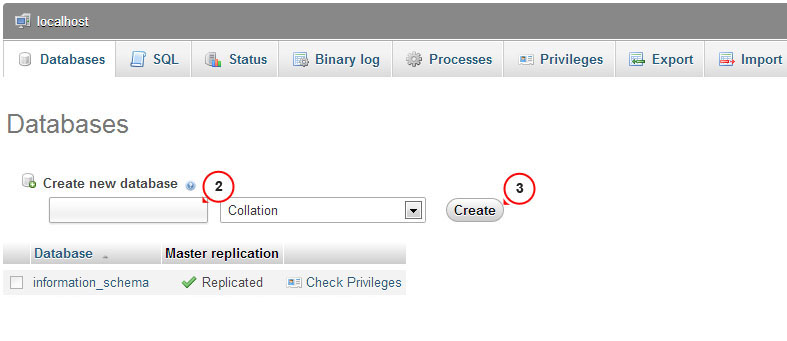
2. Input the database name.
3. Click the Create button. -
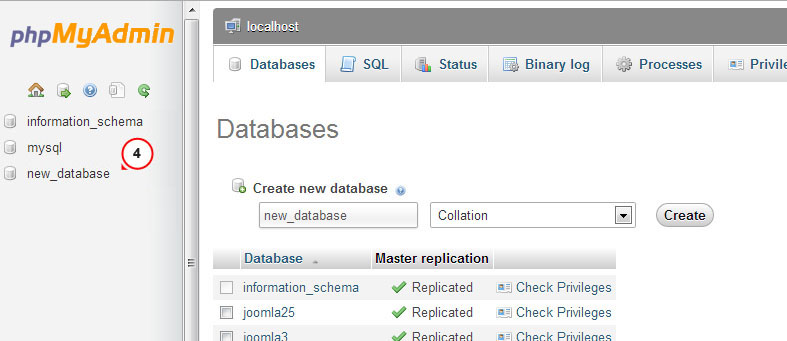
4. You can now see your database in the database listing. Click on its name to get access to the database.
You can also check a detailed video tutorial on How to create a database.
If you have any issues with creating a database, please contact your hosting provider for help and assistance.
Uploading and unzipping
To start working with OpenCart you need to upload files to your hosting server. You can do it by using your hosting file manager or some third party FTP manager.
- Open your template package directory.
- Select 'unzip.php' and 'themeXXX(full).zip' files and upload them to your server ( How to upload files to a server, How to upload files to a server using cPanel (WebHost Manager, WHM) ).
- Type the path to the 'unzip.php' file on your server (http://your_domain_name/unzip.php) in your browser.
- You should see the following screen:
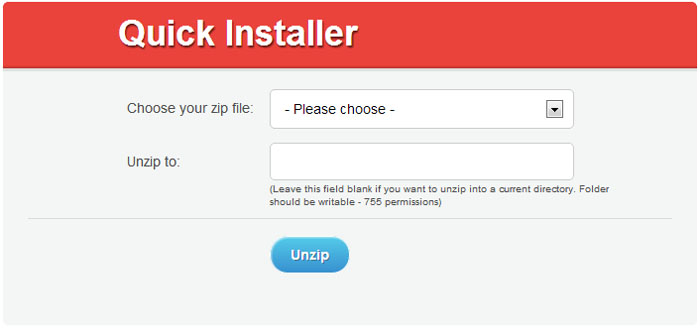
Img 1. Unzip.php initial screen.
- In the 'Choose your zip file' select box, select the uploaded 'themeXXX(full).zip' file.
- In the 'Unzip to' field, specify the directory where you want to extract the files.
- Click the 'Unzip' button to proceed.
Please make sure to set the correct permissions for the directory where you are planning to extract the files. Permissions should be CHMOD 755 or 777 depending on your server configuration.
OpenCart installation
Open your browser and type the path to your OpenCart directory in the address bar (e.g. http://your_domain_name/opencart). You should see the initial OpenCart installation screen:
Installation step 1 License
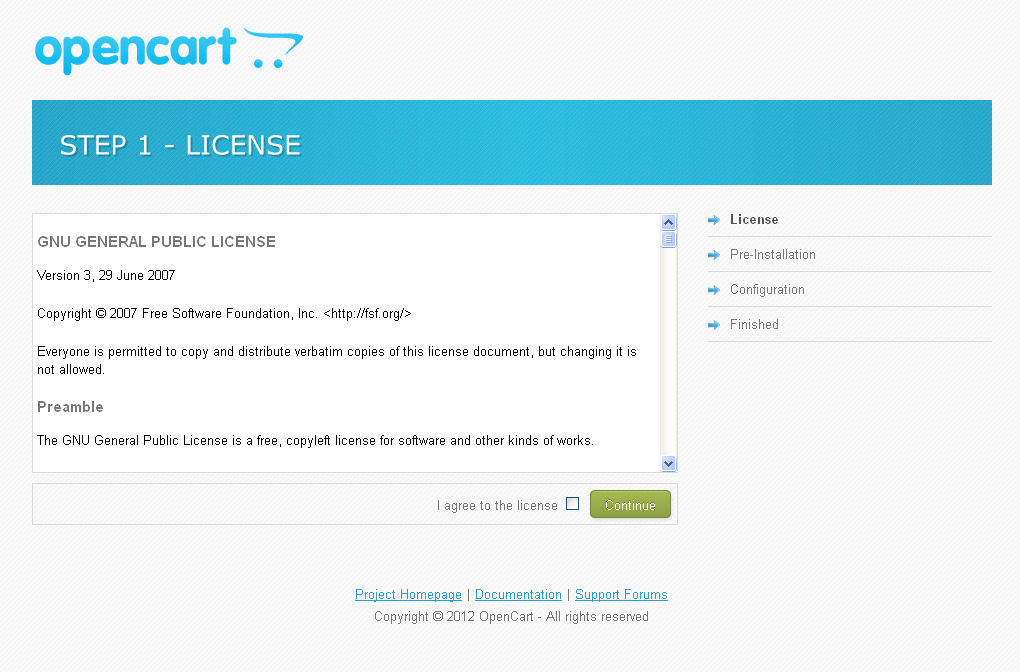
Img 1. OpenCart installation. Step 1. License
Please check the OpenCart license and if you agree with its terms, check the I agree to the license box and click the Continue button.
Step 2 Pre-Installation
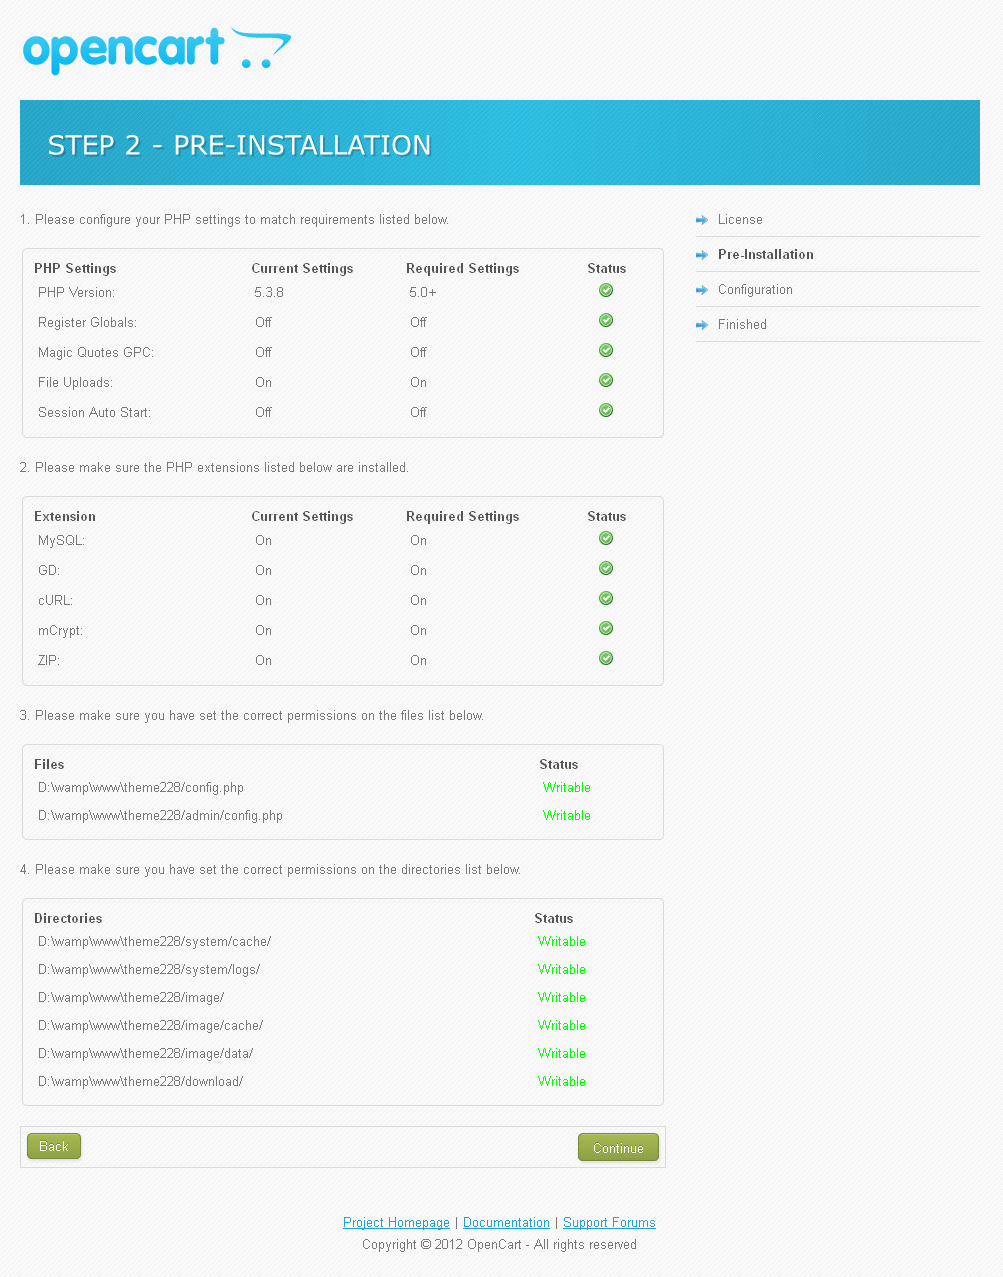
Img 3. OpenCart installation. Step 2. Pre-Installation
In this step, the OpenCart engine checks your hosting server: whether its settings fit the OpenCart requirements and whether the directories' permissions have been set correctly.
Please make sure to set the correct permissions for the OpenCart engine directories as described below:
- chmod 0755 or 0777 image/
- chmod 0755 or 0777 image/cache/
- chmod 0755 or 0777 image/data/
- chmod 0755 or 0777 system/cache/
- chmod 0755 or 0777 system/logs/
- chmod 0755 or 0777 download/
- chmod 0755 or 0777 config.php
- chmod 0755 or 0777 admin/config.php.
Step 3 Configuration
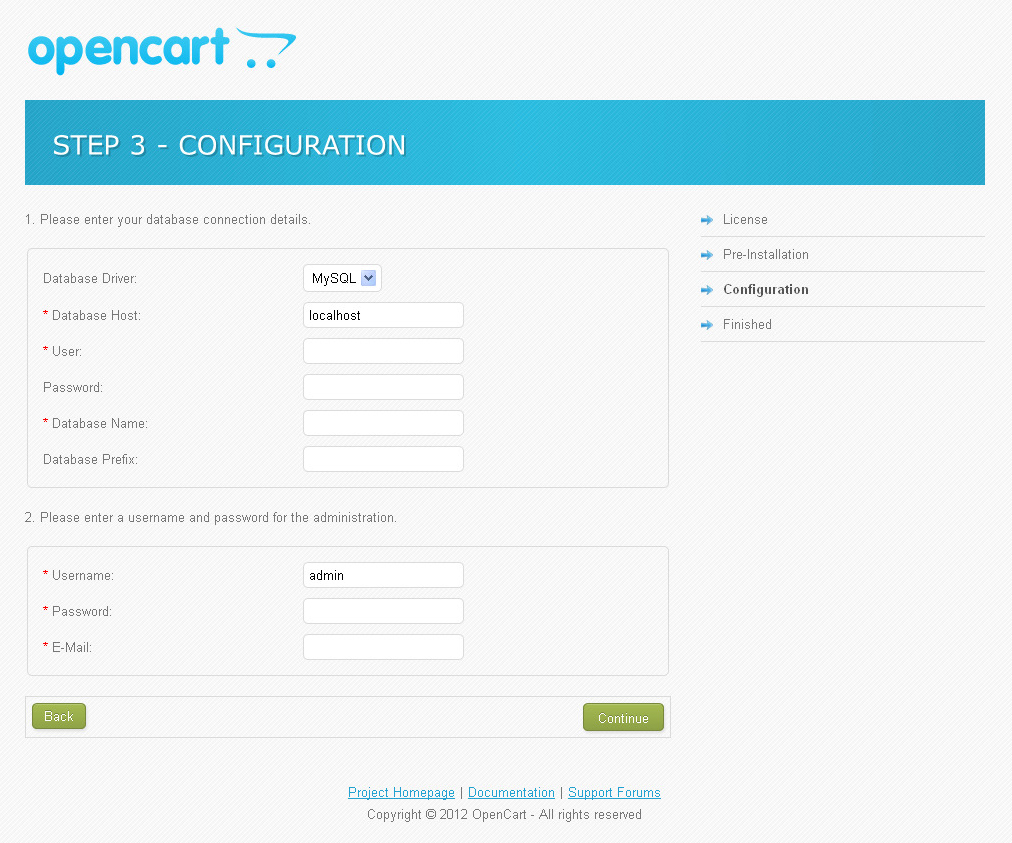
Img 4. OpenCart installation. Step 3. Configuration
At this stage, you need to input your database connection details. As you remember, in the preparation step you created a MySQL database, so now you need to input the
- database server name
- database name
- database user name
- database user password.
If you have difficulties getting these details, please contact your hosting provider.
You also need to create a store administrator account. Input the Administrator username, password and E-mail. These details will be used to access the OpenCart administration panel to manage your store.
Step 4 Finished!

Img 5. OpenCart installation. Step 4. Finished!
This is the last step of the OpenCart engine installation. You have two options: to visit the OpenCart front end, your e-commerce website, or the OpenCart back end, the administration panel.
You can check out an installation tutorial: OpenCart. How to install OpenCart engine and a template (using “fullpackage”) .
Please make sure to delete the "install" directory from your hosting server. You will not be able to access your store as long as the folder exists on your server.
The following files need to be set to 644 or 444 to prevent anyone else from editing them:
- config.php
- index.php
- admin/config.php
- admin/index.php
- system/startup.php.
Be sure the vqmod folder and the vqmod/vqcache folders are writable (either 755 or 777).
The installation is complete. To access the store front end, type your_domain_name in your web browser address bar. To access the OpenCart administration panel, type your_domain_name/admin.
Update Installation
Please make sure your version of the OpenCart engine matches the template requirements. All versions of OpenCart are available at the OpenCart official website.
- To install an OpenCart template you need to upload its files to your hosting server. In the OpenCart template package, find the "themeXXX(update).zip" archive and upload it to the root of your OpenCart installation.
Feel free to check the detailed video tutorial on how to upload files to the hosting server.
The template files will not harm your store in any way. - When that is done, please upload the unzip.php file from the template package to the server, into the same directory as the previous archive.
- As soon as you finish, please open your site in the browser and add the file name - unzip.php to the URL. It should look like this: yourwebsite.com/unzip.php.
- In the "Choose your zip file" drop-down list, please select themeXXX(update).zip and click "Unzip." It will start uncompressing the files on your server into the same directory. This will take a little while.
- Type yourwebsite.com/install/ in the address bar of your browser.
- After this, please follow the installation instructions that appear on the screen.
You can check out an installation tutorial: OpenCart. How to install a template over the existing store (using “update” package).
Welcome to vQmod
"vQmod™" (aka Virtual Quick Mod) is an override system designed to avoid having to change core files. Instead of making changes to the core files directly, the changes are created as xml search/replace script files. These script files are parsed during page load as each "source" core file is loaded with the "include" or "require" php functions. The source is then patched with the script file changes and saved to a temp file. That temp file is then substituted for the original during execution. The original source file is never altered. This results in a "virtual" change to the core during execution without any actual modification to the core files.
If you don’t have vQmod installed on your website (http://code.google.com/p/vqmod/), you have to install it.
How to install vqmod using Autoinstaller
- Download the latest version that has "opencart" in the title from http://code.google.com/p/vqmod/downloads/list
- Using FTP, upload the "vqmod" folder from the zip to the root of your opencart store.
- Be sure the vqmod folder and the vqmod/vqcache folders are writable (either 755 or 777).
- Also, make sure index.php and admin/index.php are writable.
- If you are not sure which one will work for you, try 755 first.
- If you get errors about permissions, then try 777.
- Go to http://www.yoursite.com/vqmod/install.
- You should get a success message. If not, check permissions above and try again.
- Load your store homepage and verify if it works.
- Using FTP, verify that there are new "vq" files in the "vqmod/vqcache" folder.
- If yes, then you are ready to start downloading or creating vQmod scripts.
DO NOT DELETE THE INSTALL FOLDER! YOU MUST RUN THE INSTALLER EVERY TIME YOU UPGRADE OPENCART! THERE IS NO DANGER OF RE-RUNNING THE INSTALLER!
Extensions configuration
Olark Live Chat
To set up a live chat like the one on the Live Demo, you will need to register on the official Web site Olark registration. After you provide all the data required, you will get a code to add to catalog\view\theme\themeXXX\template\common\footer.tpl before </body> tag.
Cookie Policy
Following the Cookie Law conditions you need to add appropriate modules to your website. The module will display a warning message about the cookies used on your website. You can use the following one:
Afterword where to get help, support and additional information
OpenCart is a multifunctional, light and user friendly e-commerce solution with an attractive look. It is a perfect solution for your online store. The default package contains all the necessary modules and extensions for successful sales. The open source code offers truly outstanding possibilities for your customers.
Help and Support
Additional Information: