VirtueMart 3 Documentation
Getting Started
Complete Installation
"I don't have a Joomla website and I want to install it from scratch."
Using this method you'll have the Joomla CMS engine, Joomla template, sample content, and all the required extensions installed.
Creating a Database
When you are done uploading files to the hosting server you can prepare a new database for your Joomla website. You can create the new database using the database management tool from your hosting control panel ( usually PhpMyAdmin ).
With the phpMyAdmin tool you will be able to create a new database in 3 simple steps: (check the slides below)
- Click the Database button from the top navigation menu to access the database listing.
- Input the database name into the "Create new database" field.
- Click the Create button on the right side.
Your database can be seen in the database listing now. Click on its name to get access to the database.
1. Click the Database button to access the database listing.
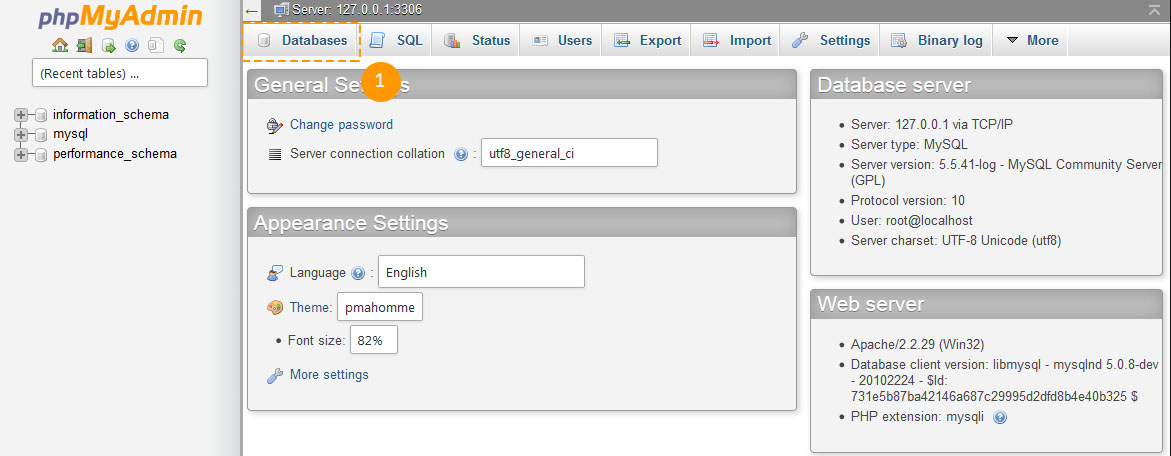
2. Input the database name.
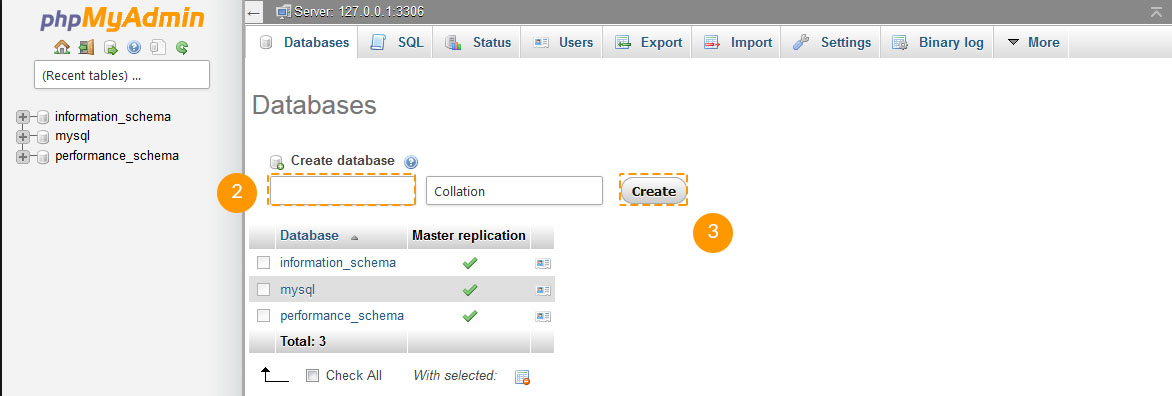
3. Click the Create button.
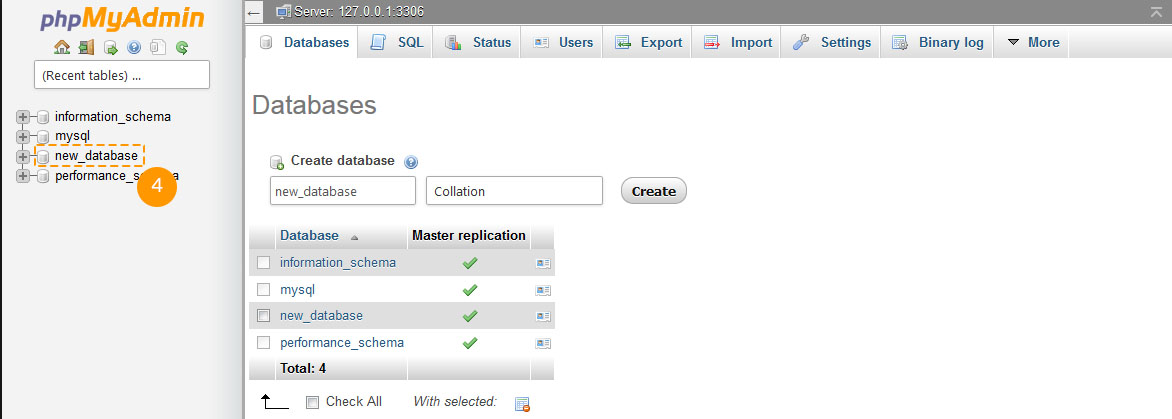
4. Your database can be seen in the database listing now. Click on its name to get access to the database.
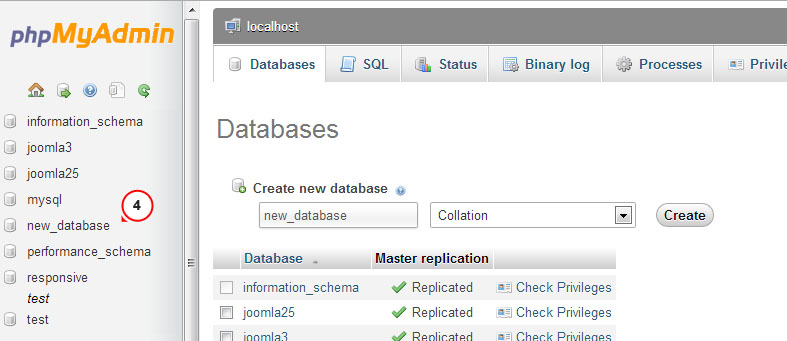
You can also check the detailed video tutorial on How to create a database
If you have any issues with creating a database, please contact your hosting provider for help and assistance.
Uploading and unzipping
To start working with Joomla you need to upload files to your hosting server. This can be done using your hosting file manager or some third party FTP manager.
- Open your template package directory and go to the 'joomla' directory.
- Select 'unzip.php' and 'fullpackage.zip' files and upload them to your server ( How to upload files to server ).
- Type the path to the 'unzip.php' file on your server ( http://your_domain_name/unzip.php ) in your browser.
-
You should see the following screen:
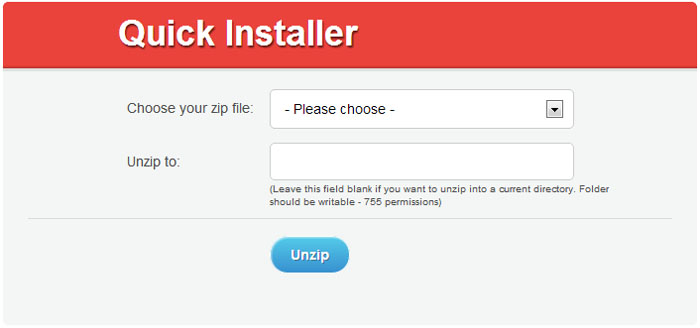
- In the 'Choose your zip file' select box please select the uploaded fullpackage.zip file.
- In the 'Unzip to' field specify the directory where you want to extract the files.
- Click the 'Unzip' button to proceed.
Please make sure to set the correct permissions for the directory where you are planning to extract the files. Permissions should be CHMOD 755 or 777 depending on your server configuration.
Joomla CMS installation
Please make sure you have completed all the preparation steps and have all the necessary stuff.
Open your browser and type the path to your Joomla directory in the address bar ( e.g. http://your_domain_name/joomla ). You should see the initial Joomla CMS installation screen:
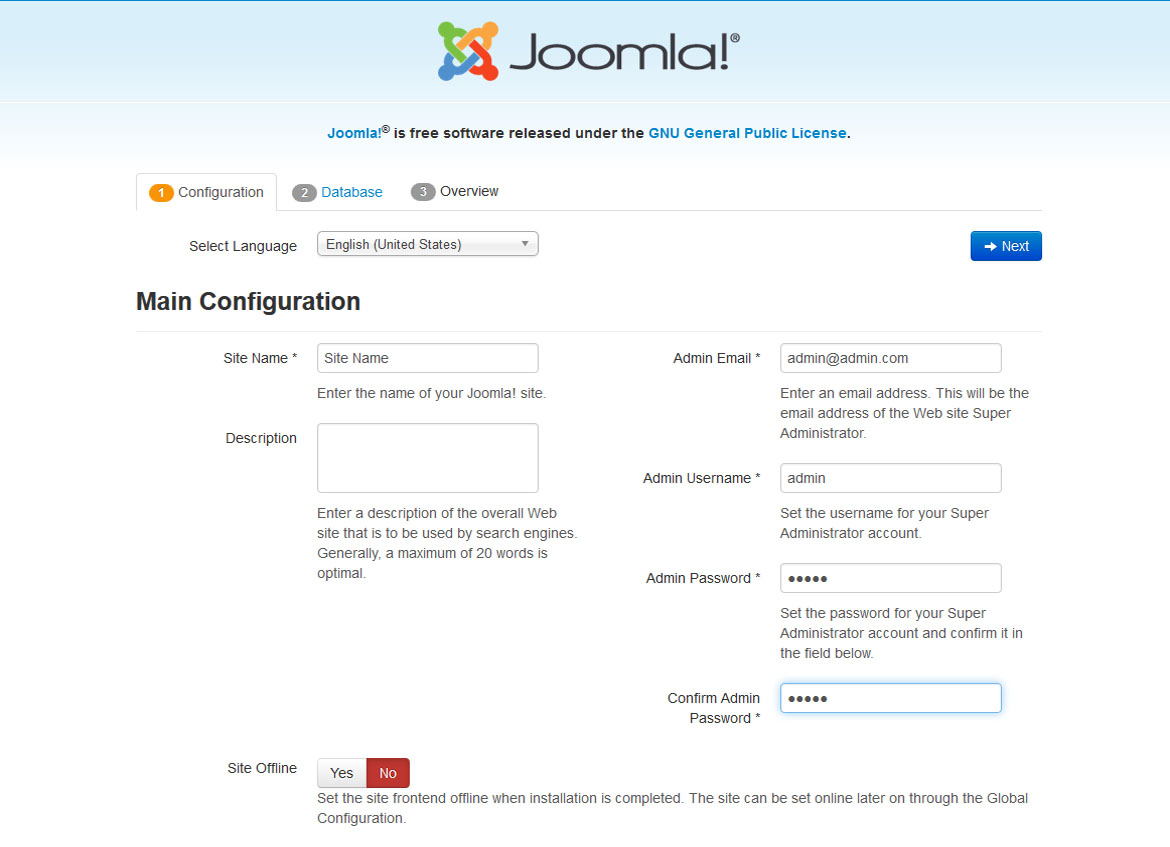
Configuration
Using the "Select Language" box choose the Joomla installation language.
Please note: The "Select Language" box allows you to choose the language of the Joomla installation process only. It won't affect your Web site language.
You need to fill in all form fields in the "Main Configuration" area. Required fields are marked with the asterisk * symbol.
Fill the "Admin Email", "Admin Username" and "Admin Password" fields in the right column to create a new Joomla website user with administrative rights.
"Admin Email", "Admin Username" and "Admin Password" are required to access your Joomla Web site backend. Keep them safe.
When you are done click the Next button in the top-right corner to proceed.
Database
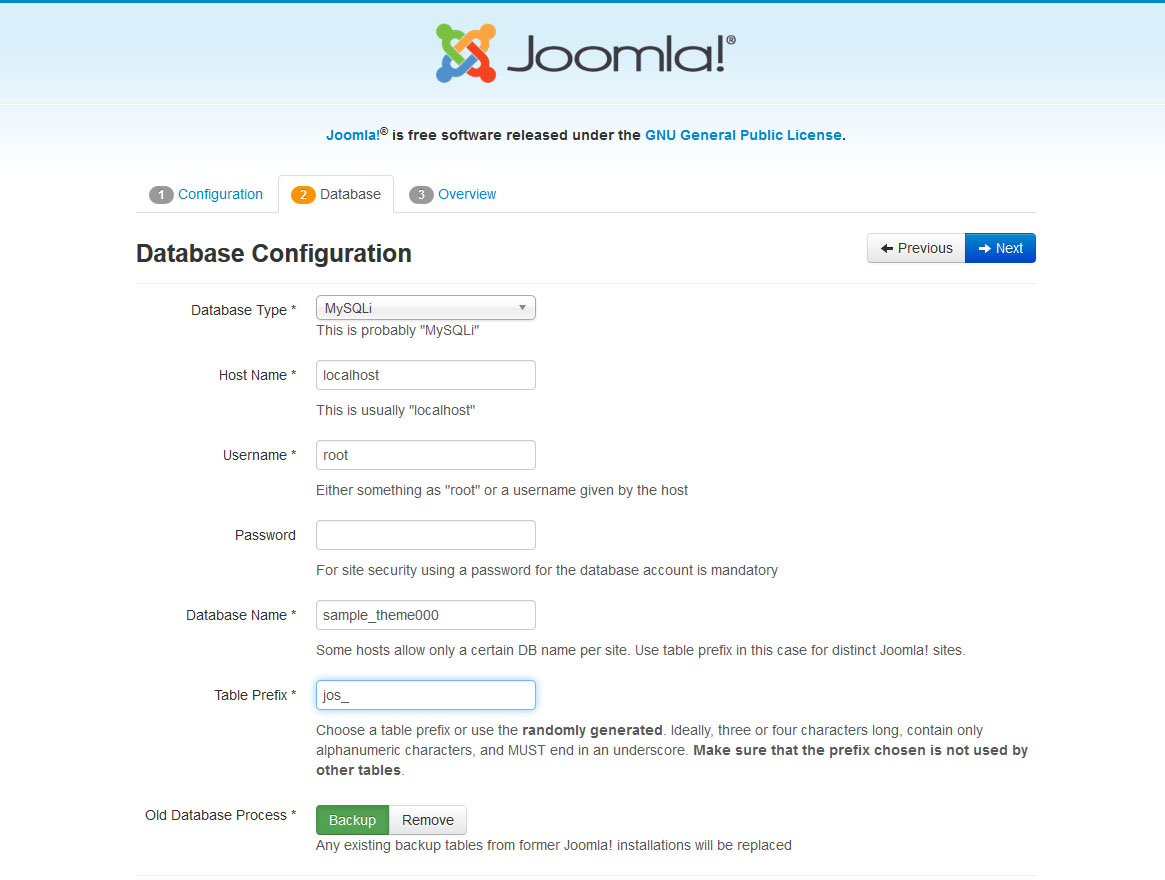
At the second step of the Joomla CMS installation you need to input your database details. If you are not sure, please contact your hosting provider to get the correct details.
As you are installing Joomla from scratch you only need to input "Host Name," "Username," "Database Name" and "Password". You can usually leave other options default. However, there can be some differences depending on your hosting provider.
When you are done click the Install button in the top-right corner to proceed.
Overview
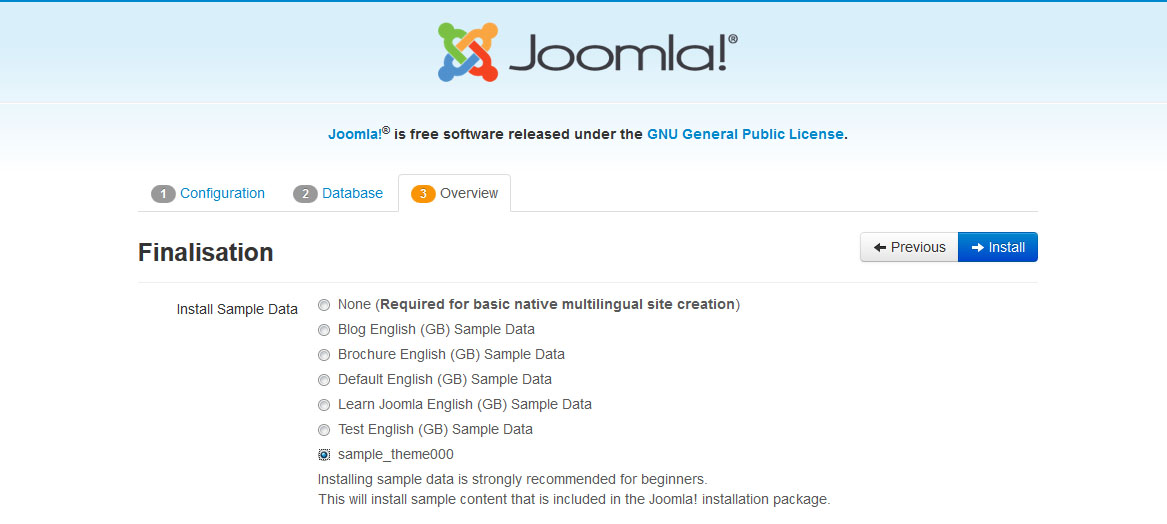
You are almost done installing Joomla CMS. At the Overview step you need to select whether you want to install Joomla Sample data.
Please note: Sample Data is required if you want to make your Joomla Web site appear as the template live demo with all the images, sample text and modules configured. To make your template appear as in the live demo page select the sample data package named "sample_theme###" where ### is the number of your theme.
Select the Sample data package you want to install or select "None" if you want to set up a pure Joomla website without any content.
Below you can check if the database configuration and administration panel access details are valid and send them to your email address if necessary.
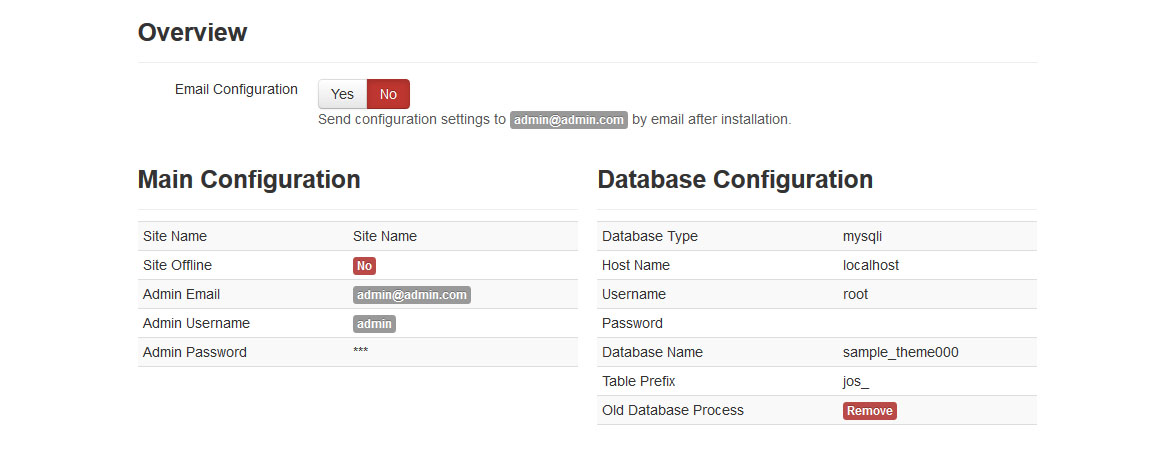
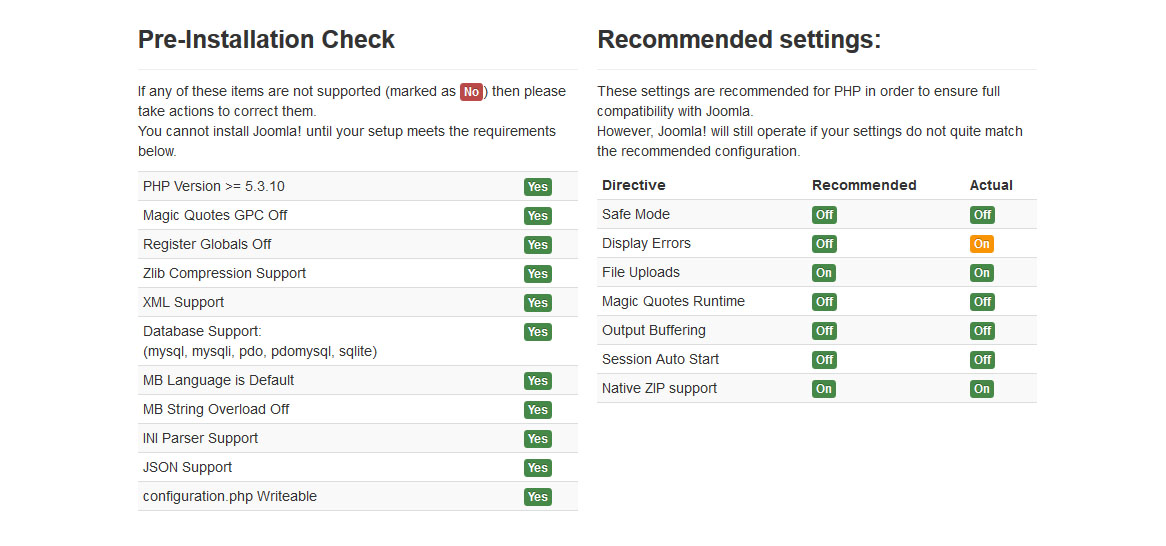
You can also check your installation settings and see if your hosting server matches the Joomla requirements. If you have any red notification boxes in the "Recommended settings" section, please contact your hosting provider for further assistance.
When you are done click the Install button in the top-right corner to proceed.
Installation Complete
Congratulations! You have successfully installed Joomla CMS.
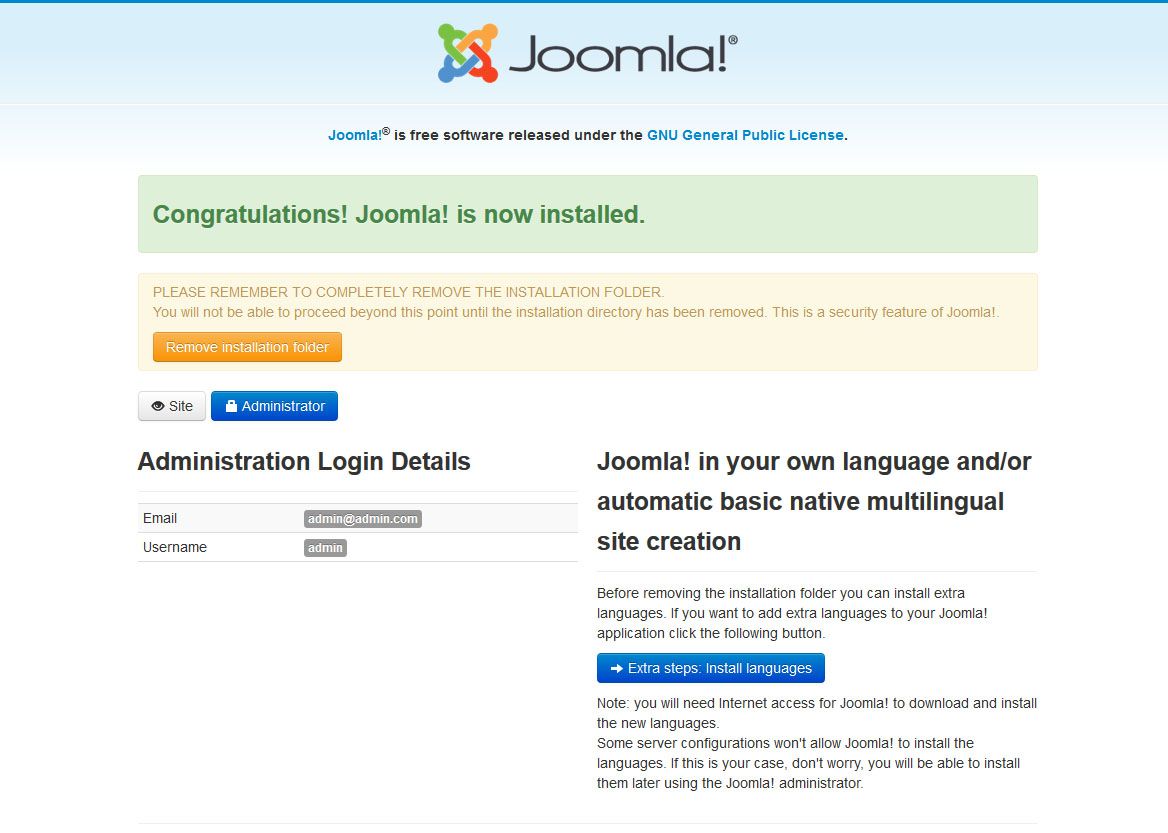
For security reasons please delete the "Installation" directory from your Joomla root directory.
Tip: You can view the video tutorial on How to install Joomla 3 engine.
Please note: if you finished the "Complete Installation" section, you can skip the next "Template Installation", "Sample Data Installation" and "Extensions Installation" sections as you have all these elements already installed.
Now you are ready to proceed to configuring your Joomla CMS based Web site. Click the "Site" button to view your Web site or "Administrator" to view Joomla backend.
Template Installation
"I already have a Joomla based Web site and just
want to change its appearance by installing the new template."
Using this method you'll have the Joomla template and all the required extensions installed.
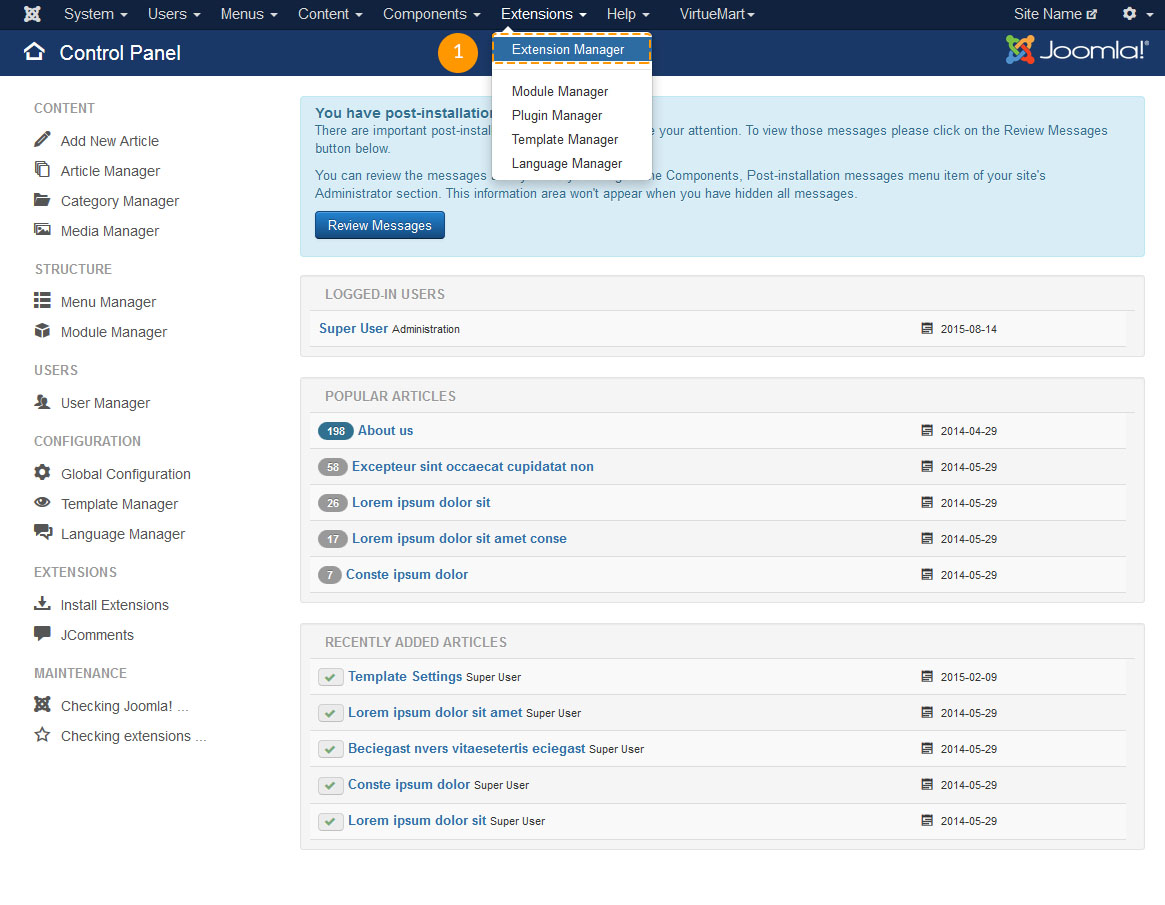
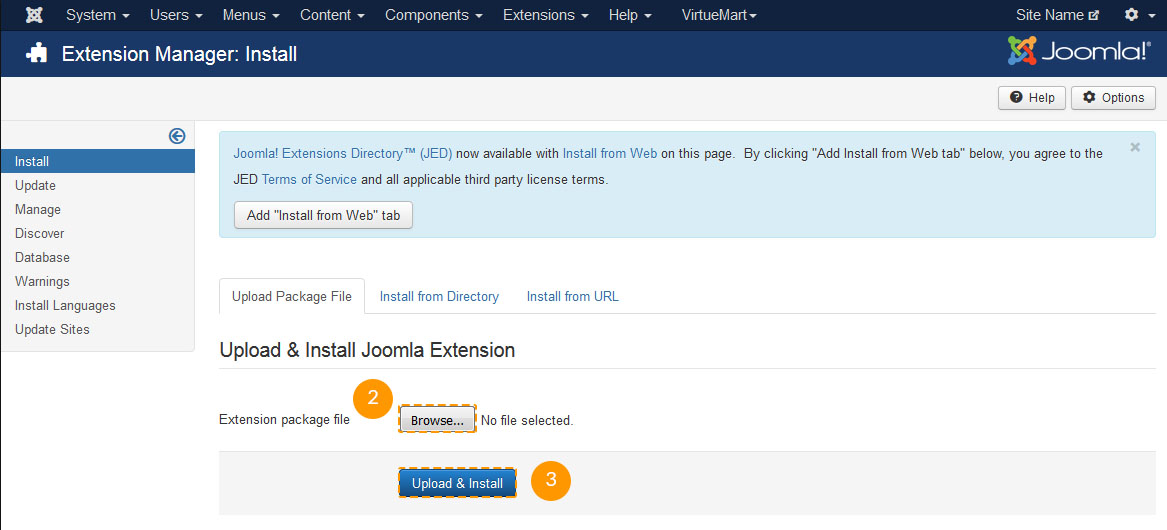
Open Joomla administration panel and go to the "Extensions > Extensions Manager" screen using the top menu.
Using the Package File "Choose File" button browse for the "theme###.zip" file in the "joomla" directory of your template package.
Click the Upload & Install button to install the Joomla template.
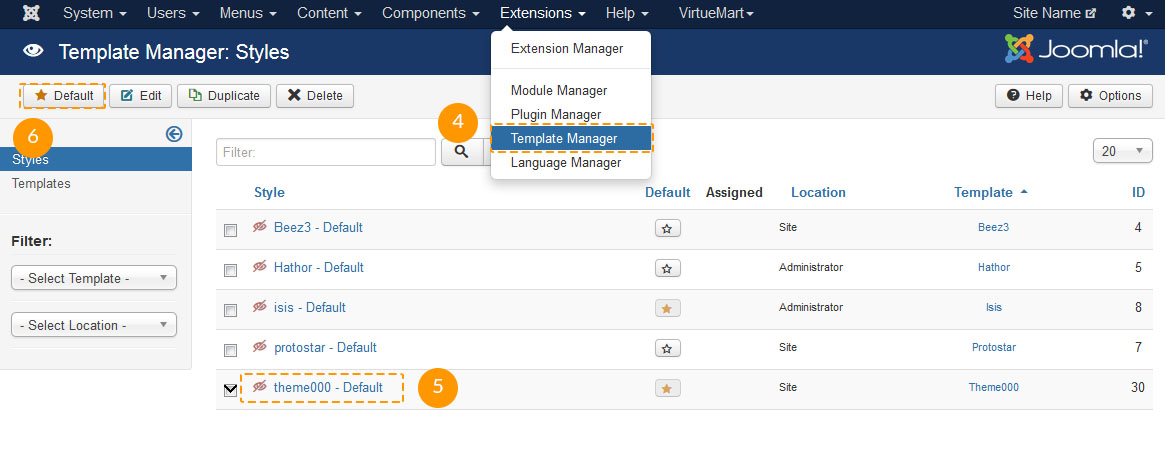
When uploading is complete you need to activate the installed template. From the top menu select "Extensions > Template Manager."
Select your newly installed template and click the "Make Default" button in the top left corner. Now you can view your website to see the changes.
Virtuemart3 installation (latest version)
It is an assumption that you have already installed Joomla! 3. Feel free to check our detailed video and text instructions on how to install Joomla content management system
Log into the Joomla admin panel with your username and password.
Go to Extensions > Extension Manager.
Click the Browse button and select the sources/com_virtuemart.3.X.X.zip file. Then click the Upload & Install button.
You should see the message "The installation was successful".
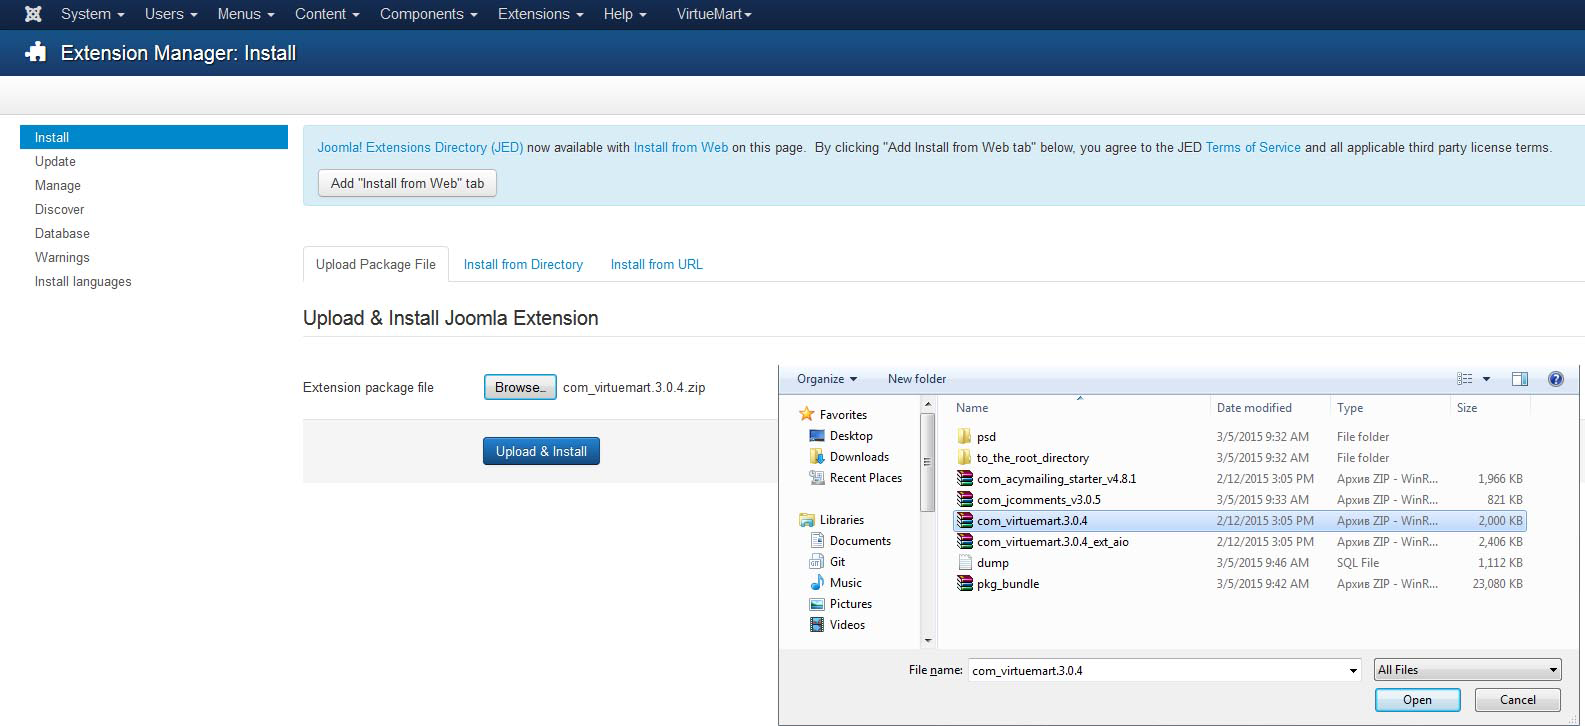
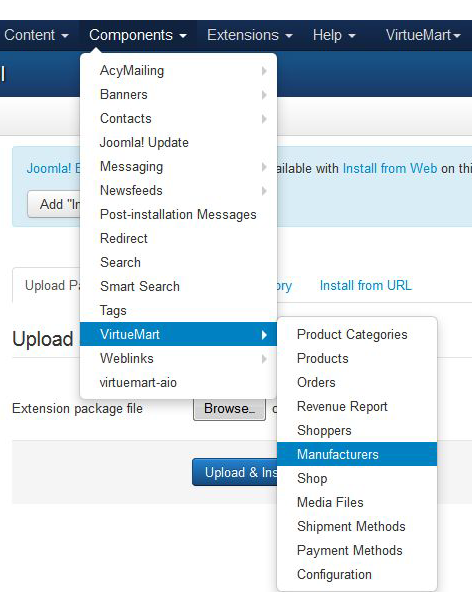
Install the other file called sources/com_virtuemart_ext_aio.3.X.X.zip. Click the Browse button and select the sources/com_virtuemart_ext_aio.3.X.X.zip file. Then click the Upload & Install button. Once the installation is complete, you should see the Virtuemart link under the Components menu.
Sample Data Installation
Sample data is used to make your Joomla website appear as the template live demo page. It contains sample articles, images, modules settings, website settings etc. If you are not planning to use sample images or any other sample content, please skip this step.
To install sample data you need to complete two simple steps.
Upload sample images.
To upload sample images please open your template package directory and go to the "sources" folder. There you should see the "to_the_root_directory" directory. It contains files that should be placed to your Joomla installation root. Please use the file manager to upload files to your server.
Import SQL file.
The final and most important step of the sample data installation is the import of the SQL file. The SQL file is a dump of the sample database, all Joomla website data is stored there. The SQL file can be imported using your database management tool (phpMyAdmin). The template SQL file - "dump.sql" is located in the "sources" directory of the template package.
Please DO NOT import the SQL file if you have a live website as it will totally replace your website database and all your data will be lost.
Beware: before importing the SQL file please make sure your database table prefix matches the table prefix in the SQL file.
You can check the table prefix directly in the database through the database
management tool. Check for the tables names. The prefix is a set of symbols before
the table name (
e.g. table "jos_assets" prefix is "jos_"
). You can also find
the database prefix in the "configuration.php" file in your Joomla root directory.
Search for line 19: public $dbprefix = 'jos_'; (
where the prefix is
"jos_"
).
If the table prefixes don't match, open the "dump.sql" file with your code editor and using the Search & Replace tool (CTRL+F or CTRL+H hotkeys) replace the "jos_" table prefix ( used in the SQL file ) with the one that matches your database. You can check the detailed video tutorial on how to change database prefix in SQL file.
Now you can import that SQL file to your database.
To import sample data to your database please perform these simple steps (check the
slides below):
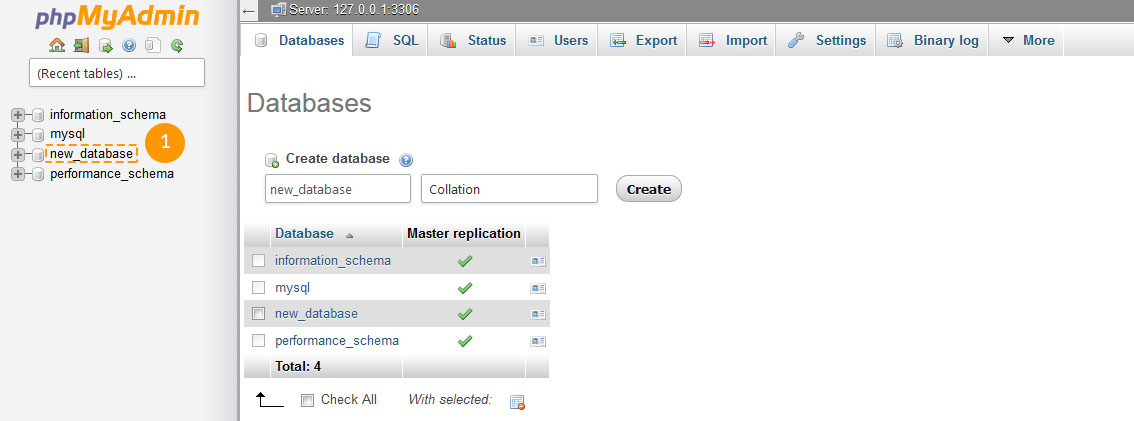
Select your database from the database list in the left column in the phpMyAdmin tool.
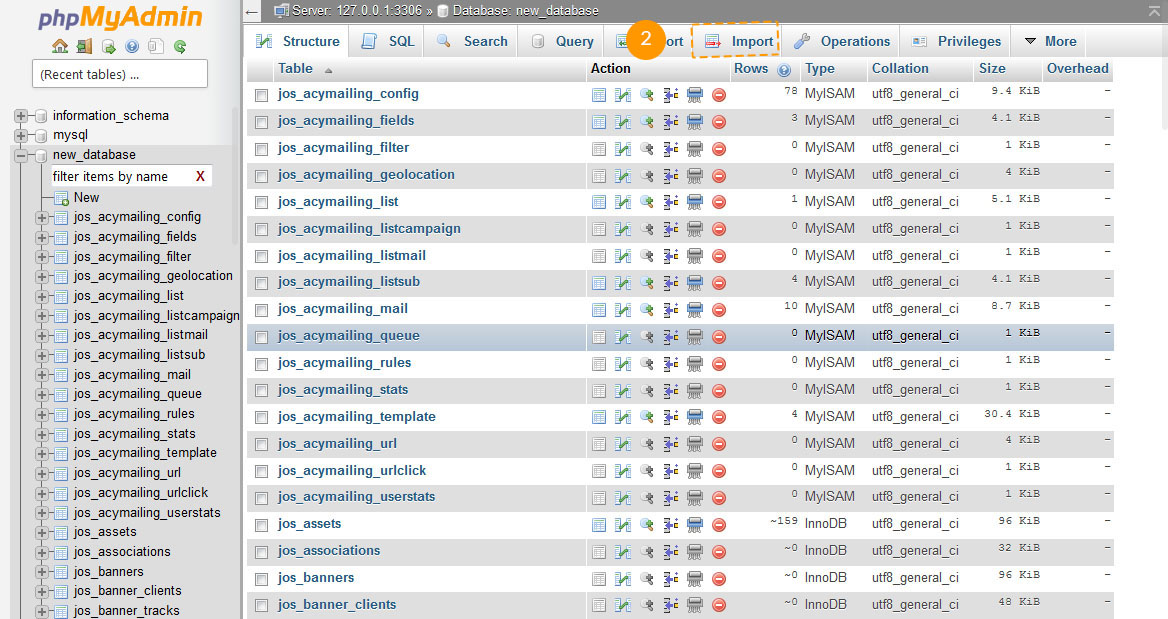
Click the "Import" button from the top navigation menu.
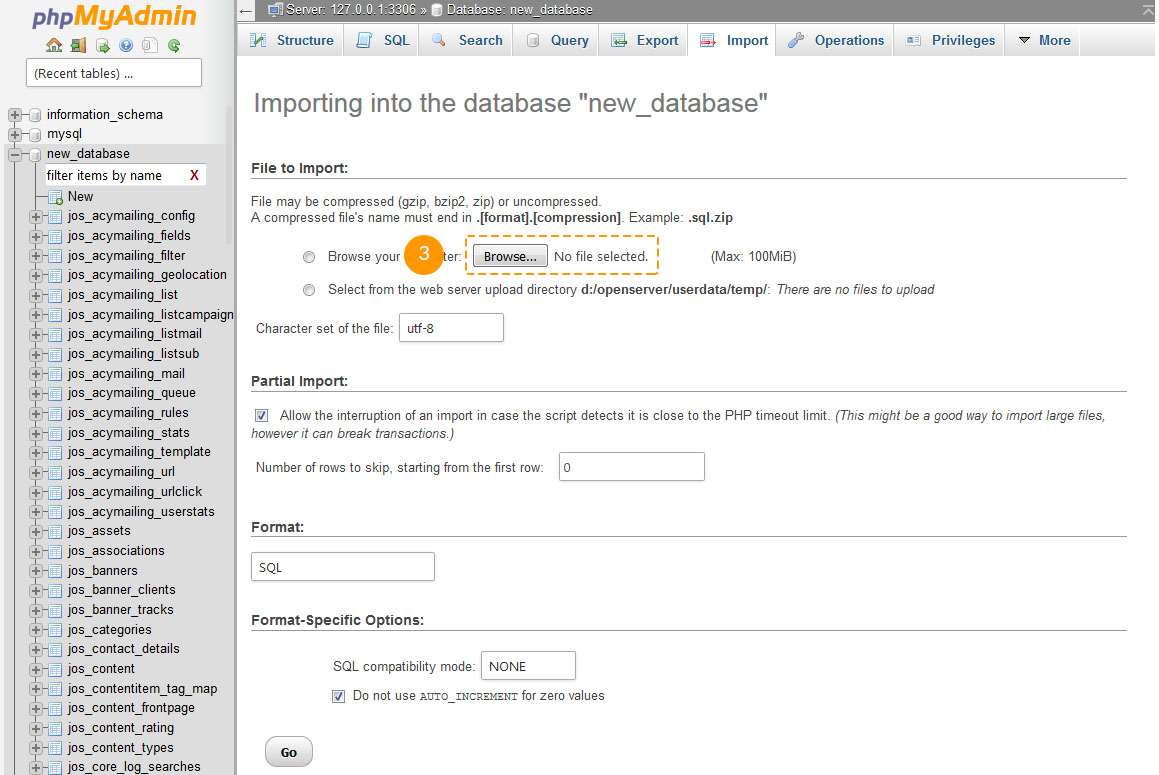
Click "Choose file" and browse for the dump.sql file in the template package "sources" directory.
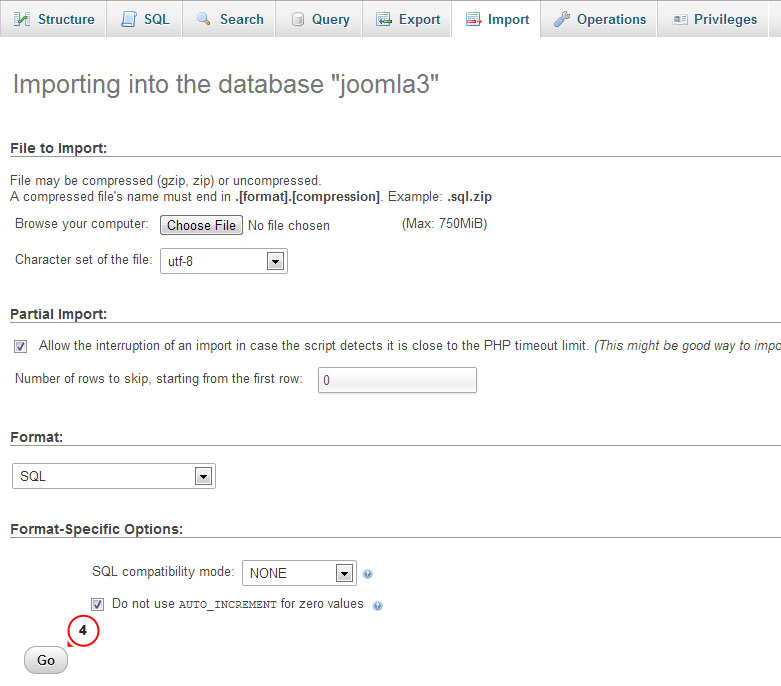
Click the "Go" button to start importing the sample data.
You can also check the detailed tutorial on how to import SQL file using phpMyAdmin tool.
Modules installation
Joomla themes are provided with additional extensions: modules, plugins and components that are used to implement various functionality and features. All the additional extensions can be installed in a couple of clicks using the bundle package provided.
The bundle archive is located in the 'sources' directory of your template package and called 'pkg_bundle.zip'. It can be easily installed, as any other extension or theme, through Joomla admin panel > Extensions manager.
- Open the Joomla administration panel. From the top menu select 'Extensions'. From the dropdown select 'Extensions Manager'.
- Make sure the 'Install' section is selected in the left column.
- Click the 'Browse/Choose file' button and select the 'sources/pkg_bundle.zip' archive.
- Click the 'Upload and install' button to install all the modules.
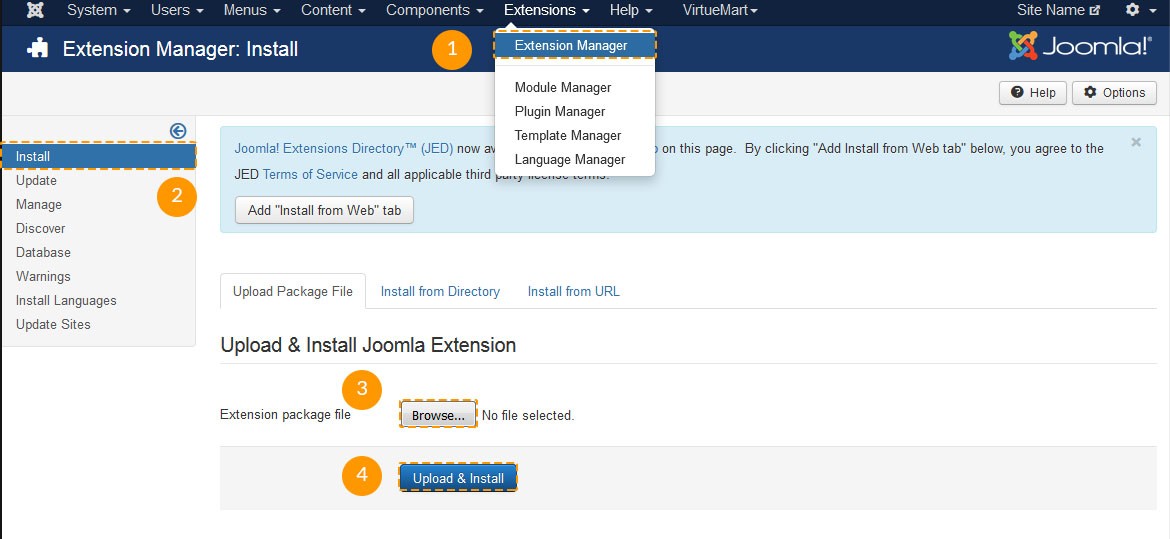
In case your theme contains some extensions which have not been included into 'pkg_bundle.zip', you need to install each one separately. This can be done exactly as the 'sources/pkg_bundle.zip' installation through the 'Extensions Manager' interface.
The file names of extensions archives usually start with 'mod_', 'com_' or 'plg_,' so you will recognize them easily.
