Introduction What can be found in this package and what it can be used for
Thank you for purchasing the VirtueMart template. This documentation consists of several parts and shows you the entire process of how to setup and administer a VirtueMart/Joomla Web site from scratch. We did our best to make this manual as clear and easy to follow as possible.
What is Joomla CMS?
Joomla CMS is an open source solution for building rich content Web sites. It enables you to build Web sites and powerful on-line applications and requires almost no technical skills or knowledge to manage. Many aspects, including its ease-of-use and extensibility, have made Joomla the most popular Web site software available. Learn More
What is a Joomla template?
Joomla template is a skin for your Joomla CMS platform. In other words, you can easily change your Joomla Web site appearance by installing a new template in a few easy steps. In all it's simplicity, the Joomla template is provided with all necessary source files, and you are free to edit or extend it the way you need.
What is VirtueMart2.0?
VirtueMart is an Open Source E-Commerce solution (a component or a plug-in) for the Joomla! Content Management System.
It can be run as a Shopping Cart or in a Catalog mode. You need to install Joomla! first (as the "Framework") and then install & configure VirtueMart.Learn More
File structure
The template package you have downloaded consists of several folders. Let's see what each folder contains :
- Documentation - contains documentation files
- index_en.html - main documentation file. You are right here :)
- joomla - contains Joomla theme files
- theme###.zip - main theme archive. Contains all theme files. Should be installed through Joomla extension manager
- fullpackage.zip - contains complete Joomla installation package with the engine files, the theme and the sample (live demo) content
- unzip.php - file used to extract files from the fullpackage.zip when uploaded to the hosting server
- screenshots - contains template screenshots. Not for production
- sources - contains the template source files
- psd - template Adobe Photoshop source files (.psd)
- to_the_root_folder - contains the files and directories to be uploaded to the root directory of your Joomla installation (for manual installation only)
- dump.sql - database backup file. Contains the sample content of your theme
- pkg_bundle.zip - contains additional extensions provided with the theme
- additional files needed for manual installation of your theme - mod_virtuemart_cart_tm.zip, mod_virtuemart_product.zip,plg_system_vm2_cart_j25.zip,The Company Name.html
Prepare What do you need to make this work?
Before you proceed to setting up your VirtueMart/Joomla Web site, make sure to complete the following preparation steps:
Editing software
To feel comfortable working with Virtuemart2 for Joomla template we recommend you to download all applications required. You can see the list of required software on the template preview page.
The requirements may vary for different templates so we'll tell you here what is needed in general:
- First of all, you need the right applications to extract the password protected sources_#########.zip archive. You should use WinZip 9+ (Windows) and Stuffit Expander 10+ (Mac).
- You may also need Adobe Photoshop application. It is used to edit the .PSD source files and it is necessary if you want to edit the template design graphics and images.
- To edit the template source code files, you'll need a code editor like Adobe Dreamweaver, Notepad++, Sublime Text etc.
- To upload files to the hosting server, you may need an FTP Manager like Total Commander, FileZilla, CuteFTP etc.
Hosting
As Joomla CMS is a PHP/MySQL based application, you need to prepare a hosting environment to run Joomla on.
If you have a live hosting, please make sure it matches the Joomla software requirements and is ready to be used for Joomla websites.
Otherwise you can run Joomla locally on your computer using the local server. To create a local hosting server, please use the localhost applications like WAMP, AppServ, MAMP etc. Any of those can be easily installed as any other program and used for running Joomla.
Please, check the tutorials below on how to configure the local development environment:
Getting Started What to click to make this work?
Complete Installation
I don't have a Joomla website and I want to install it from scratch.
Using this method, you'll have the Joomla CMS engine, Joomla template, Virtuemart2, sample content, and all required extensions installed.
Template Installation
I already have a Joomla based Web site and just want to change its appearance by installing the new template.
Using this method you'll have the Joomla template and all required extensions installed.
Complete Installation
The Complete installation method can be used if you want to setup a Joomla website from scratch. We assume that you have completed all preparation steps and have all necessary stuff.
Creating Database
When you are done uploading the files to the hosting server, you can prepare a new database for your Joomla website. You can create the new database using the database management tool of your hosting control panel (usually PhpMyAdmin).
With the phpMyAdmin tool you will be able to create a new database in 3 simple steps: (check the slides below)
- Click the Database button from the top navigation menu to access the database listing
- Input a database name into the "Create new database" field
- Click the Create button on the right side
Your database can be seen in the database listing. Click on it's name to get access to the database
-

1. Click Database button to access to the database listing
-
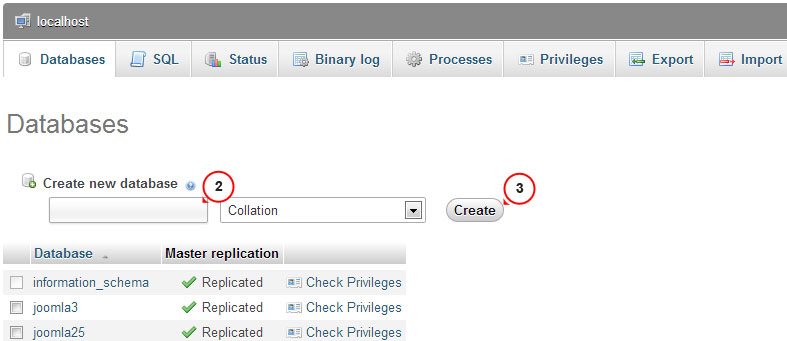
2. Input database name
3. Click Create button -
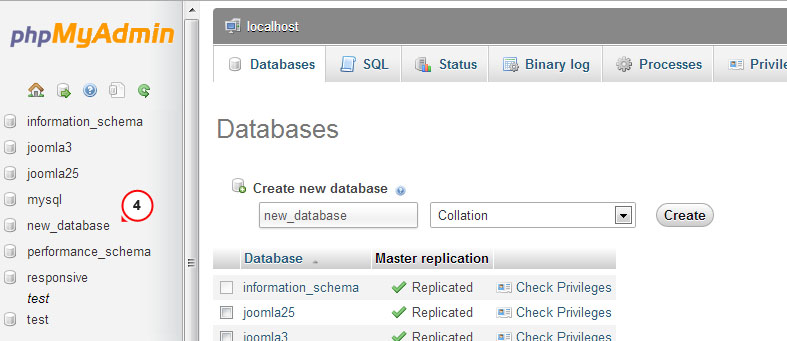
4. Your database can be seen in the database listing. Click on it's name to get access to the database.
You can also check a detailed video tutorial on How to create a database
If you have any issues with creating a database please contact your hosting provider for help and assistance.
Uploading and unzipping
To start working with Joomla you need to upload files to your hosting server. This can be done using your hosting file manager or some third party FTP manager.
- Open your template package directory and go to the 'joomla' directory
- Select the unzip.php' and 'fullpackage.zip' files and upload them to your server( How to upload files to server)
- Type the path to the 'unzip.php' file on your server (http://your_domain_name/unzip.php) in your browser.
- You should see the following screen:
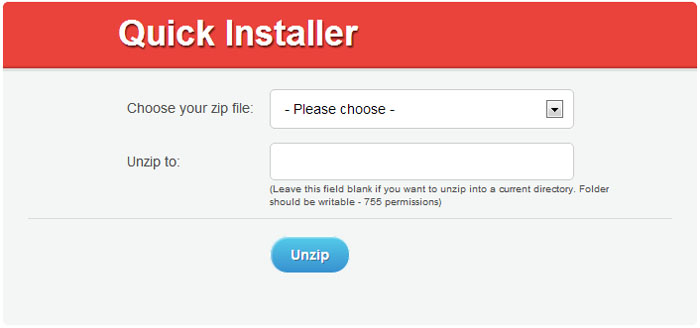
Img 1. Unzip.php initial screen.
- In the 'Choose your zip file' select box, select the uploaded fullpackage.zip file.
- In the 'Unzip to' filed specify the directory where you want to extract the files.
- Click 'Unzip' button to proceed.
Please, make sure to set the correct permissions to the directory you are planning to extract the files to. Permissions should be CHMOD 755 or 777 depending on your server configuration.
Joomla CMS installation
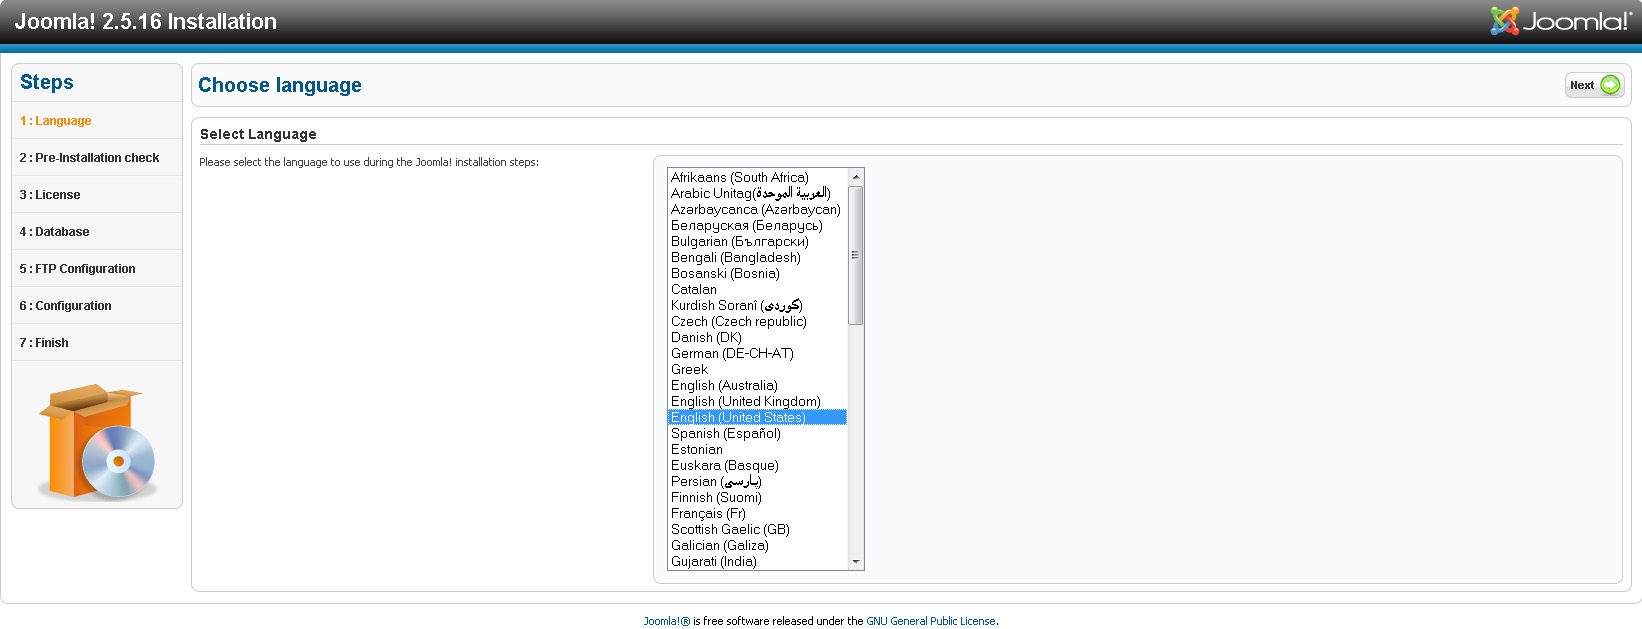
Open your browser and type path to your Joomla directory in the address bar (e.g. http://your_domain_name/joomla). You should see the initial Joomla CMS installation screen:
Step 1 Choosing Language
Choose the Joomla! installation language
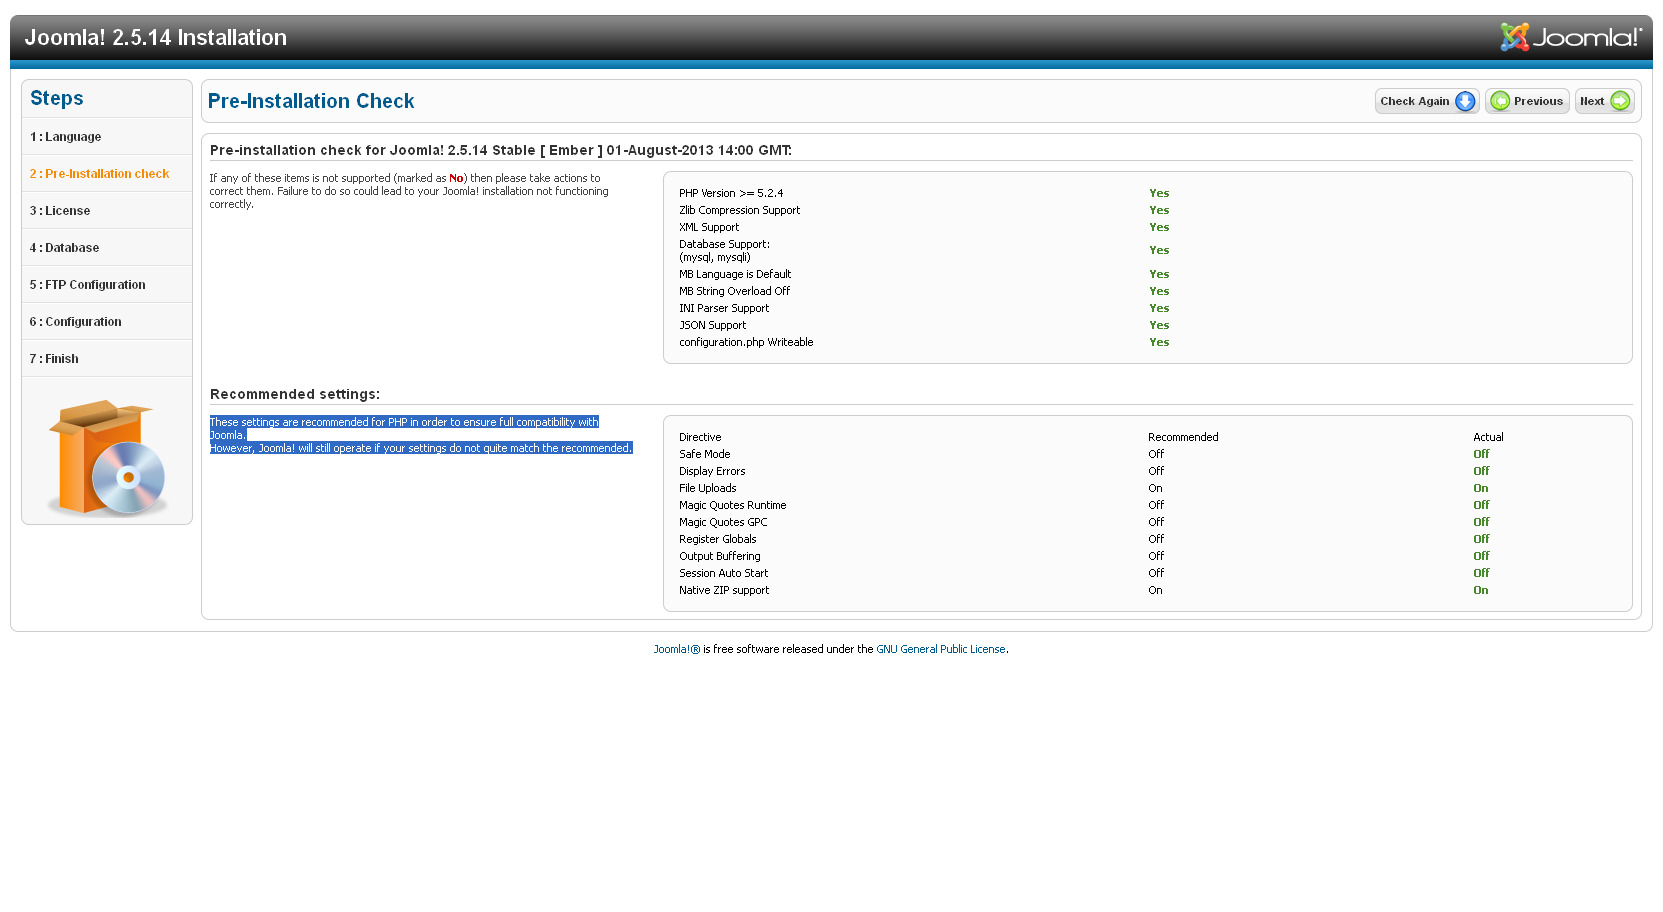
Step 2 Pre-Installation Check
Pre-installation check for Joomla! 2.5.14 Stable
Recommended settings:These settings are recommended for PHP in order to ensure its full compatibility with Joomla. However, Joomla! will still operate if your settings do not quite match the ones recommended.
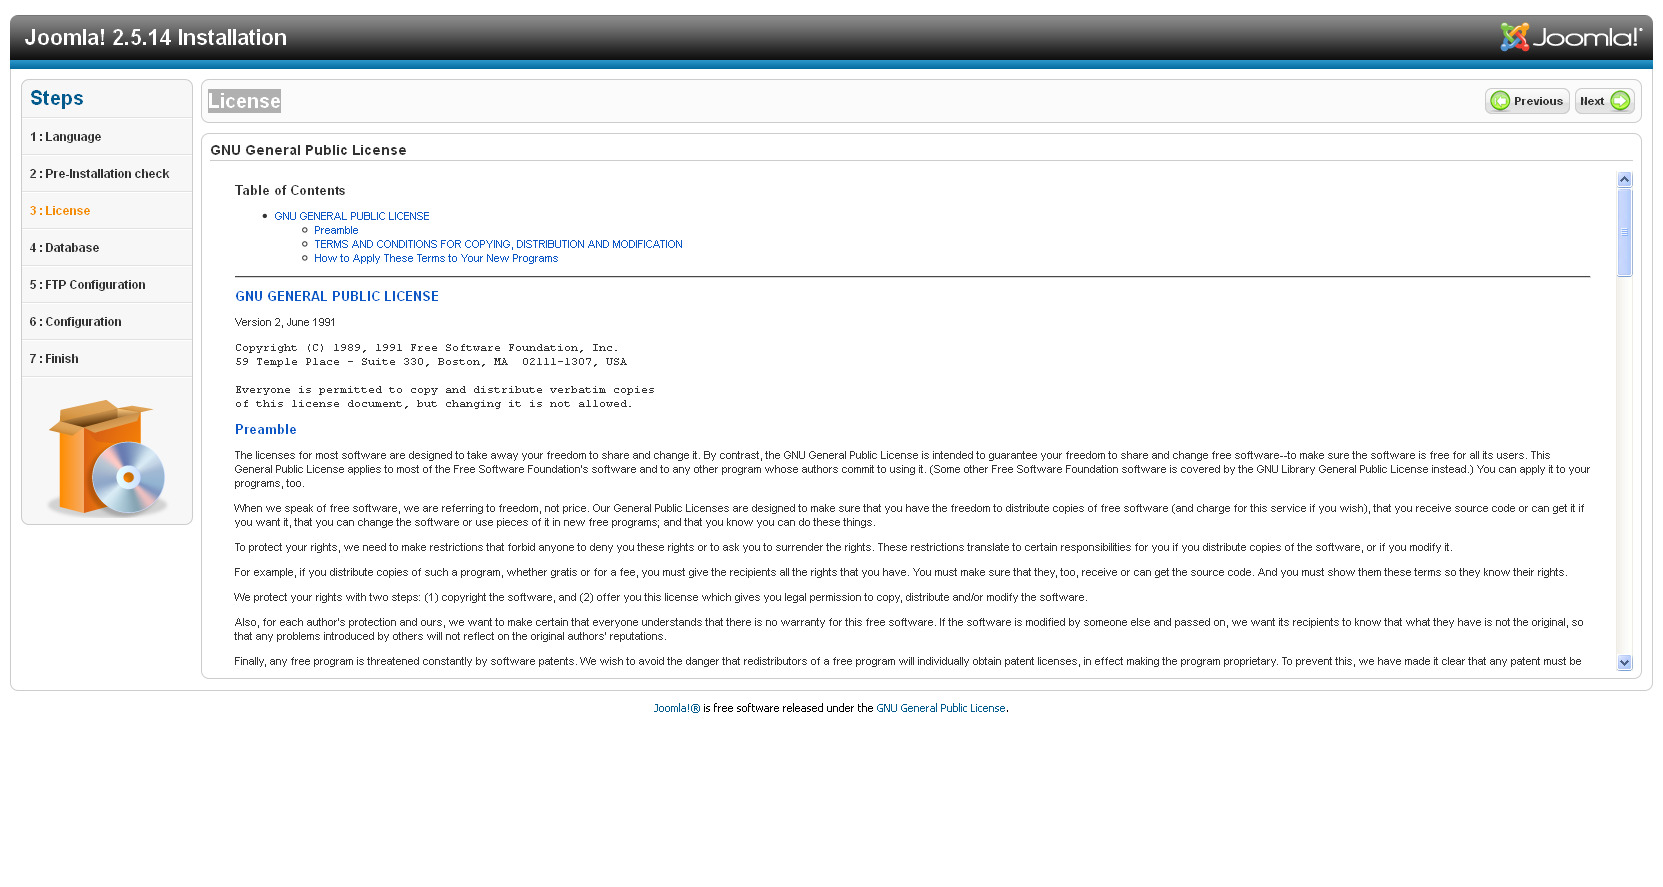
Step 3 License
Read through the license and click to agree to its terms to proceed
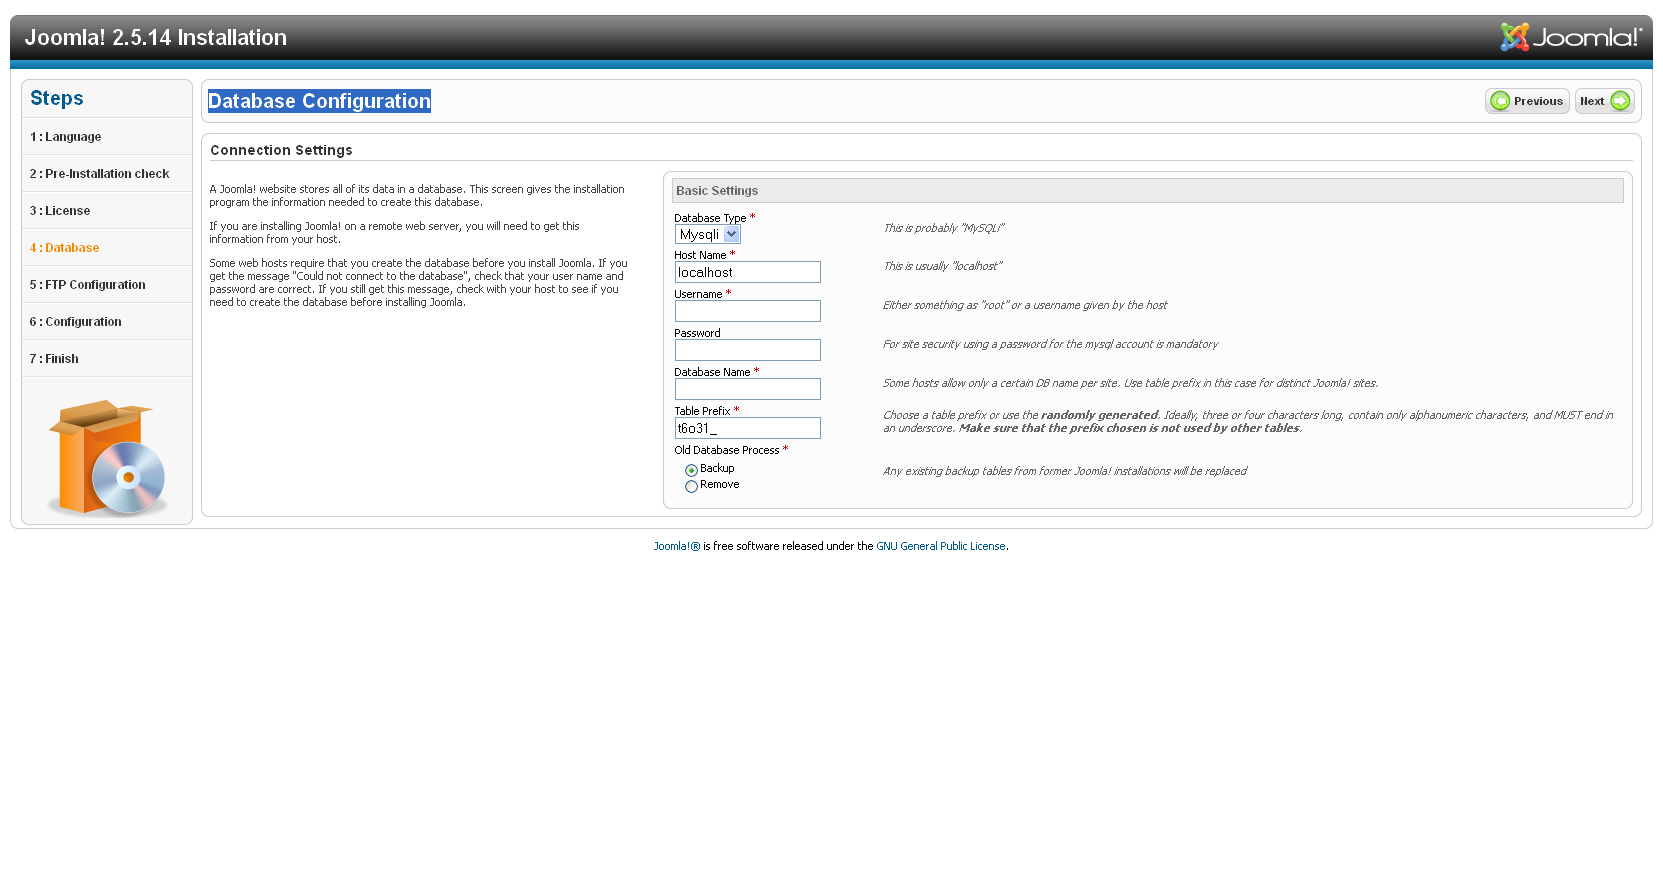
Step 4 Database Configuration
Joomla! requires a MySQL database to store the website data, so in order to proceed, you will need to create it by using your hosting control panel. You can learn more about creating databases by checking our detailed video tutorial. You can always contact your hosting provider directly if there are any issues.
Once the database is created, you should have all the necessary information to fill in the fields on this page like Host Name, Database Username and Password.
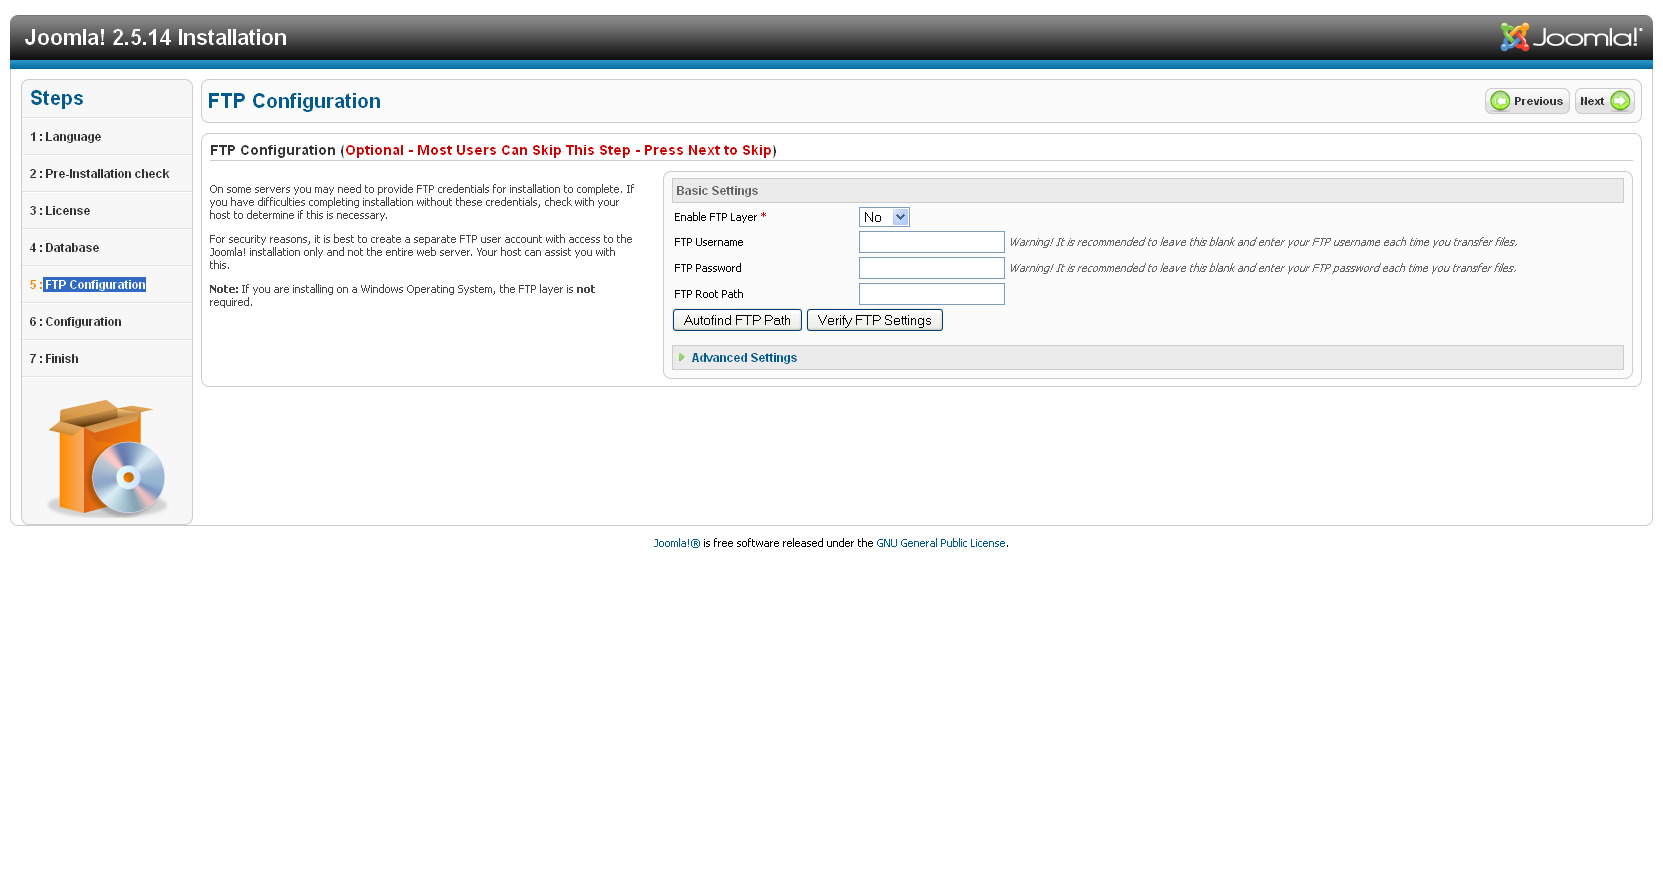
Step 5 FTP Configuration
You may just skip this step by pressing "Next":
Step 6 Main Configuration
It's important to fill in all the fields on this page and remember the username and password, since you will need them for logging into your Joomla! admin panel. Do not forget to import the Joomla! sample data.
"Admin Email", "Admin Username" and "Admin Password" are required to access your Joomla Web site backend. Keep them safe.
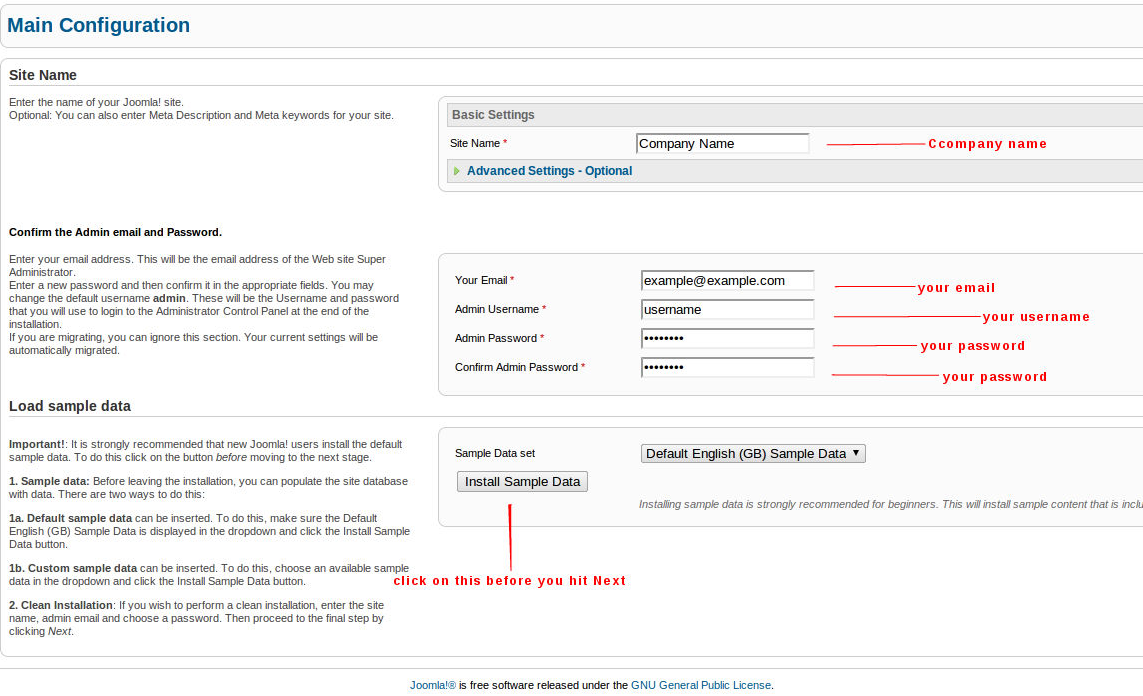
When you are done, click the button in the top-right corner to proceed.
Step 7 Finish
Congratulations! Joomla! is now installed.
In order to log into the administration panel, you first need to remove the "installation" folder on your FTP server. Just click "Remove Installation Folder" on this page to remove it. In the top right corner you can find buttons to access the frontend and the backend of your site.
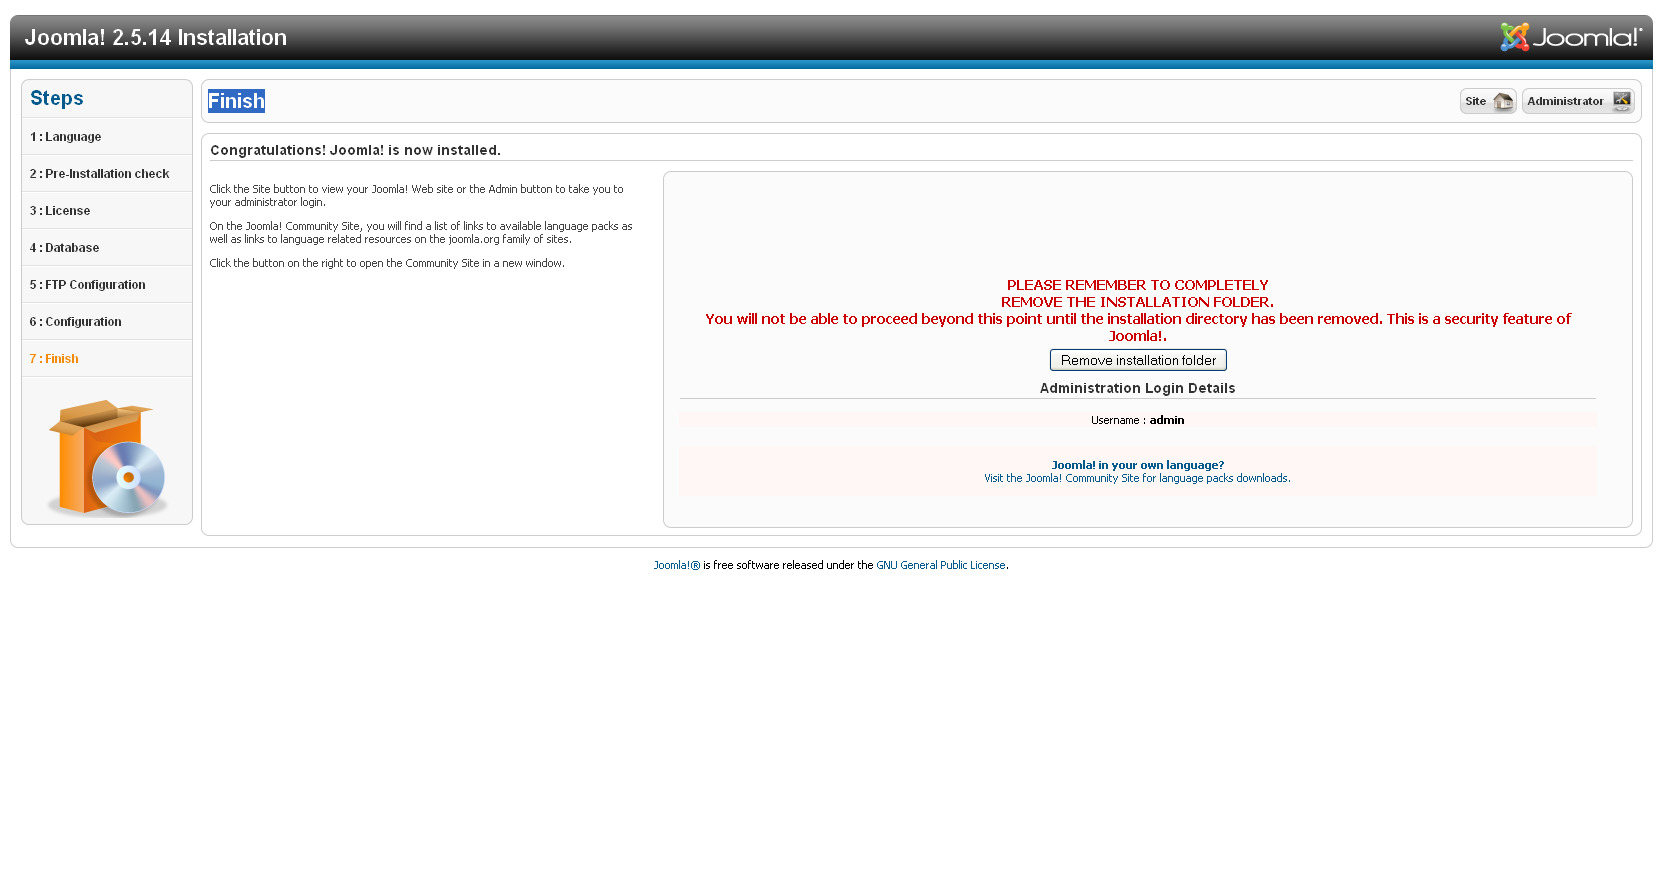
Now you are ready to proceed to configuring your Joomla CMS based website. Click the "Site" button to view your website or the "Administrator" button to view the Joomla backend.
The last but not least important step is to update the database:
- Go to Components->VirtueMart->Configuration->Configuration->, scroll down to the "Advanced Settings" section - mark the "Enable database Update tools" option and click "Save & Close" button in the top right corner.
- Now go to Tools->Tools & Migration menu - click the "Install tables or if necessary update them" button.
This was the "quick start" installation. After installing the fullpackage and activating the sample data in its configuration, you will get a completely installed VirtueMart2 template you purchased.
Even if you wish to perform the manual installation of Joomla!, the steps needed for this are identical to the ones required for the fullpackage installation. After that the next step will be installing and activating the Joomla! template you purchased.
Template Installation
This installation method can be used if you already have a Joomla website and just want to change the website appearance by installing the Joomla template.
Step 1 Open your Joomla administration panel and go to "Extensions > Extensions Manager" in the top menu.

Joomla template installation. Step 1. Extensions Manager
Step 2 Using the "Browse" button navigate to the "theme###.zip" file in the "joomla" directory of your template package
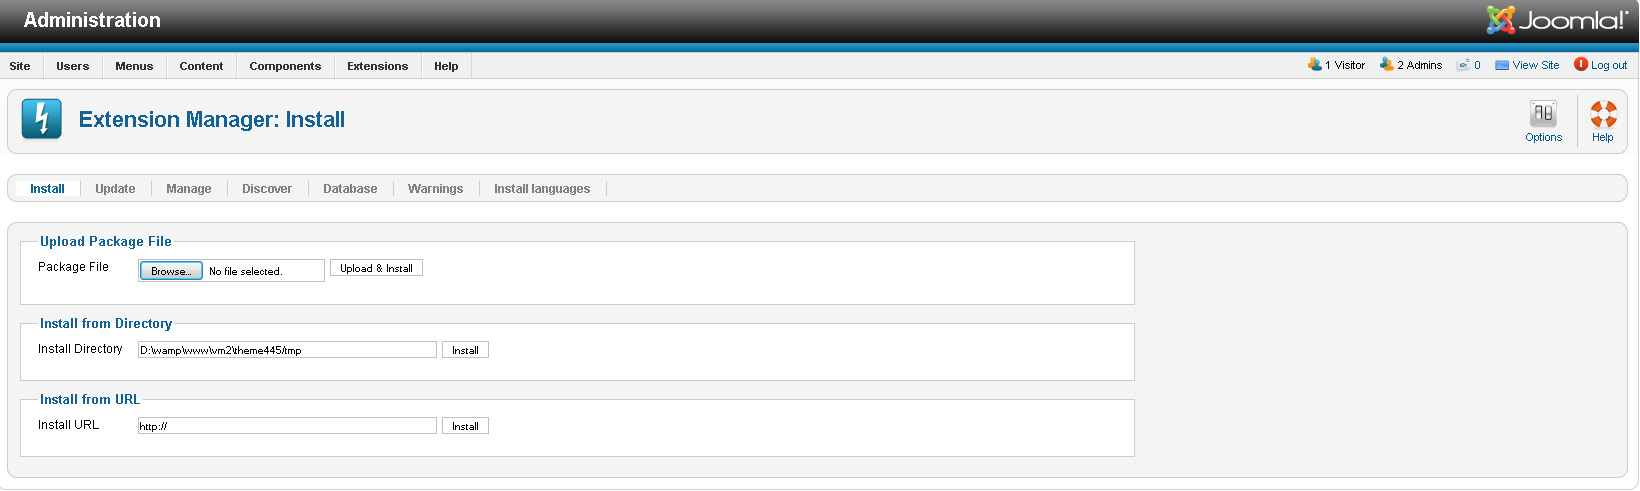
Joomla template installation. Step 2. Uploading the theme archive
Click the button to install the Joomla template.
Step 3 When uploading is complete, you will need to activate the template. In the top menu select "Extensions > Template Manager"
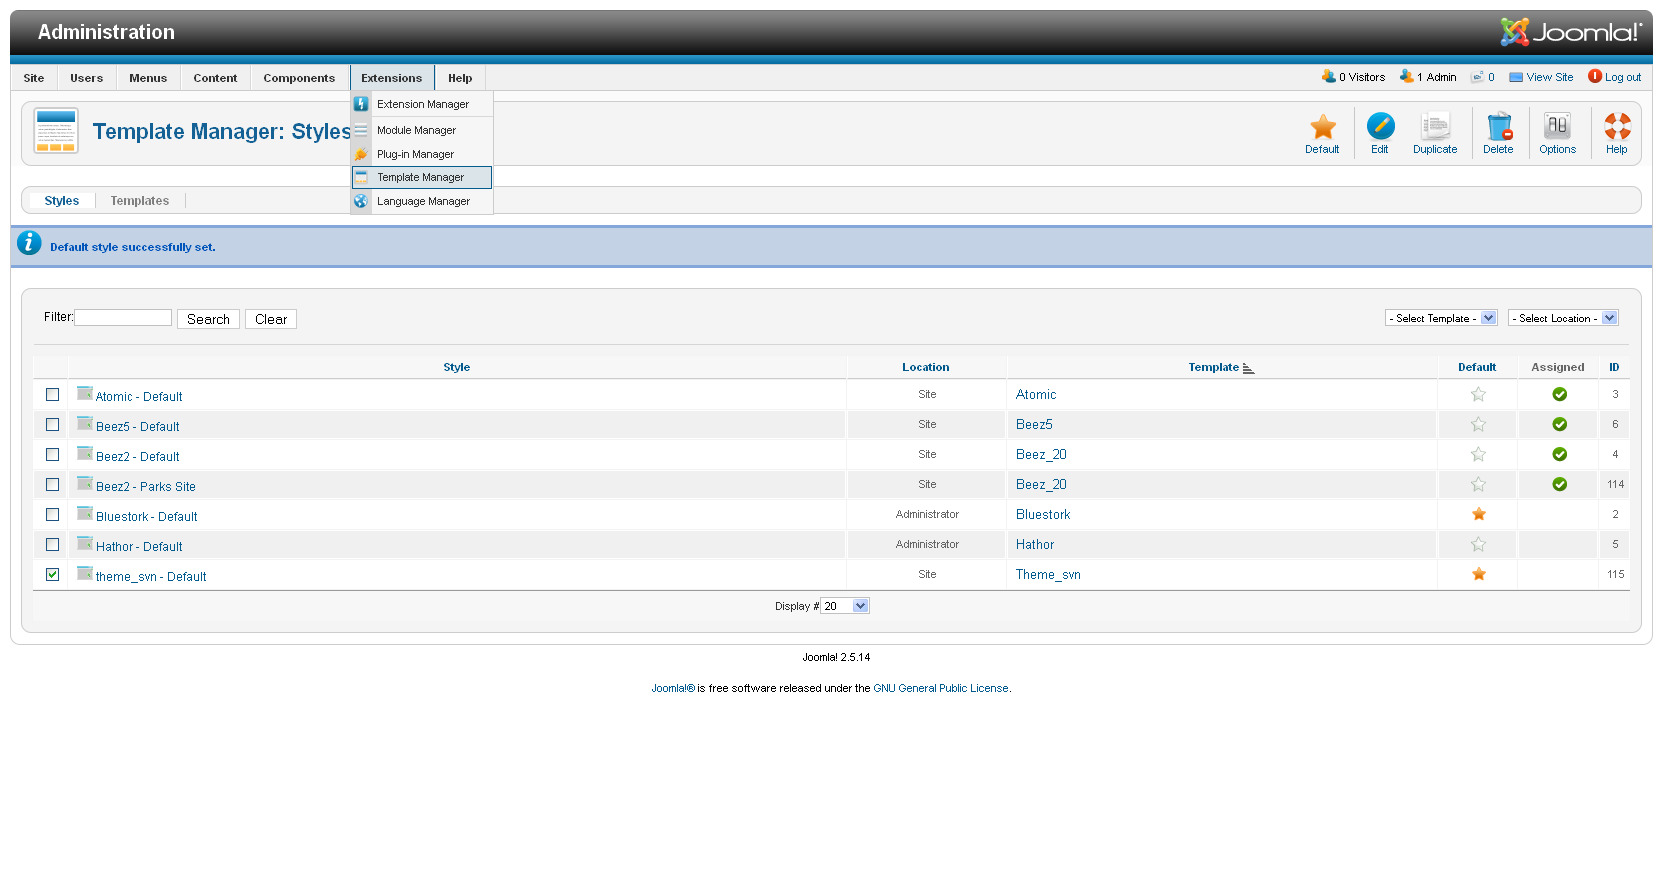
Joomla template installation. Step 3. Template activation
Select your newly installed template and click the "Make Default" button in the top left corner. Now you can view your website to see the changes.
Virtuemart2 installation (last version)
It is an assumption that you have already installed Joomla 2.5.14 Feel free to check our detailed video and text instructions on how to install Joomla content management system
1. First you need to download the latest package of Virtuemart 2.x.x here. You will need to download the file called com_virtuemart.2.0.xx_extract_first.zip.(last version)
2. Once the file is downloaded, unzip it into a desired folder or just place them on your Desktop for quick access. Inside the zip file there will be two files:
- com_virtuemart.2.0.xx.zip(last version)
- com_virtuemart_ext_aio.2.0.xx.zip(last version)
3. Now log into the Joomla admin panel with your username and password.
4.Go to Extensions > Extension Manager.
5. Click the Browse button and select the com_virtuemart.2.0.xx.zip(last version) file. Then click the Upload & Install button.
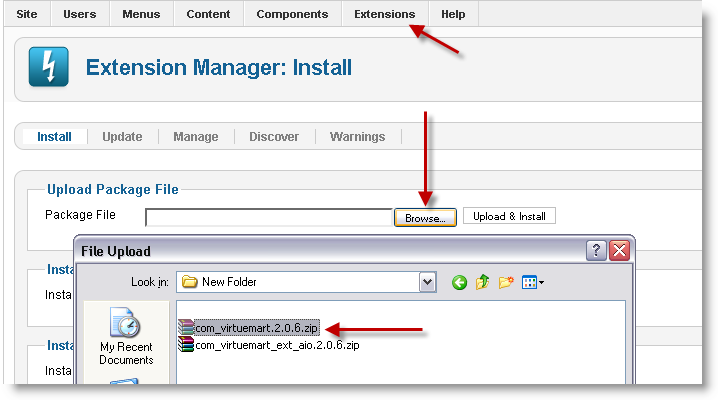
You should see the message "The installation was successful".
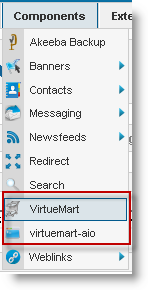
6. Install the other file called com_virtuemart_ext_aio.2.0.xx.zip(last version). Click the Browse button and select the com_virtuemart_ext_aio.2.0.xx.zip(last version) file. Then click the Upload & Install button. Once the installation is complete, you should see the Virtuemart link under the Components menu.
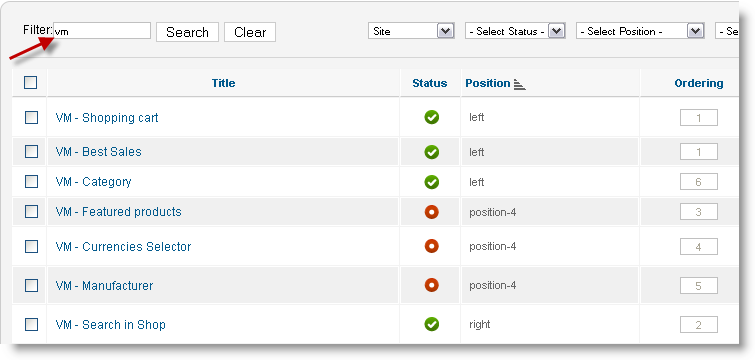
7. Check if the following plugins and modules have been installed.Go to the top menu Extensions > Module Manager. In the filter box type in vm and click Search. You should see the following Virtuemart modules:
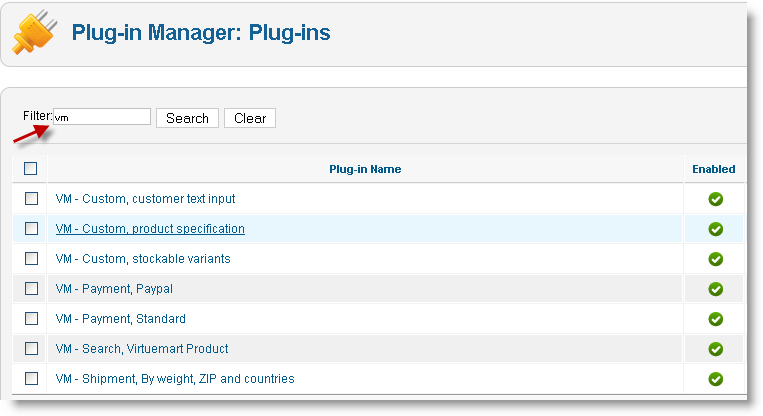
Do the same for the plugin. Go to the top menu Extensions > Plug-in Manager. In the filter box type in vm and click Search. You should then see the following Virtuemart plugins:
8. Go back to the Module manager and enable the modules you would like to use on your website frontend. Here you can also set their positions on your webpages. Then go to your site frontend and check out the new virtuemart module.
9. Next you will need to create a new menu link so the site users could navigate to your shop. To do so, click on Menus and select the desired menu you would like to point to the Store page. For example, you can add a link to the top menu, side menu and etc.
In this example we will use the top menu. Go to Menus > Top.
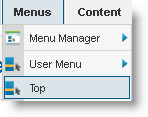
10. Click the New button in the top navigation panel.

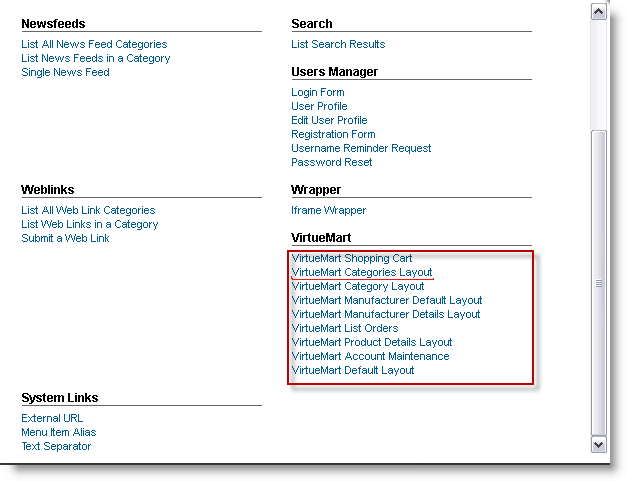
11. Under Details, click the Select button next to the field Menu Item Type *.
Then you will have options to create your menu. In this tutorial we will select VirtueMart Categories Layout.
12. Give your link a Menu Title, and click the Save and Close button at the top.
Sample Data Installation
Sample data is used to make your VirtueMart/Joomla website look like the template preview page. It contains sample articles, images, modules settings, website settings etc. If you are not planning to use the sample images or any other sample content, just skip this step.
To install the sample data, you need to complete two simple steps.
Step 1. Upload sample images.
To upload the sample images, please open your template package directory and go to the "sources" folder. There you should see the "to_the_root_directory" directory. It contains the files that should be uploaded to your Joomla installation root. Please, use the file manager to upload the files to your server.
Step 2. Import SQL file.
The final and the most important step of the sample data installation is to import the SQL file. The SQL file is the backup of the sample database, all Joomla website data is stored there. The SQL file can be imported by using your database management tool (phpMyAdmin). The template SQL file ("dump.sql") is located in the "sources" directory of the template package.
Please, DO NOT import the SQL file, if you have a live website, as it will completely replace your website database and all your data will be lost.
Beware: before importing the SQL file, please make sure your database table prefix matches the table prefix in the SQL file.
You can check what your table prefix is in the database through the database management tool. Check the table names. The prefix is a set of symbols before the table name. (e.g. table "jos_assets" prefix is "jos_"). You can also find the database prefix in the "configuration.php" file in your Joomla root directory. Search for line 19: public $dbprefix = 'jos_'; (where the prefix is "jos_")
If the table prefixes don't match open "dump.sql" file, in a code editor by using the Search & Replace tool (CTRL+F or CTRL+H hotkeys) you will need to replace the "jos_" table prefix (used in the SQL file) with the one that matches your database. You can check a detailed video tutorial on how to change the database prefix in the SQL file.
Now you can import that SQL file into your database.
To import sample data into your database, please perform these simple steps: (check the slides below):
- Select your database from the database list in the left column of the phpMyAdmin tool
- Click the "Import" button from the top navigation menu
- Click "Choose file" and browse for the dump.sql file in the "sources" directory of your template package
- Click "Go" to start importing the sample data
-
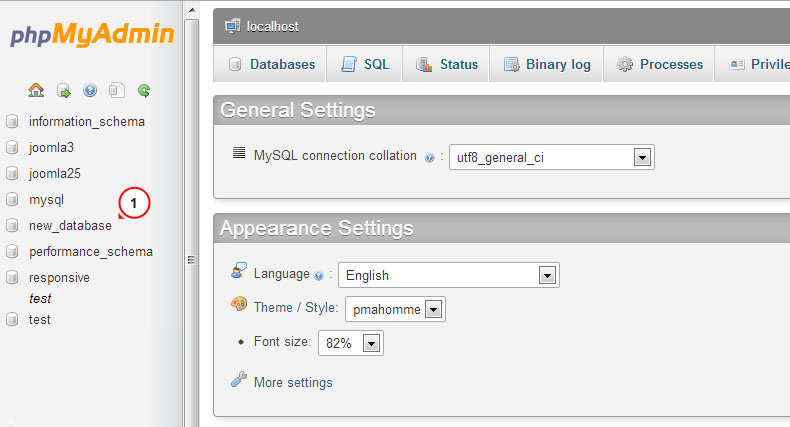
1. Select your database
-
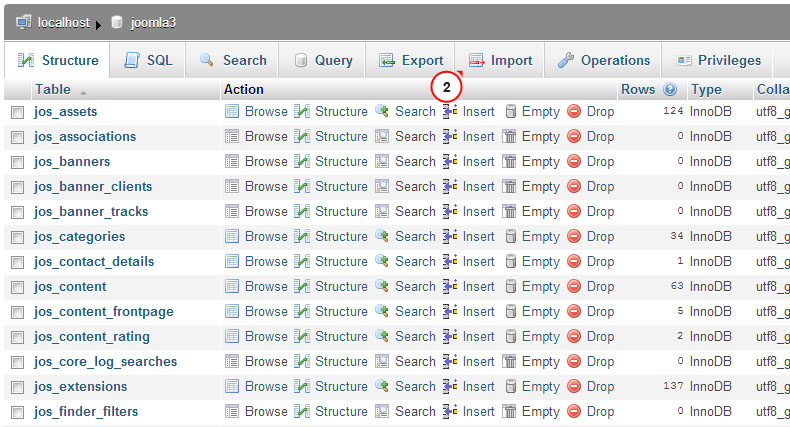
2. Click "Import" button
-
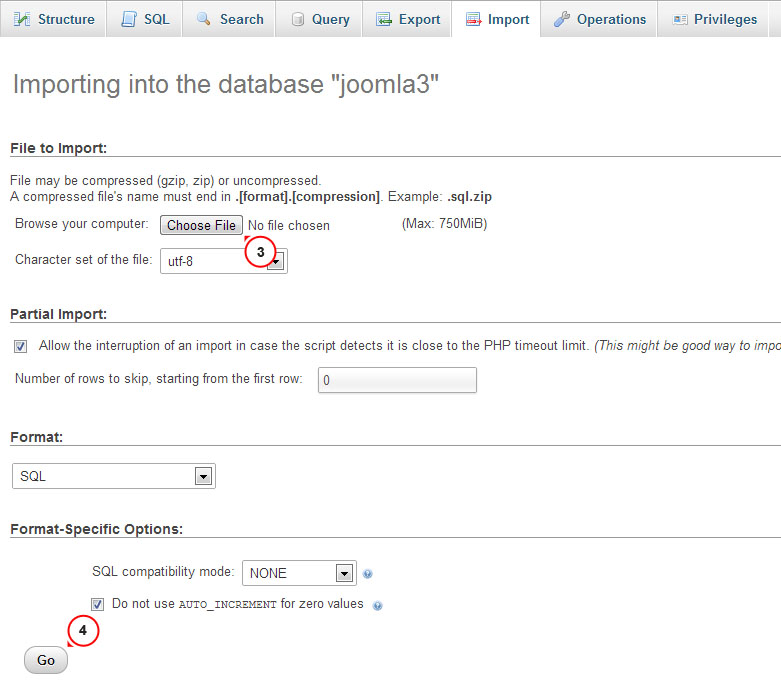
3. Click "Choose file" and browse for the dump.sql file in the template package "sources" directory
4. Click "Go" button to start importing sample data
You can also check a detailed tutorial on how to import the SQL file by using the phpMyAdmin tool
Configuring Modules
The template may have some modules that are not included to the default VirtueMart/Joomla! installation and should be installed manually. The procedure is the same as described in step 1 of this document.
- In your Joomla! administration panel select "Extensions - Extensions Manager".
- Click the Browse button and select the extension package from the template "sources" folder.
- Click the "Upload & Install" button.
- Go to "Extensions - Module manager". The newly installed module should appear in the modules list.
Open the module and set the configuration options according to the Modules Configuration table.
1 - Currency:
- Type: mod_virtuemart_currencies
- Position: user5
- Class Suffix:
- Show Title: yes
- Order: 1
- Pages: All
- Additional info:
2 - Login Form
- Type: mod_login
- Position: left
- Class Suffix: _login
- Show Title: yes
- Order: 2
- Pages: All
- Additional info:
3 - Manufacturer
- Type: mod_virtuemart_manufacturer
- Position: new
- Class Suffix: _manufacturers
- Show Title: yes
- Order: 1
- Pages: All
- Additional info:
4 - Footer
- Type: mod_footer
- Position: footer
- Class Suffix:
- Show Title: no
- Order: 1
- Pages: All
- Additional info:
5 - foot-menu
- Type: mod_menu
- Position: user9
- Class Suffix:
- Show Title: no
- Order: 1
- Pages: All
- Additional info:
6 - Follow Us
- Type: mod_custom
- Position: user9
- Class Suffix: _social
- Show Title: yes
- Order: 1
- Pages: All
- Additional info:
7 - Breadcrumbs Advanced
- Type: mod_breadcrumbs_advanced
- Position: syndicate
- Class Suffix: _Breadcrumbs
- Show Title: no
- Order: 1
- Pages: Online Store
Home
Manufacturer Default Layout
List Orders
User Edit Address
Display Vendor contact
Category Layout - Additional info:
8 - Google Map
- Type: mod_JGMap
- Position: right
- Class Suffix: _map
- Show Title: yes
- Order: 1
- Pages: Contacts
- Additional info:
9 - The Company Name
- Type: mod_custom
- Position: left
- Class Suffix: _address
- Show Title: yes
- Order: 6
- Pages: Contacts
- Additional info:
10 - foot-menu (2)
- Type: mod_menu
- Position: user9
- Class Suffix:
- Show Title: no
- Order: 2
- Pages: All
- Additional info:
11 - foot-menu (3)
- Type: mod_menu
- Position: user9
- Class Suffix:
- Show Title: no
- Order: 3
- Pages: All
- Additional info:
12 - foot-menu (4)
- Type: mod_menu
- Position: user9
- Class Suffix:
- Show Title: no
- Order: 4
- Pages: All
- Additional info:
13 - Slideshow CK
- Type: mod_slideshowck
- Position: user8
- Class Suffix: _slider
- Show Title: no
- Order: 1
- Pages: Home
- Additional info:
14 - YJ Pop Login
- Type: mod_yj_pop_login
- Position: user10
- Class Suffix: _LoginForm
- Show Title: no
- Order: 1
- Pages: All
- Additional info:
15 - VirtueMart Ajax Search
- Type: mod_vm_ajax_search
- Position: user4
- Class Suffix: _ajax_search
- Show Title: no
- Order: 1
- Pages: All
- Additional info:
16 - Top_menu
- Type: mod_superfish_menu
- Position: user3
- Class Suffix:
- Show Title: no
- Order: 1
- Pages: All
- Additional info:
17 - Categories
- Type: mod_virtuemart_category
- Position: left
- Class Suffix: -categories
- Show Title: yes
- Order: 1
- Pages: About Us
Home
Online Store
Home
Delivery
FAQs
Manufacturer Default Layout
List Orders
User Edit Address
Display Vendor contact
Category Layout
About joomla!
Wrappers
Reviews
News
Create an Account
Advanced Search
Order History
Shipping & Returns - Additional info:
18 - Categories Top
- Type: mod_virtuemart_category
- Position: user7
- Class Suffix: -category
- Show Title: no
- Order: 1
- Pages: All
- Additional info:
19 - Shopping Cart
- Type: mod_virtuemart_cart_tm
- Position: user6
- Class Suffix: }
- Show Title: no
- Order: 1
- Pages: All
- Additional info:
20 - Featured Products
- Type: mod_virtuemart_product
- Position: user2
- Class Suffix: _new
- Show Title: yes
- Order: 1
- Pages: Home
Home - Additional info:
21 - Bestsellers
- Type: mod_virtuemart_product
- Position: left
- Class Suffix: _best
- Show Title: yes
- Order: 1
- Pages: All
- Additional info:
After all the necessary changes are applied, save the values of each module by clicking the "Save & Close" button in the upper right corner.
You also need to upload the following folders to the root of your Joomla! installation:
sources\to_the_root_directory\administrator
sources\to_the_root_directory\images
sources\to_the_root_directory\media
Addendum Where to get help, support and additional information
We did our best to make this documentation as clear as possible. However, if you have any difficulties with the Joomla template or suggestions on improving the template or its documentation, feel free to contact our support team through:
Help and Support
Loading data from Google servers
Some countries have issues connecting to Google servers. This can cause issues loading Google Fonts and Java Script libraries from Google CDN. To resolve these issues please do the following:
Can't load Google Fonts:
- Open \templates\theme****\index.php file
- Locate the line:
$doc->addStyleSheet('//fonts.googleapis.com/css?family=[---your_web_font_name_here---]'); - Replace it with the following:
$doc->addStyleSheet('//fonts.useso.com/css?family=[---your_web_font_name_here---]');
Documentation
Joomla! Extensions
At www.extensions.joomla.org you can download more than 6 thousands of modules, plugins and components to add various features to your Joomla website.
Joomla! Extensions
At extensions.joomla.org you can download more than 6 thousand modules, plugins and components to add various features to your Joomla website.