


- Web templates
- E-commerce Templates
- CMS & Blog Templates
- Facebook Templates
- Website Builders
FAQs
General Tutorials
Featured templates
MonsterONE Subscrioption


This guide will show you how to create locale files in Shopify.
A locale file is a .json file that contains a set of translations for the text strings used in a theme template file. A separate locale file is used for every language that’s available in the theme. Locale files are stored in the Locales section of the theme editor.
Instead of hard-coded text strings, theme template files use the translation keys and pass them to the translation filter (or t filter.)
The translation filter retrieves the appropriate translated string from the locale file for the active language.
You can generate a locale file in a number of ways: by clicking on Add a new locale from the theme template editor or by creating a new locale file manually.
To add a new locale from the Edit HTML/CSS page:
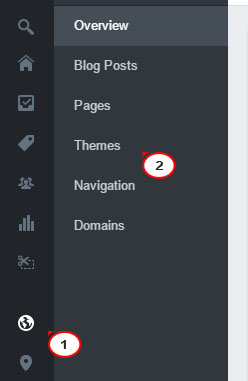
From your Shopify admin, click on Online Store, then click on Themes
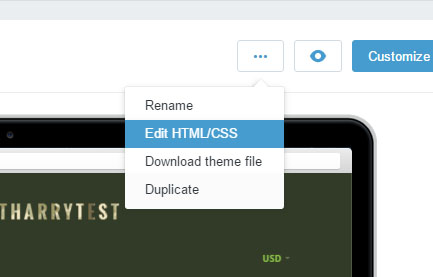
Find the theme you want to edit, press the … button and then click on Edit HTML/CSS:
Scroll down the sidebar and click on Locales, then choose Add a new locale.
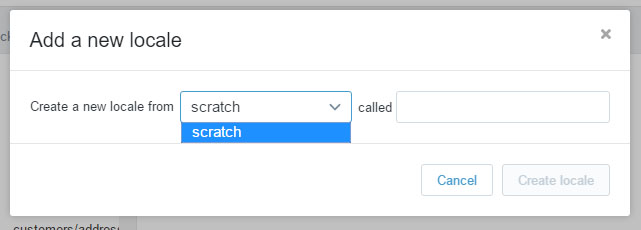
From the drop-down, select an existing locale file as a starting point or create a new one from scratch. Enter a name for the locale file (without the .json extension), then press Create locale.
Creating a new locale file manually:
If you create a locale file manually (that’s outside the theme editor), be sure to use the correct IETF language tag for the filename.
Where to save your locale files:
Save your locale files in the /locales folder, which is accessible from the Template Editor.

Naming locale files: when naming new locale files, you must follow the standard IETF language tag nomenclature, where the first lowercase letter code represents the language, and the second uppercase code represents the region, for example:
fr-CA.json for French – Canada, en-GB.json for English – Great Britain, es-ES.json for Spanish – Spain.
If a language isn’t region-specific, you can use only the 2-letter language representation of the IETF language tag, for example: fi.json for Finnish – All Regions.
The default locale file: you must designate a default locale file, *.default.json. The default locale file contains the translations for the default language of your theme. Only one default file is permitted, which by default is en.default.json (English).
Values: values can contain HTML and Liquid objects (through interpolation.) You should limit the presence of these elements in the translation files, to ensure a simple translation process for merchants creating an additional language.
In some cases, you might have to include template elements in the values, to accommodate linguistic and grammatical differences, for example:
This is the end of the tutorial. Now you know how to create locale files.
Feel free to check the detailed video tutorial below:
Shopify. How to create locale files