


- Web templates
- E-commerce Templates
- CMS & Blog Templates
- Facebook Templates
- Website Builders
FAQs
General Tutorials
Featured templates
MonsterONE Subscrioption


This tutorial shows available Store settings in VirtueMart.
VirtueMart 2.x. Shop settings overviewVirtueMart allows you to select “Simple Layout” and “Extended Layout”. You will see how to manage your shop and advanced administration accessed via the VirtueMart administrative interface.
It assumes that you have already installed and configured your site (VirtueMart 2.x with Joomla! 2.5.x).
In order to find shop settings, you should perform the following:
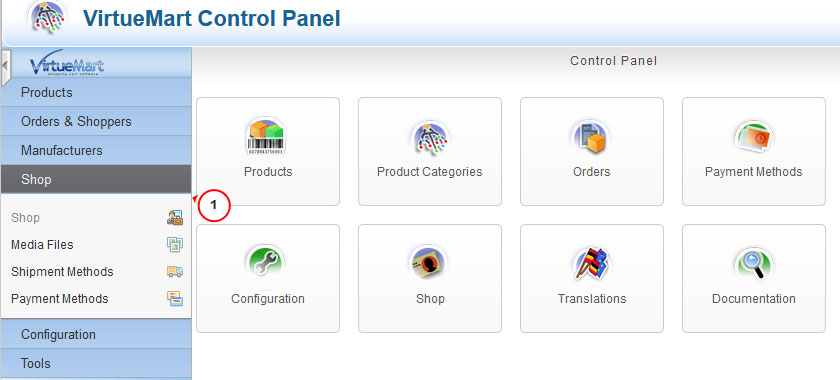
Log into your Joomla admin, go to Components->VirtueMart.
In your VirtueMart Control Panel click on the Shop->Shop tab on the left:
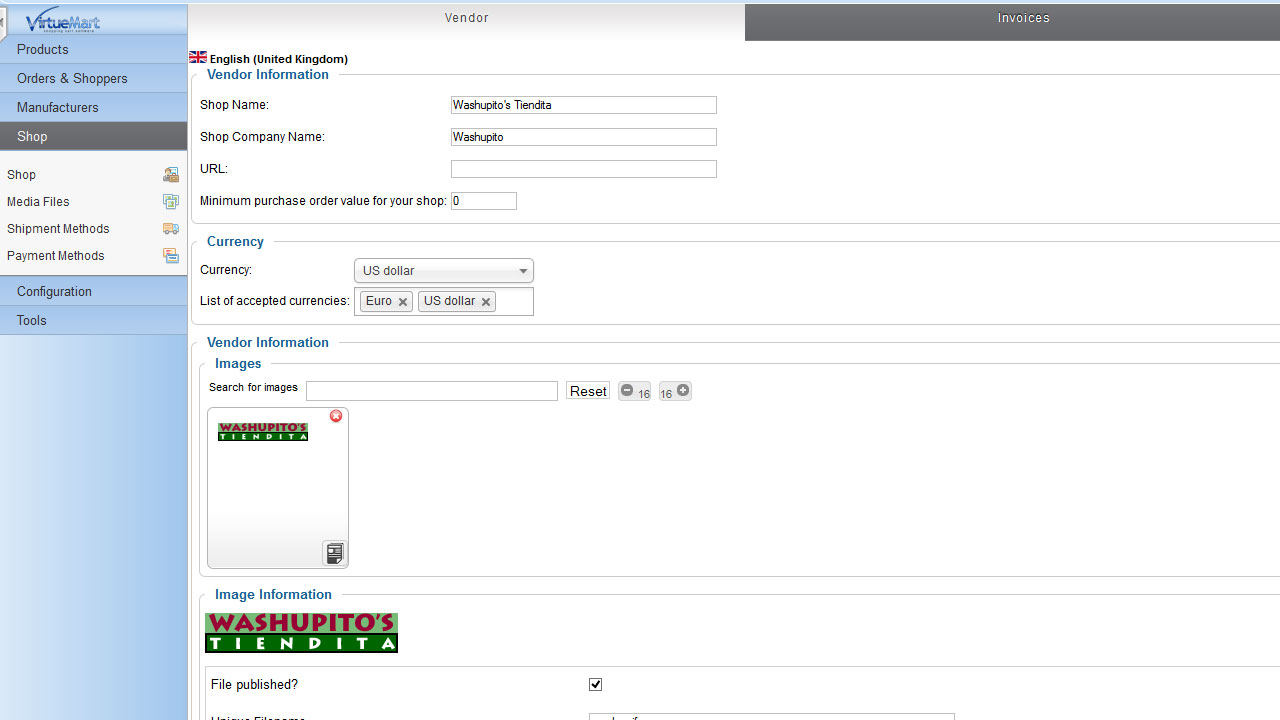
Vendor tab:
Shop Name: The name of this website.
Shop Company Name: The name of the company that runs this website.
URL: This will be filled in for you, do not change it!
Minimum purchase order value for your shop: If you want to refuse small purchases and force customers to purchase more than a minimum amount, enter the amount here.
Currency: Select your main currency from the drop-down list.
List of accepted currencies.: Click in the box to display a drop-down list of all currencies to select from. Click the X on a currency to delete it.
Vendor Information – Images: Type a space to see a list of all images, or the red X on the image to delete it. Click the bottom right icon on the image to edit the image information. If your media won’t upload, scroll down to the bottom of the page and make sure that the long links say “WRITEABLE.” If not, use cPanel’s FILE MANAGER to change the “Write Permissions” for the folders to 755 (on some hosts 777).
Image Information – File Published?: Check the box to publish or uncheck the box to hide the media.
Image Information – Unique File name: A unique “alias” or name for the media.
Image Information – Displayed image subtitle: The words you want to appear when visitors put their cursor over the image.
Image Information – Image Alt-Text: The words you want a sight-impaired reader to hear to describe this image.
Image Information – Used URL: Leave blank for VirtueMart to assign a URL to this media.
Image Information – Used Thumb URL: Leave blank for VirtueMart to assign a URL to this media.
Image Information – Role: Choose “displayable” to allow customers to view the media only, or “downloadable” if you want them to be able to download the media.
Image Information – Storing location/type: Category is filled in for you.
Upload File: To upload an image from your computer, click the BROWSE Button and select it from your personal computer. Then choose whether to upload, replace existing image or replace the existing thumbnail image. IMPORTANT: If you do not select the UPLOAD radio button, the image will not upload. Click the top right SAVE Button to upload.
Description: A description for the home page, sometimes called the “Home Page Welcome” text. Type the text like typing an email. Use the buttons at the bottom of the editor.
Legal Information: Delete the sample text and insert your own disclaimers, copyright or other information here.
Meta Information: Delete the sample text and insert your own meta data here:
Invoices tab: you can configure the look of invoices, delivery notes, etc. You can take a look at a preview page (after saving the changes):

Shopper Information tab: you can configure the Vendor – Permissions, Shopper Number/ID, Shopper Group, Shipment Addresses and Additional Information:

Media Files tab: Allows you to synchronize media files with the VirtueMart. First, upload all your media into the image folders and then click on this button. All the medias will be uploaded to the database.
Shipment Methods tab: VirtueMart integrates only one shipment method based on weight, zip, country, number of products, or order amount.
All details on how to create a new shipment method are available at this link.
Payment methods tab: All the payment methods available are listed in the parameter.
All details on how to create a new payment method are available at this link.
Feel free to check the detailed video tutorial below:
VirtueMart 2.x. Shop settings overview