


- Web templates
- E-commerce Templates
- CMS & Blog Templates
- Facebook Templates
- Website Builders
FAQs
General Tutorials
Featured templates
MonsterONE Subscrioption


Our Support team is ready to present a new tutorial that will show you how to manage inventory and stock in WooCommerce.
WooCommerce. How to Manage Inventory and Stock
Using WooCommerce inventory controls is an important part of managing physical goods and ensuring you do not oversell a product.
Global settings allow you to configure how inventory and stock is managed in your WordPress installation, and also a number of thresholds that can apply to all products in your shop.
Fist, navigate to WooCommerce > Settings > Inventory:

Check the Manage Stock option to enable stock on all products. If you have a mix of virtual and physical products, you can skip this option here and enable stock on individual product posts (explained in the next section).
Hold Stock (minutes) – This option determines how long WooCommerce will hold inventory for unpaid orders. This means that if a person has a pending order, WooCommerce will remove the item from the global inventory amount until this time limit is up.
Check the Notifications option to receive an email notifications for low or out of stock items:
Enter the email to send notifications to in the Notification Recipient field.
Enter a Low Stock threshold – when stock reaches this number, a low stock notification will be sent.
Enter the Out of Stock Threshold – The number in this field will determine the point in which an item is out of inventory (typically 0)
Check Out of Stock Visibility if you want to hide out-of-stock items within the WooCommerce catalog.
Select a Stock Display Format for how stock should be displayed within the WooCommerce product page.
The following steps will walk you through setting inventory via the Product options panel in the Product post.
Navigate to Products section in your admin panel, open a product.
In the Product Data area click on the Inventory tab:
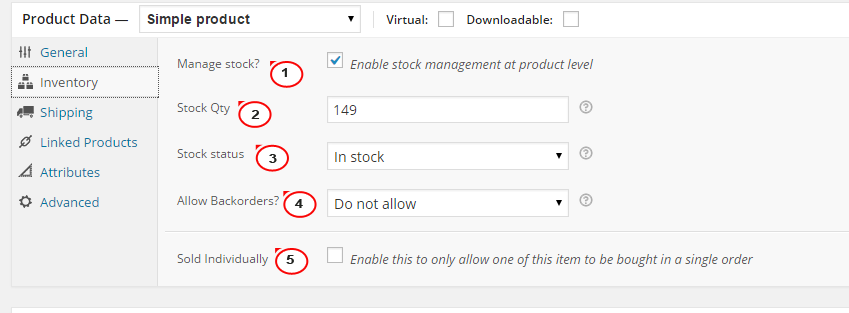
Check Manage Inventory if you need to set the option on this individual product.
Enter a Stock Qty – number of products you have on hand.
Set the Stock Status – basically if the Stock Qty is zero, then the Stock Status is out of stock and vice versa.
Choose whether to Allow Backorders or not.
As noted, enable Sold Individually to only allow one of this item to be bought in a single order.
Feel free to check the detailed video tutorial below:
