


- Web templates
- E-commerce Templates
- CMS & Blog Templates
- Facebook Templates
- Website Builders
FAQs
General Tutorials
Featured templates
MonsterONE Subscrioption


This tutorial is going to show you how to set up a Subscribe and Follow widget in WordPress Blogging themes.
First you need to get the MailChimp API key and a List ID.
Login to your MailChimp account and click on your account name at the top right corner. Now click on Account in the dropdown.

Under the Extras tab, there’ll be a dropdown. Select the API Keys
.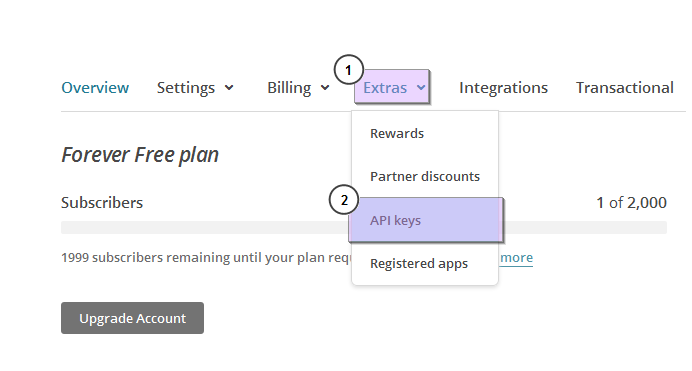
Scroll to the bottom and click the Create A Key button to generate a new key or just highlight and copy an existing key.

Now you need to obtain your List ID. Scroll all the way to the top and click on Lists.
Now click on (or create) a List that you want your new customers to be automatically imported to.
Go to the Settings tab and click on List name and defaults.
Your List ID will be found here.

Second step would be adding these details to your WordPress site.
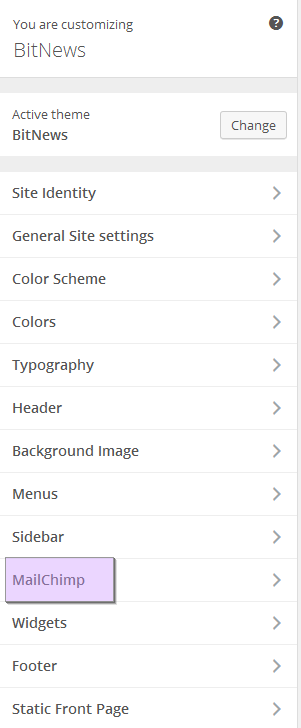
Open your WordPress Dashboard and navigate to Appearance -> Customize -> MailChimp. Insert both MailChimp API key and List ID
Save changes and check your site.
This is the end of tutorial. Feel free to check the detailed video tutorial below:
WordPress Blogging themes. How to set up Subscribe and Follow widgetYou can see more templates in our large scale of WordPress Themes.
