- Web templates
- E-commerce Templates
- CMS & Blog Templates
- Facebook Templates
- Website Builders
WordPress. How to work with the social icons widget (based on Cherry Framework 3.x)
February 6, 2015
Our Support team is ready to present a new tutorial that will show you how to work with the social icons (based on Cherry Framework)
WordPress. How to work with the social icons widget (based on Cherry Framework)
To enable the widget, please do the following (if you used the sample data files, it should be already enabled):
-
Navigate to Appearance > Widgets in your WordPress Dashboard.
-
Under Available Widgets find Cherry – Social Networks.
-
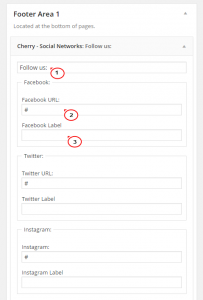
Drag and drop the Cherry – Social Networks widget into the needed widget area:
-
By default, there are 7 social media networks in the widget. Each icon has two options: URL and label.
-
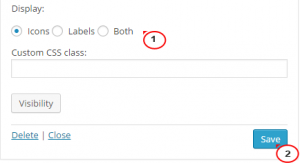
You can use the check box to select what should be displayed on the website:
-
To enable the icons, you need to fill the url/label fields in. Icons with empty fields will not be displayed.
-
When you are done, click Save at the bottom.
-
Check your site to see the changes.
In order to replace the social networks icons, you will need to replace the original .png files in wp-content/themes/theme#####/images/icons directory on your server by uploading the new .png images with the same titles.
In order to make the links open in a new window, please do the following:
-
Navigate to wp-content/themes/theme#####/includes/widgets/ directory on your server. Check if my-social-widget.php file exists.
-
If this file exists in the mentioned folder of your child theme, skip to the next step, otherwise please follow the steps below:
-
Go to the wp-content/plugins/cherry-plugin/includes/widgets directory via FTP or hosting file manager. Download my-social-widget.php file.
-
Copy/move the copied file to the wp-content/themes/theme#####/includes/widgets folder.
-
-
Open my-social-widget.php file to edit.
-
Hit Ctrl + F on your keyboard and look for this line:
<a class="social_link social_link__<?php echo strtolower($network); ?>" rel="tooltip" data-original-title="<?php echo strtolower($network); ?>" href="<?php echo $networks[$network]['link']; ?>">
-
Add target=”_blank” after the href=”” attribute. The code should look like the following:
<a class="social_link social_link__<?php echo strtolower($network); ?>" rel="tooltip" data-original-title="<?php echo strtolower($network); ?>" href="<?php echo $networks[$network]['link']; ?>" target="_blank">
-
Save changes and check the social links on your site.
In order to add a new social media icon, for instance one for Picasa (you will just need to change “Picasa” and “picasa” in the lines of this tutorial if you are going to add a different button, like “Lastfm”/”lastfm”, “Tumblr”/”tumblr” etc.), please do the following:
-
Navigate to wp-content/themes/theme#####/includes/widgets/ directory on your server.
-
Open my-social-widget.php file to edit.
-
Under (any line can be found using Ctrl + F):
		 $networks['Twitter']['link'] = $instance['twitter'];
		 $networks['Facebook']['link'] = $instance['facebook'];
		 $networks['Flickr']['link'] = $instance['flickr'];
		 $networks['Linkedin']['link'] = $instance['linkedin'];
		 $networks['Delicious']['link'] = $instance['delicious'];
		 $networks['Youtube']['link'] = $instance['youtube'];
add:
$networks['Picasa']['link'] = $instance['picasa'];
-
Under:
		 $networks['Twitter']['label']   = $instance['twitter_label'];
		 $networks['Facebook']['label']  = $instance['facebook_label'];
		 $networks['Flickr']['label']    = $instance['flickr_label'];
		 $networks['Instagram']['label']      = $instance['instagram_label'];
		 $networks['Rss']['label']  = $instance['rss_label'];
		 $networks['Delicious']['label'] = $instance['delicious_label'];
		 $networks['Linkedin']['label']   = $instance['linkedin_label'];
		 $networks['Google_plus']['label']   = $instance['google_plus_label'];
add:
$networks['Picasa']['label'] = $instance['picasa_label'];
-
Change:
<?php foreach(array("Facebook", "Twitter", "Flickr", "Instagram", "Rss", "Delicious", "Linkedin", "Google_plus") as $network) : ?>to:
<?php foreach(array("Facebook", "Twitter", "Flickr", "Instagram", "Rss", "Delicious", "Linkedin", "Google_plus", "Picasa") as $network) : ?> -
Under:
		 $instance['twitter']         = $new_instance['twitter'];
		 $instance['facebook']        = $new_instance['facebook'];
		 $instance['flickr']          = $new_instance['flickr'];
		 $instance['instagram']           = $new_instance['instagram'];
		 $instance['rss']       		 = $new_instance['rss'];
		 $instance['delicious']       = $new_instance['delicious'];
		 $instance['linkedin']       = $new_instance['linkedin'];
		 $instance['google_plus']     = $new_instance['google_plus'];
add:
$instance['picasa'] = $new_instance['picasa'];
-
Under:
		 $instance['twitter_label']   = $new_instance['twitter_label'];
		 $instance['facebook_label']  = $new_instance['facebook_label'];
		 $instance['flickr_label']    = $new_instance['flickr_label'];
		 $instance['instagram_label']     = $new_instance['instagram_label'];
		 $instance['rss_label'] 		 = $new_instance['rss_label'];
		 $instance['delicious_label'] = $new_instance['delicious_label'];
		 $instance['linkedin_label'] = $new_instance['linkedin_label'];
		 $instance['google_plus_label'] = $new_instance['google_plus_label'];
add:
$instance['picasa_label'] = $new_instance['picasa_label'];
-
Change:
$defaults = array( 'title' => '', 'twitter' => '', 'twitter_label' => '', 'facebook' => '', 'facebook_label' => '', 'flickr' => '', 'flickr_label' => '', 'instagram' => '', 'instagram_label' => '', 'rss' => '', 'rss_label' => '', 'delicious' => '', 'delicious_label' => '', 'linkedin' => '', 'linkedin_label' => '', 'google_plus' => '', 'google_plus_label' => '', 'display' => 'icons', 'text' => '');
to:
$defaults = array( 'title' => '', 'twitter' => '', 'twitter_label' => '', 'facebook' => '', 'facebook_label' => '', 'flickr' => '', 'flickr_label' => '', 'instagram' => '', 'instagram_label' => '', 'rss' => '', 'rss_label' => '', 'delicious' => '', 'delicious_label' => '', 'linkedin' => '', 'linkedin_label' => '', 'google_plus' => '', 'google_plus_label' => '', 'picasa' => '', 'picasa_label' => '', 'display' => 'icons', 'text' => '');
-
Under:
		 $twitter         = $instance['twitter'];
		 $facebook        = $instance['facebook'];
		 $flickr          = $instance['flickr'];
		 $instagram           = $instance['instagram'];
		 $rss       		 = $instance['rss'];
		 $delicious       = $instance['delicious'];
		 $linkedin       = $instance['linkedin'];
		 $google_plus     = $instance['google_plus'];
add:
$instance['picasa'] = $new_instance['picasa'];
-
Under:
		 $twitter_label   = $instance['twitter_label'];
		 $facebook_label  = $instance['facebook_label'];
		 $flickr_label    = $instance['flickr_label'];
		 $instagram_label     = $instance['instagram_label'];
		 $rss_label  	 = $instance['rss_label'];
		 $delicious_label = $instance['delicious_label'];
		 $linkedin_label = $instance['linkedin_label'];
		 $google_plus_label = $instance['google_plus_label'];
add:
$picasa_label = $instance['picasa_label'];
-
Under:
	 <fieldset style="border:1px solid #dfdfdf; padding:10px 10px 0; margin-bottom:1em;">
		<legend style="padding:0 5px;"><?php echo 'Google+'; ?>:</legend>
		<p>
			<label for="<?php echo $this->get_field_id('google_plus'); ?>"><?php echo 'Google+ URL:'; ?></label>
			<input class="widefat" id="<?php echo $this->get_field_id('google_plus'); ?>" name="<?php echo $this->get_field_name('google_plus'); ?>" type="text" value="<?php echo esc_attr($google_plus); ?>" /></p>
		<p>
			<label for="<?php echo $this->get_field_id('google_plus_label'); ?>"><?php echo 'Google+ '.theme_locals("label"); ?></label>
			<input class="widefat" id="<?php echo $this->get_field_id('google_plus_label'); ?>" name="<?php echo $this->get_field_name('google_plus_label'); ?>" type="text" value="<?php echo esc_attr($google_plus_label); ?>" />
		</p>
	</fieldset>
Add:
<fieldset style="border:1px solid #dfdfdf; padding:10px 10px 0; margin-bottom:1em;"> <legend style="padding:0 5px;"><?php echo 'Picasa' ?>:</legend> <p><label for="<?php echo $this->get_field_id('picasa'); ?>"><?php echo 'Picasa:' ?></label> <input class="widefat" id="<?php echo $this->get_field_id('picasa'); ?>" name="<?php echo $this->get_field_name('picasa'); ?>" type="text" value="<?php echo esc_attr($picasa); ?>" /></p> <p><label for="<?php echo $this->get_field_id('picasa_label'); ?>"><?php echo 'Picasa '.theme_locals("label") ?></label> <input class="widefat" id="<?php echo $this->get_field_id('picasa_label'); ?>" name="<?php echo $this->get_field_name('picasa_label'); ?>" type="text" value="<?php echo esc_attr($picasa_label); ?>" /></p> </fieldset> -
Save changes when you are done editing the file.
-
Upload a picasa.png to the wp-content/themes/theme#####/images/icons/ folder on your server. The new image should have the same dimensions as the original social icons images in this folder. Sometimes in the wp-content/themes/theme#####/images/icons folder there are icons already included.
-
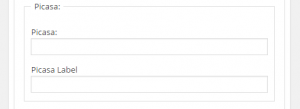
In your WordPress admin, go to Appearance > Widgets > Cherry – Social Networks. There should be a new option for Picasa at the bottom with the two fields to fill in:
In order to change the tooltips, for example facebook to myfacebook, please do the following:
-
Rename facebook.png in the wp-content/themes/theme#####/images/icons folder to myfacebook.png
-
Open my-social-widget.php file located in the wp-content/themes/theme#####/includes/widgets folder.
-
Change the name on line 15:
$networks['Facebook']['link'] = $instance['facebook'];
to:
$networks['Myfacebook']['link'] = $instance['facebook'];
-
And the name on line 48 to:
<?php foreach(array("Myfacebook", "Twitter", "Flickr", "Feed", "Linkedin", "Delicious", "Youtube) as $network) : ?> -
Save the changes and check the tooltip on your site.
Feel free to check the detailed video tutorial below:
WordPress. How to work with the social icons widget (based on Cherry Framework)


