


- Web templates
- E-commerce Templates
- CMS & Blog Templates
- Facebook Templates
- Website Builders
FAQs
General Tutorials
MonsterONE Subscrioption


The following tutorial is going to show how to manage shopping cart price rules in Magento.
Magento. How to manage shopping cart price rules
NOTE: In Magento you can set up different promotions and discounts that apply only to the products in the customer’s shopping cart. The shopping cart price rules can be based on different combinations of conditions. The conditions themselves can be based on various attributes of the products in the cart (category, SKU, manufacturer, etc.) and/or on the different shopping cart attributes such as shipping country, shipping state/province, total weight, etc.
NOTE: We recommend disabling Magento cache or clearing it after all configuration changes. Please check the following tutorial for the detailed guidance Magento. How to clear cache
Let’s add a new shopping cart rule:
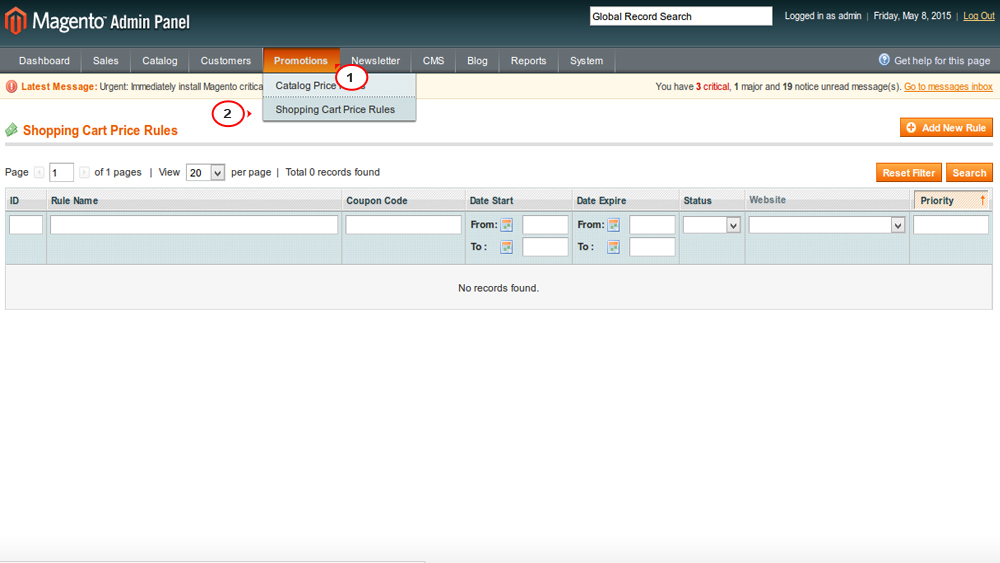
Log into your Magento admin panel.
Navigate to Promotions->Shopping cart price rules menu.
Click Add new rule button:
Each rule includes the following settings:
Rule Name – type some name for the price rule (displayed in the admin panel only).
Description – use it to type some information that is related to the price rule (optional).
Status – from this option you can select whether the price rule should be active or not.
Websites – this is a list of the websites that you have created from System> Manage Stores. To mark/unmark more than one website, press and hold the Ctrl button on your keyboard and click on the name with the left mouse button.
Customer Groups – you can select the customer group or groups for which you want the price rule to be valid. Mark/unmark more than one group with the help of the Ctrl button on your keyboard.
Coupon – by default, this option is set to No Coupon which means that no coupon code is required and the price rule will apply to any customer belonging to one of the selected groups in the Customer Groups option. If you select Specific Coupon, a couple of new options will be added just underneath this one:
This first option is labeled Coupon Code and it’s for specifying a coupon code. You can type a code manually, or you can let Magento generate it automatically. In case you want to generate code(s) automatically, mark the checkbox for Use Auto Generation. When you do that and save the rule, a new section will appear on the left side of the add/edit rule form. It’s called Manage Coupon Codes (in fact this section will be added after you save the rule even if you leave the Coupon drop-down menu to No Coupon).
The second option is Uses per Coupon. If you leave the field blank or you put 0, the coupon can be used countless number of times as long as the price rule is active. If you want customers to be able to apply the coupon a limited number of times, just type the number in the field.
Uses per Customer – you can use this option to specify how many times the particular promotion can be used by a customer. If you leave the field blank or you put 0, there will be no limit.
From Date and To Date – you can use these two options to specify a period of time for which the promotion will be valid.
Priority – configure the order in which price rules should be applied.
Public in RSS Feed – by default, this option is enabled:

Click on the Conditions button on the left to configure the conditions that have to be fulfilled for the price rule to be applied. On the right you’ll see the text specifying that all of the conditions that you add have to be true so that the rule is applied.
However, by clicking on ALL and TRUE you can change the way the conditions are fulfilled. For example, if you add a few conditions and you want the rule to be applied if any of them is matched instead of all, you can click on ALL and use the drop-down menu that appears to set it to ANY:

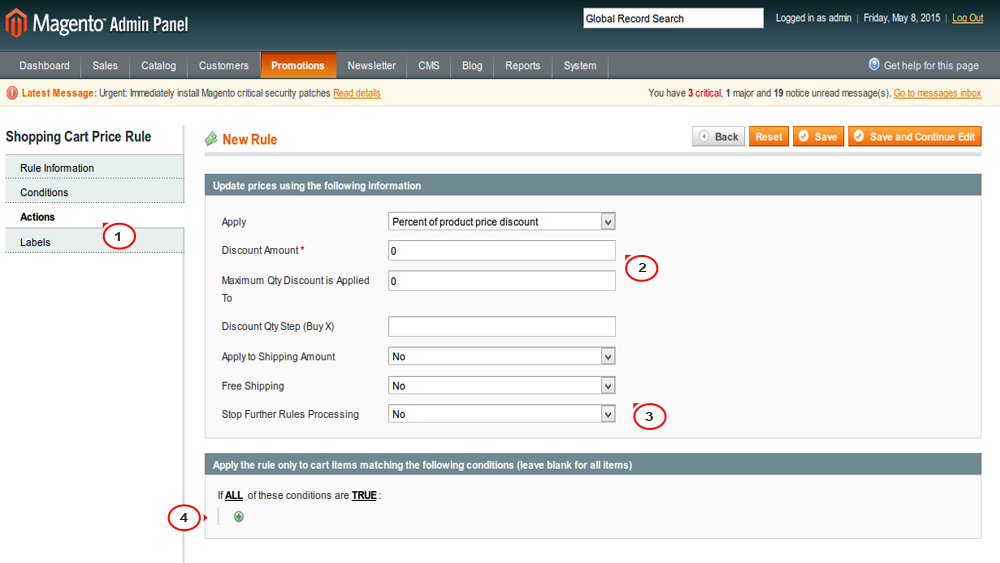
Apply – from this option you can select how the discount should be applied (By Percentage of the Original Price, By Fixed Amount, To Percentage of the Original Price, To Fixed Amount, Buy X get Y free (discount amount is Y)).
Discount Amount – in this field you can put the number for the discount amount.
Maximum Qty Discount is Applied To – if you want the discount to be applied to a limited number of items in the cart, put that number in the field.
Discount Qty Step (Buy X) – if you select Buy X get Y free (discount amount is Y) from the Apply drop-down menu on the same page, then you can use this option to specify the number of units from a product that the customer has to order so that they can get a certain number of items for free.
Apply to Shipping Amount – by default, the discount is not applied to shipping charges. If you want the shipping amount also to be discounted, set this option to Yes.
Free Shipping – If you set it to For matching items only, no shipping charges will be calculated for the items in the cart to which the shipping cart price rule applies. If you select For shipment with matching items and there are items in the cart for which the price rule is valid, then there will be no shipping charges for the whole shipment.
Stop Further Rules Processing – by default, this is set to No. If you don’t want other rules that meet the conditions (except this particular rule) to be applied, set this option to Yes.
Apply the rule only to cart items matching the following conditions (leave blank for all items) – configure additional conditions if required:
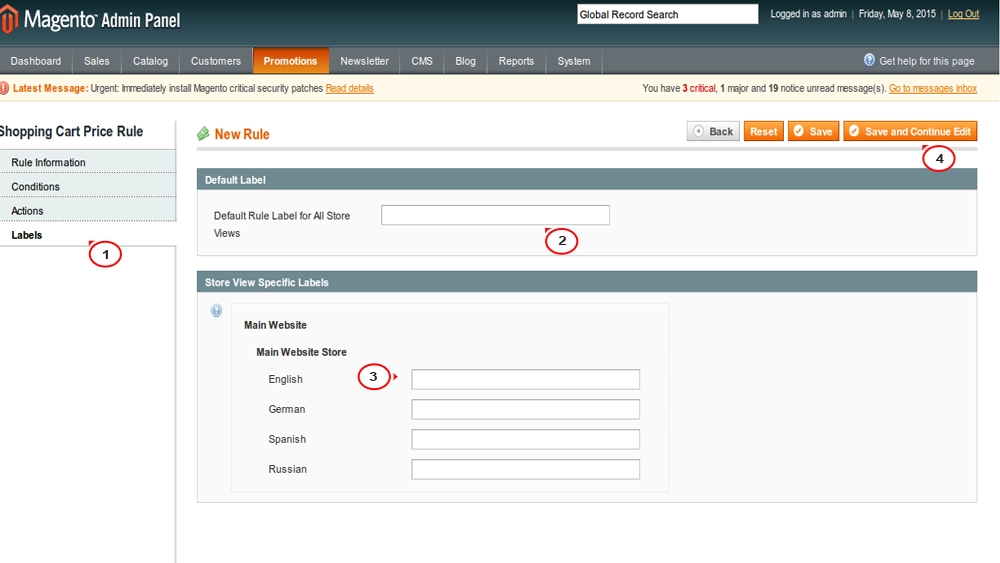
On the page that opens there’s a field in which you can type the label as it will appear in all store views if there’s no label specified for the particular store view. If you want the label to be different per store view, then you can type it in the corresponding field that’s provided for the store view.
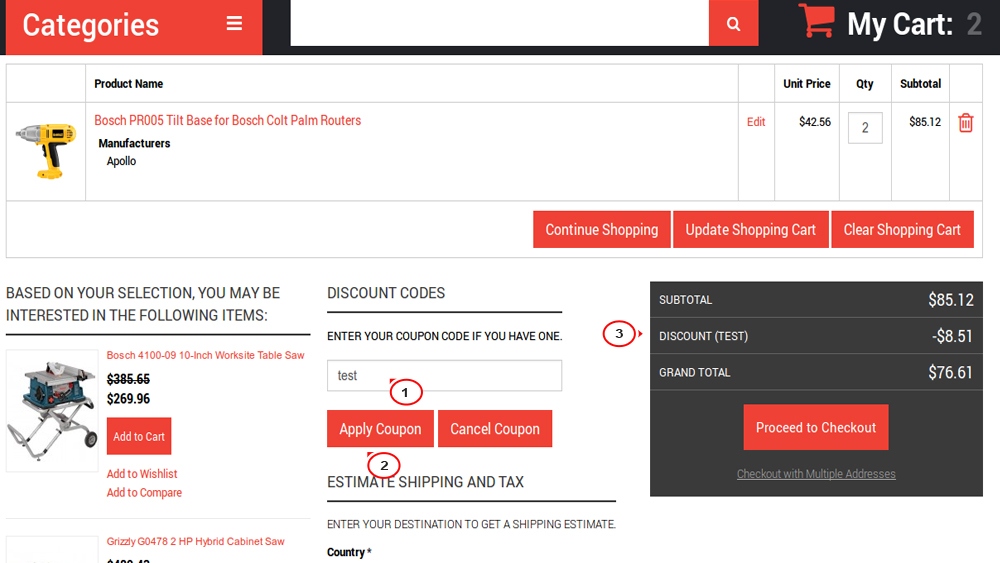
If there’s no label specified, the discount will be labeled on the cart page on the frontend as just Discount.
Click Save and Continue edit button:
This section will be accessible once you save the shopping cart price rule.
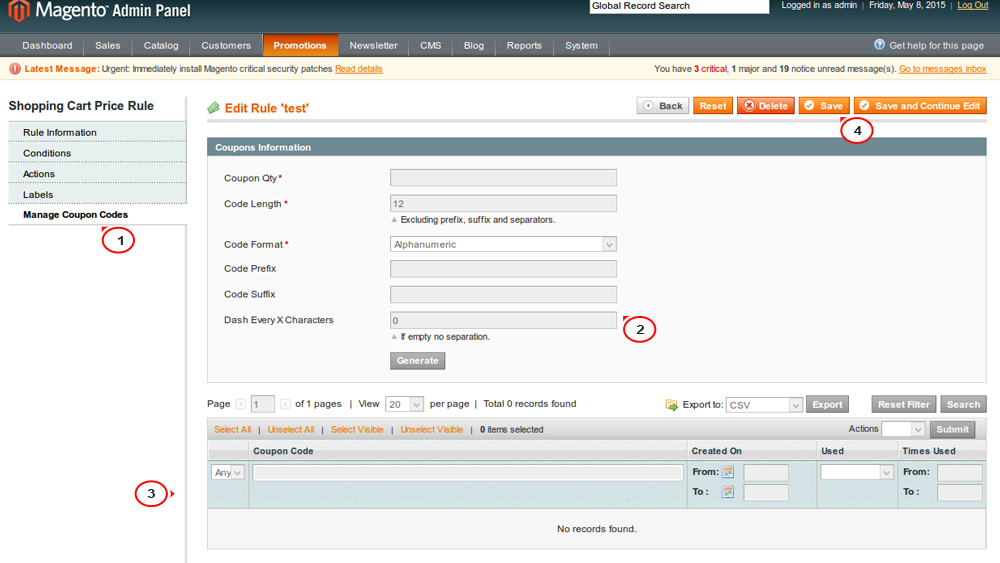
You can generate many coupon codes at the same time; specify the quantity in the field for Coupon Qty. You can set the length of the codes in the field for Code Length, and from the Code Format drop-down menu you can select whether the codes should include letters and numbers, only letters, or only numbers. If you want the generated codes to have a fixed prefix and/or suffix, type them respectively in the fields for Code Prefix and Code Suffix.
After you configure the settings, click on the Generate button to create the coupons. They will be listed in the table under the options. You can delete coupons by marking their checkbox in the table and using the Actions button in the upper right corner of the table:
After you’re done with the coupon codes, click Save or Save and Continue Edit button.
NOTE: Each time you add a new rule the options for code length, format, prefix, suffix and dashes will be set to their default values. To change those default values, go to System menu>Configuration>Promotions-> Customers->Auto Generate Specific Coupon Codes panel.
Go back to your website and check how your new shopping cart price rule works:
That is the end of the tutorial. Now you know how to manage shopping cart price rules in Magento.
Feel free to check the detailed video tutorial below:
