


- Web templates
- E-commerce Templates
- CMS & Blog Templates
- Facebook Templates
- Website Builders
FAQs
General Tutorials
Featured templates
MonsterONE Subscrioption


The following tutorial is going to show you how to manage header and footer links in PrestaShop 1.5.x templates.
PrestaShop 1.5.x. How to manage footer and header links
Log into your PrestaShop admin panel and navigate to Modules -> Positions.
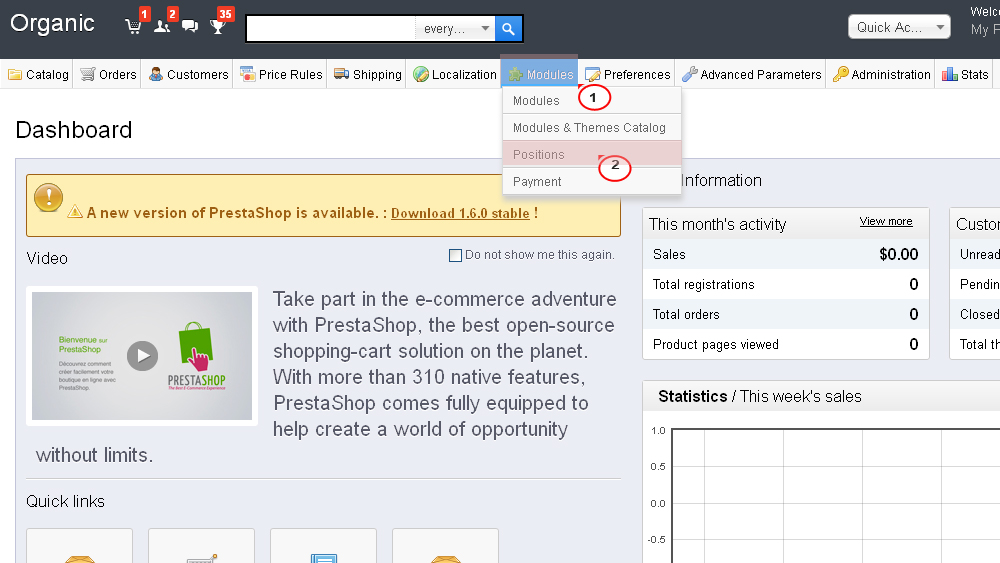
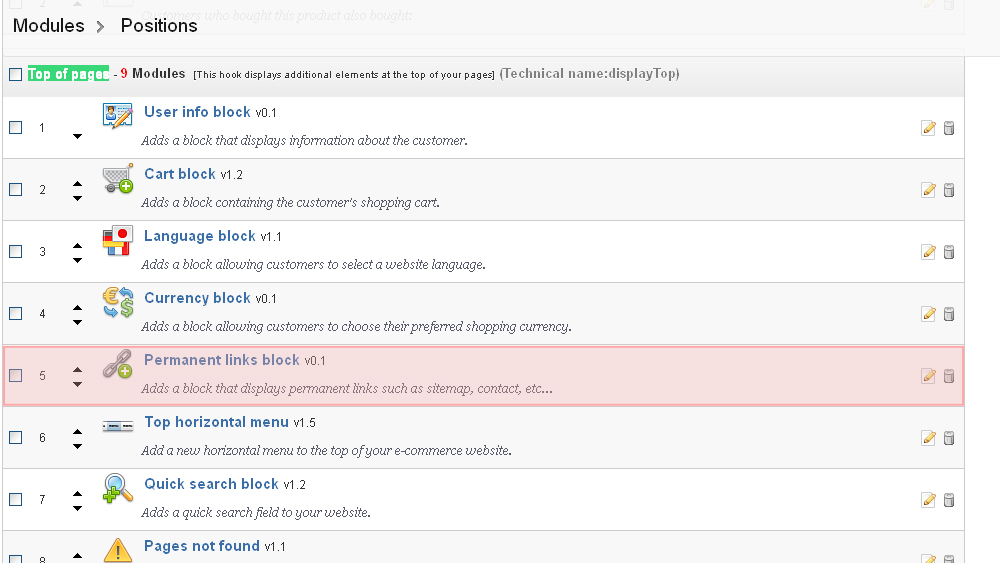
Here you should search for ‘Top of pages’ position and check which module is used to display header links.
That would be Permanent links block in our case.
Connect via FTP to your domain and navigate to themes\themeXXX\modules\blockpermanentlinks folder, where themeXXX is the theme you have installed. Here you should edit blockpermanentlinks-header.tpl file using any code editor.
The following lines of code display header links:
<ul id="header_links">
<li><a href="{$link->getPageLink('index.php')}" class="header_links_home">{l s='home' mod='blockpermanentlinks'}</a></li>
<li id="header_link_contact"><a href="{$link->getPageLink('contact', true)}" title="{l s='contact' mod='blockpermanentlinks'}">{l s='contact' mod='blockpermanentlinks'}</a></li>
<li id="header_link_sitemap"><a href="{$link->getPageLink('sitemap')}" title="{l s='sitemap' mod='blockpermanentlinks'}">{l s='sitemap' mod='blockpermanentlinks'}</a></li>
<li id="header_link_bookmark">
<script type="text/javascript">writeBookmarkLink('{$come_from}', '{$meta_title|addslashes|addslashes}', '{l s='bookmark' mod='blockpermanentlinks' js=1}');</script>
</li>
</ul>
Each line of code represents one menu element. E.g. This line is displaying Sitemap menu element:
<li id="header_link_sitemap"><a href="{$link->getPageLink('sitemap')}" title="{l s='sitemap' mod='blockpermanentlinks'}">{l s='sitemap' mod='blockpermanentlinks'}</a></li>
You should remove line of code in case you would like to delete some menu element, or you should add a new line of code if you would like to add a new link to menu.
Foe example, we will add a link to Specials page to header links section. URL to Specials page is http://domain.com/index.php?controller=prices-drop.
You should edit themes\themeXXX\modules\blockpermanentlinks\blockpermanentlinks-header.tpl file using any code editor.
Search for the following code:
<ul id="header_links">
<li><a href="{$link->getPageLink('index.php')}" class="header_links_home">{l s='home' mod='blockpermanentlinks'}</a></li>
<li id="header_link_contact"><a href="{$link->getPageLink('contact', true)}" title="{l s='contact' mod='blockpermanentlinks'}">{l s='contact' mod='blockpermanentlinks'}</a></li>
<li id="header_link_sitemap"><a href="{$link->getPageLink('sitemap')}" title="{l s='sitemap' mod='blockpermanentlinks'}">{l s='sitemap' mod='blockpermanentlinks'}</a></li>
<li id="header_link_bookmark">
<script type="text/javascript">writeBookmarkLink('{$come_from}', '{$meta_title|addslashes|addslashes}', '{l s='bookmark' mod='blockpermanentlinks' js=1}');</script>
</li>
</ul>
Add a new line of code
<li id="header_link_specials"><a href="{$link->getPageLink('prices-drop')}" title="{l s='Specials' mod='blockpermanentlinks'}">{l s='Specials' mod='blockpermanentlinks'}</a></li>
right below:
<li id="header_link_contact"><a href="{$link->getPageLink('contact', true)}" title="{l s='contact' mod='blockpermanentlinks'}">{l s='contact' mod='blockpermanentlinks'}</a></li>
Let me explain the meaning of the code:
href="{$link->getPageLink('prices-drop')}"
we should insert a part of URL to the page. The part which goes right after controller=. That would be prices-drop in our case.
title="{l s='Specials'
is the name of the button which is displayed on your site.
Now we will check which modules are used to display links in footer of the site.
Navigate to Modules -> Positions in PrestaShop admin panel and search for Footer position.
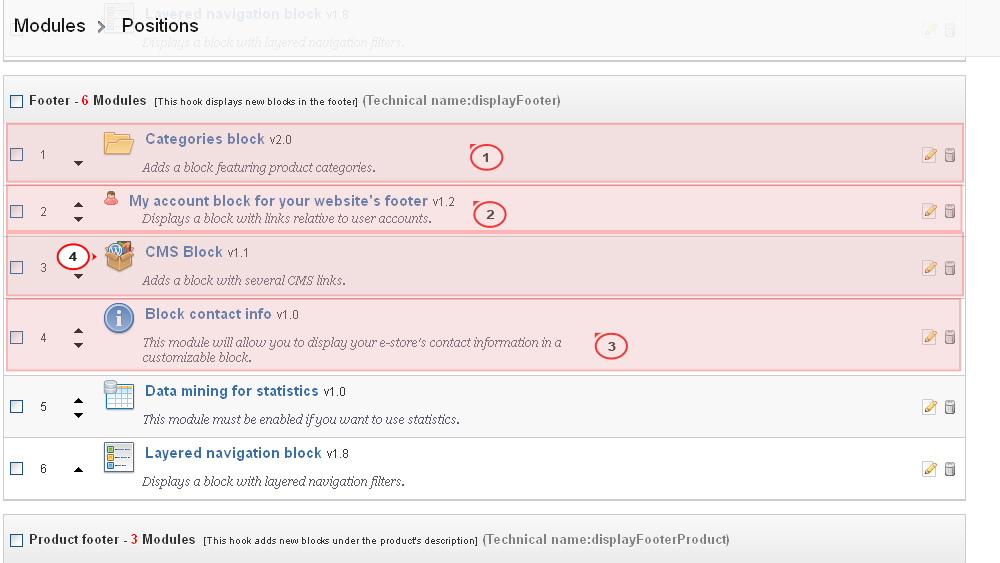
These modules are used to display content for footer links section:
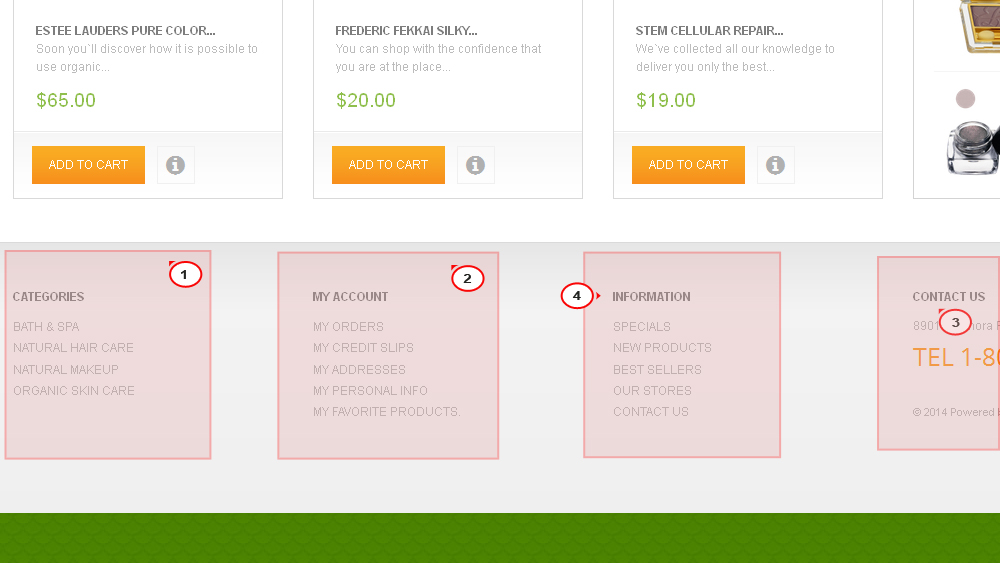
CMS Block is displaying CMS pages. You can navigate to Modules -> Modules section, search for CMS block, Configure it and select which pages to display on the page.
Our Stores link shows up in CMS block if Display in the footer option is enabled under Preferences -> Store Contacts section

Categories column displays all the categories activated in Admin > Catalog > Categories.
My account block for your website’s footer is displaying My account section. You can enable or disable that block under Modules -> Modules in your PrestaShop admin panel.
My account links can be modified in /themes/themeXXX/modules/blockmyaccount/blockmyaccount.tpl file, where themeXXX is your theme folder name.
The following code is displaying Information section:
<ul class="list-footer toggle_content clearfix">
{if !$PS_CATALOG_MODE}<li class="first_item"><a href="{$link->getPageLink('prices-drop')}" title="{l s='Specials' mod='blockcms'}"><i class="icon-circle-arrow-right"></i>{l s='Specials' mod='blockcms'}</a></li>{/if}
<li class="{if $PS_CATALOG_MODE}first_{/if}item"><a href="{$link->getPageLink('new-products')}" title="{l s='New products' mod='blockcms'}">{l s='New products' mod='blockcms'}</a></li>
{if !$PS_CATALOG_MODE}<li class="item"><a href="{$link->getPageLink('best-sales')}" title="{l s='Top sellers' mod='blockcms'}"><i class="icon-circle-arrow-right"></i>{l s='Top sellers' mod='blockcms'}</a></li>{/if}
{if $display_stores_footer}<li class="item"><a href="{$link->getPageLink('stores')}" title="{l s='Our stores' mod='blockcms'}">{l s='Our stores' mod='blockcms'}</a></li>{/if}
<li class="item"><a href="{$link->getPageLink($contact_url, true)}" title="{l s='Contact us' mod='blockcms'}"><i class="icon-circle-arrow-right"></i>{l s='Contact us' mod='blockcms'}</a></li>
{foreach from=$cmslinks item=cmslink}
{if $cmslink.meta_title != ''}
<li class="item"><a href="{$cmslink.link|addslashes}" title="{$cmslink.meta_title|escape:'htmlall':'UTF-8'}"><i class="icon-circle-arrow-right"></i>{$cmslink.meta_title|escape:'htmlall':'UTF-8'}</a></li>
{/if}
{/foreach}
{*
<li><a href="{$link->getPageLink('sitemap')}" title="{l s='sitemap' mod='blockcms'}"><i class="icon-circle-arrow-right"></i>{l s='Sitemap' mod='blockcms'}</a></li>
*}
</ul>
Each line of code represents one menu element. The syntax is the same as in themes\themeXXX\modules\blockpermanentlinks\blockpermanentlinks-header.tpl file.
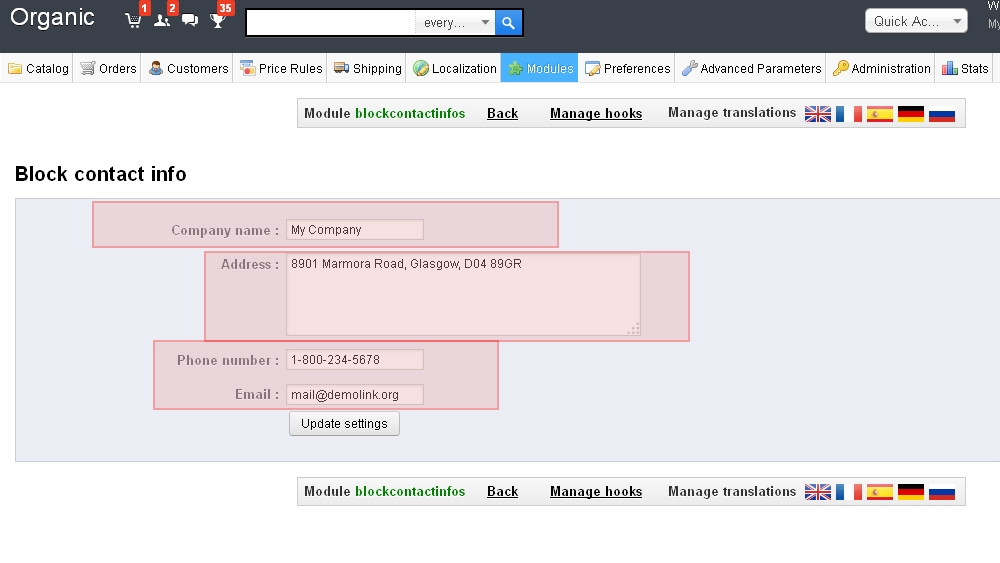
Block contact info is displaying Contact us section. Navigate to Modules -> Modules in your PrestaShop admin panel and search for Block contact info in the list of blocks.
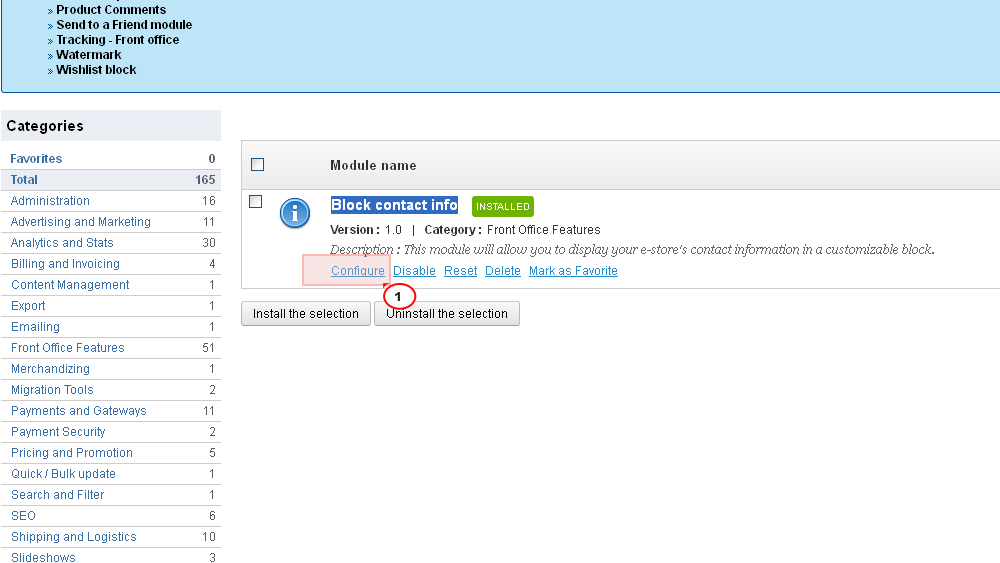
Click Configure button to edit block.
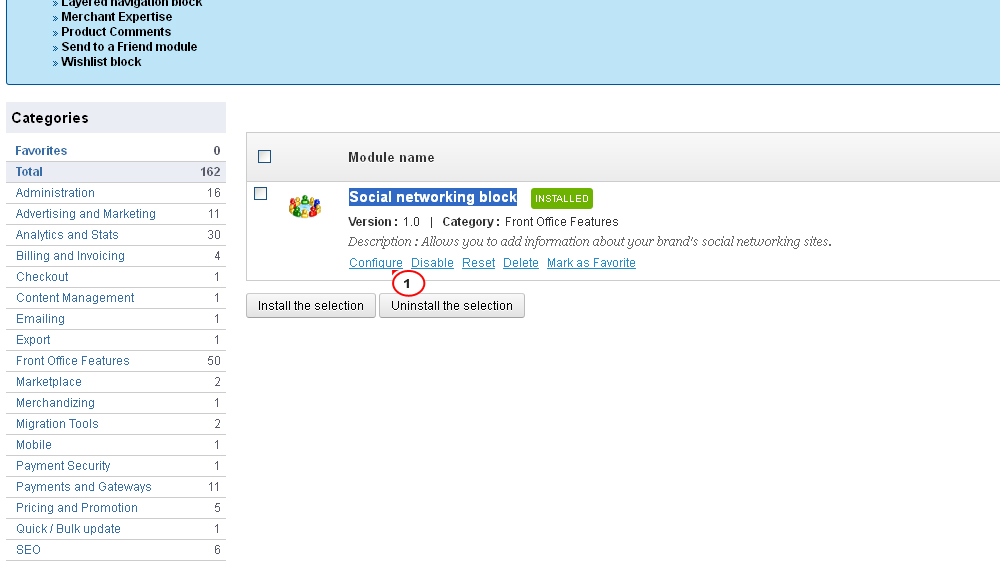
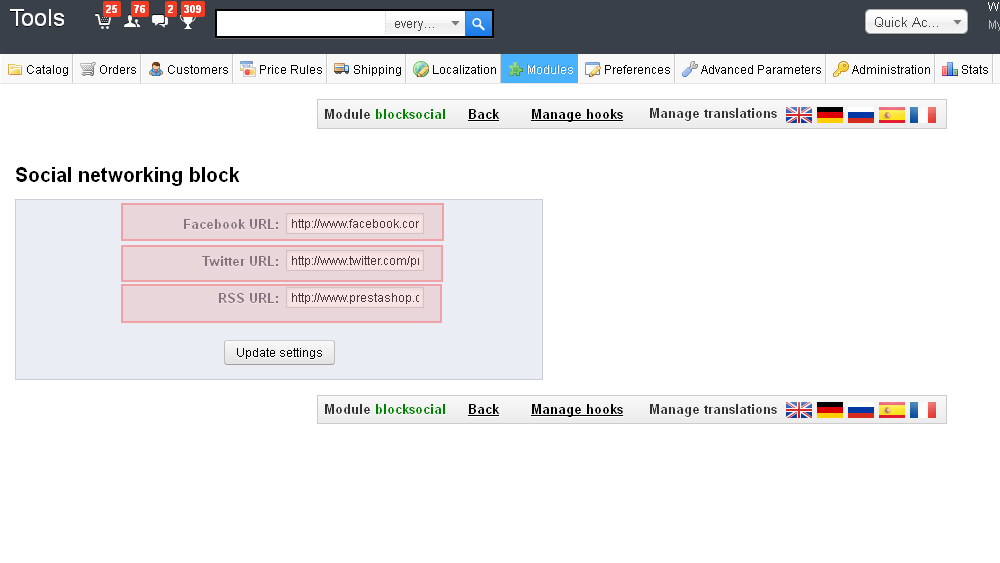
Social networking block is displaying Follow us section. Navigate to Modules -> Modules in your PrestaShop admin panel and search for Social networking block in the list of blocks. Click Configure link to edit it.
Here you can update links for each social icon.
Feel free to check the detailed video tutorial below:
