Magento Ketty v2.0 theme
Ketty theme configuration
In this section we are going to show you how to customize the appearance of your store up to your needs. Here you can see main features included to the unique theme and the instructions to configure them.
Home (Main) Page Configuration
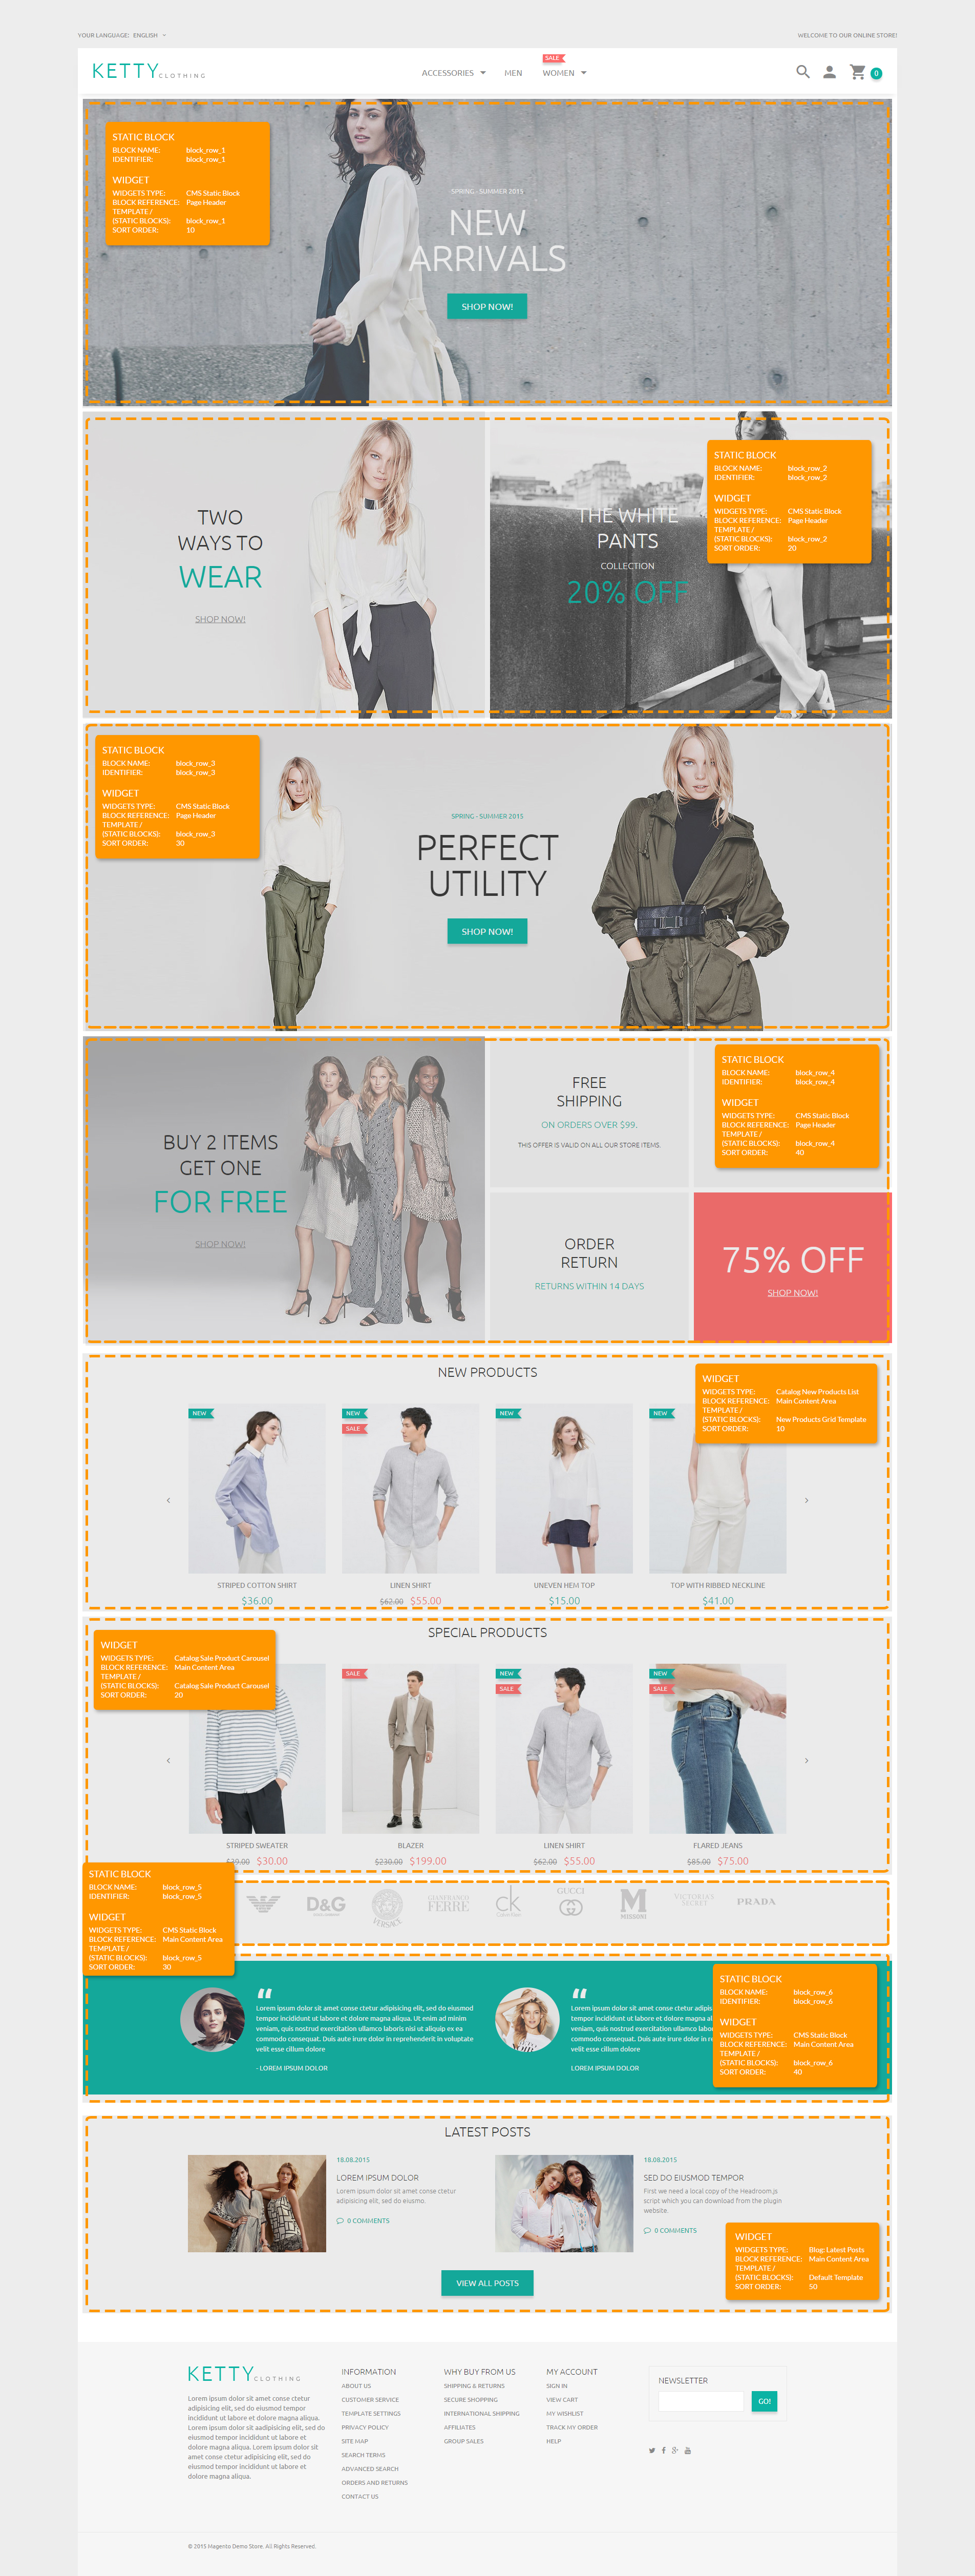
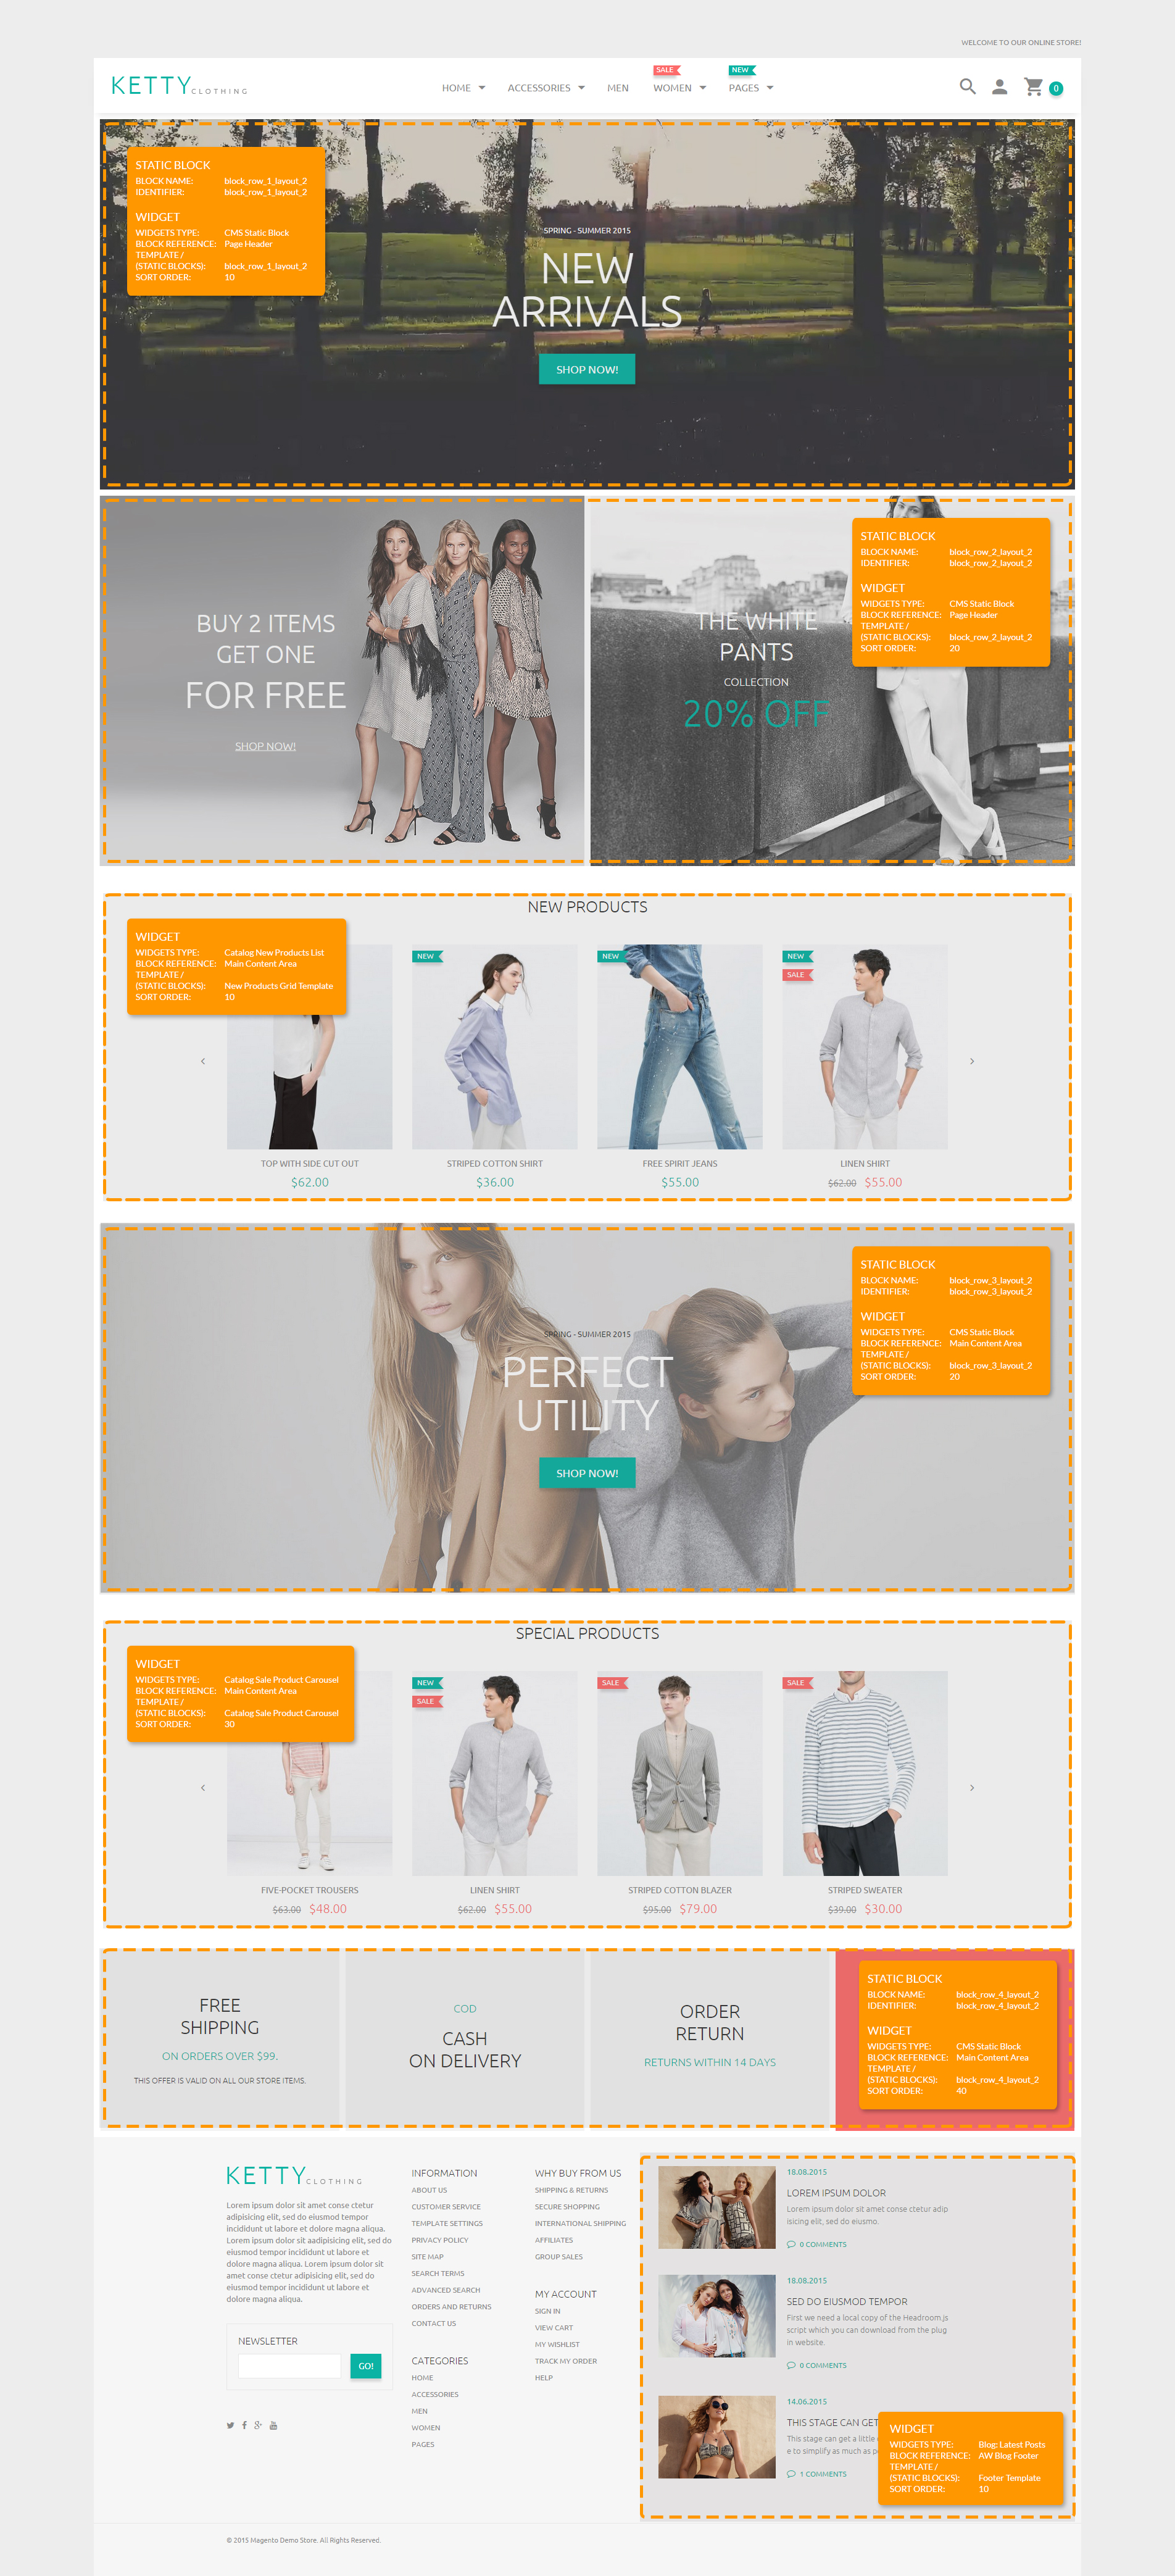
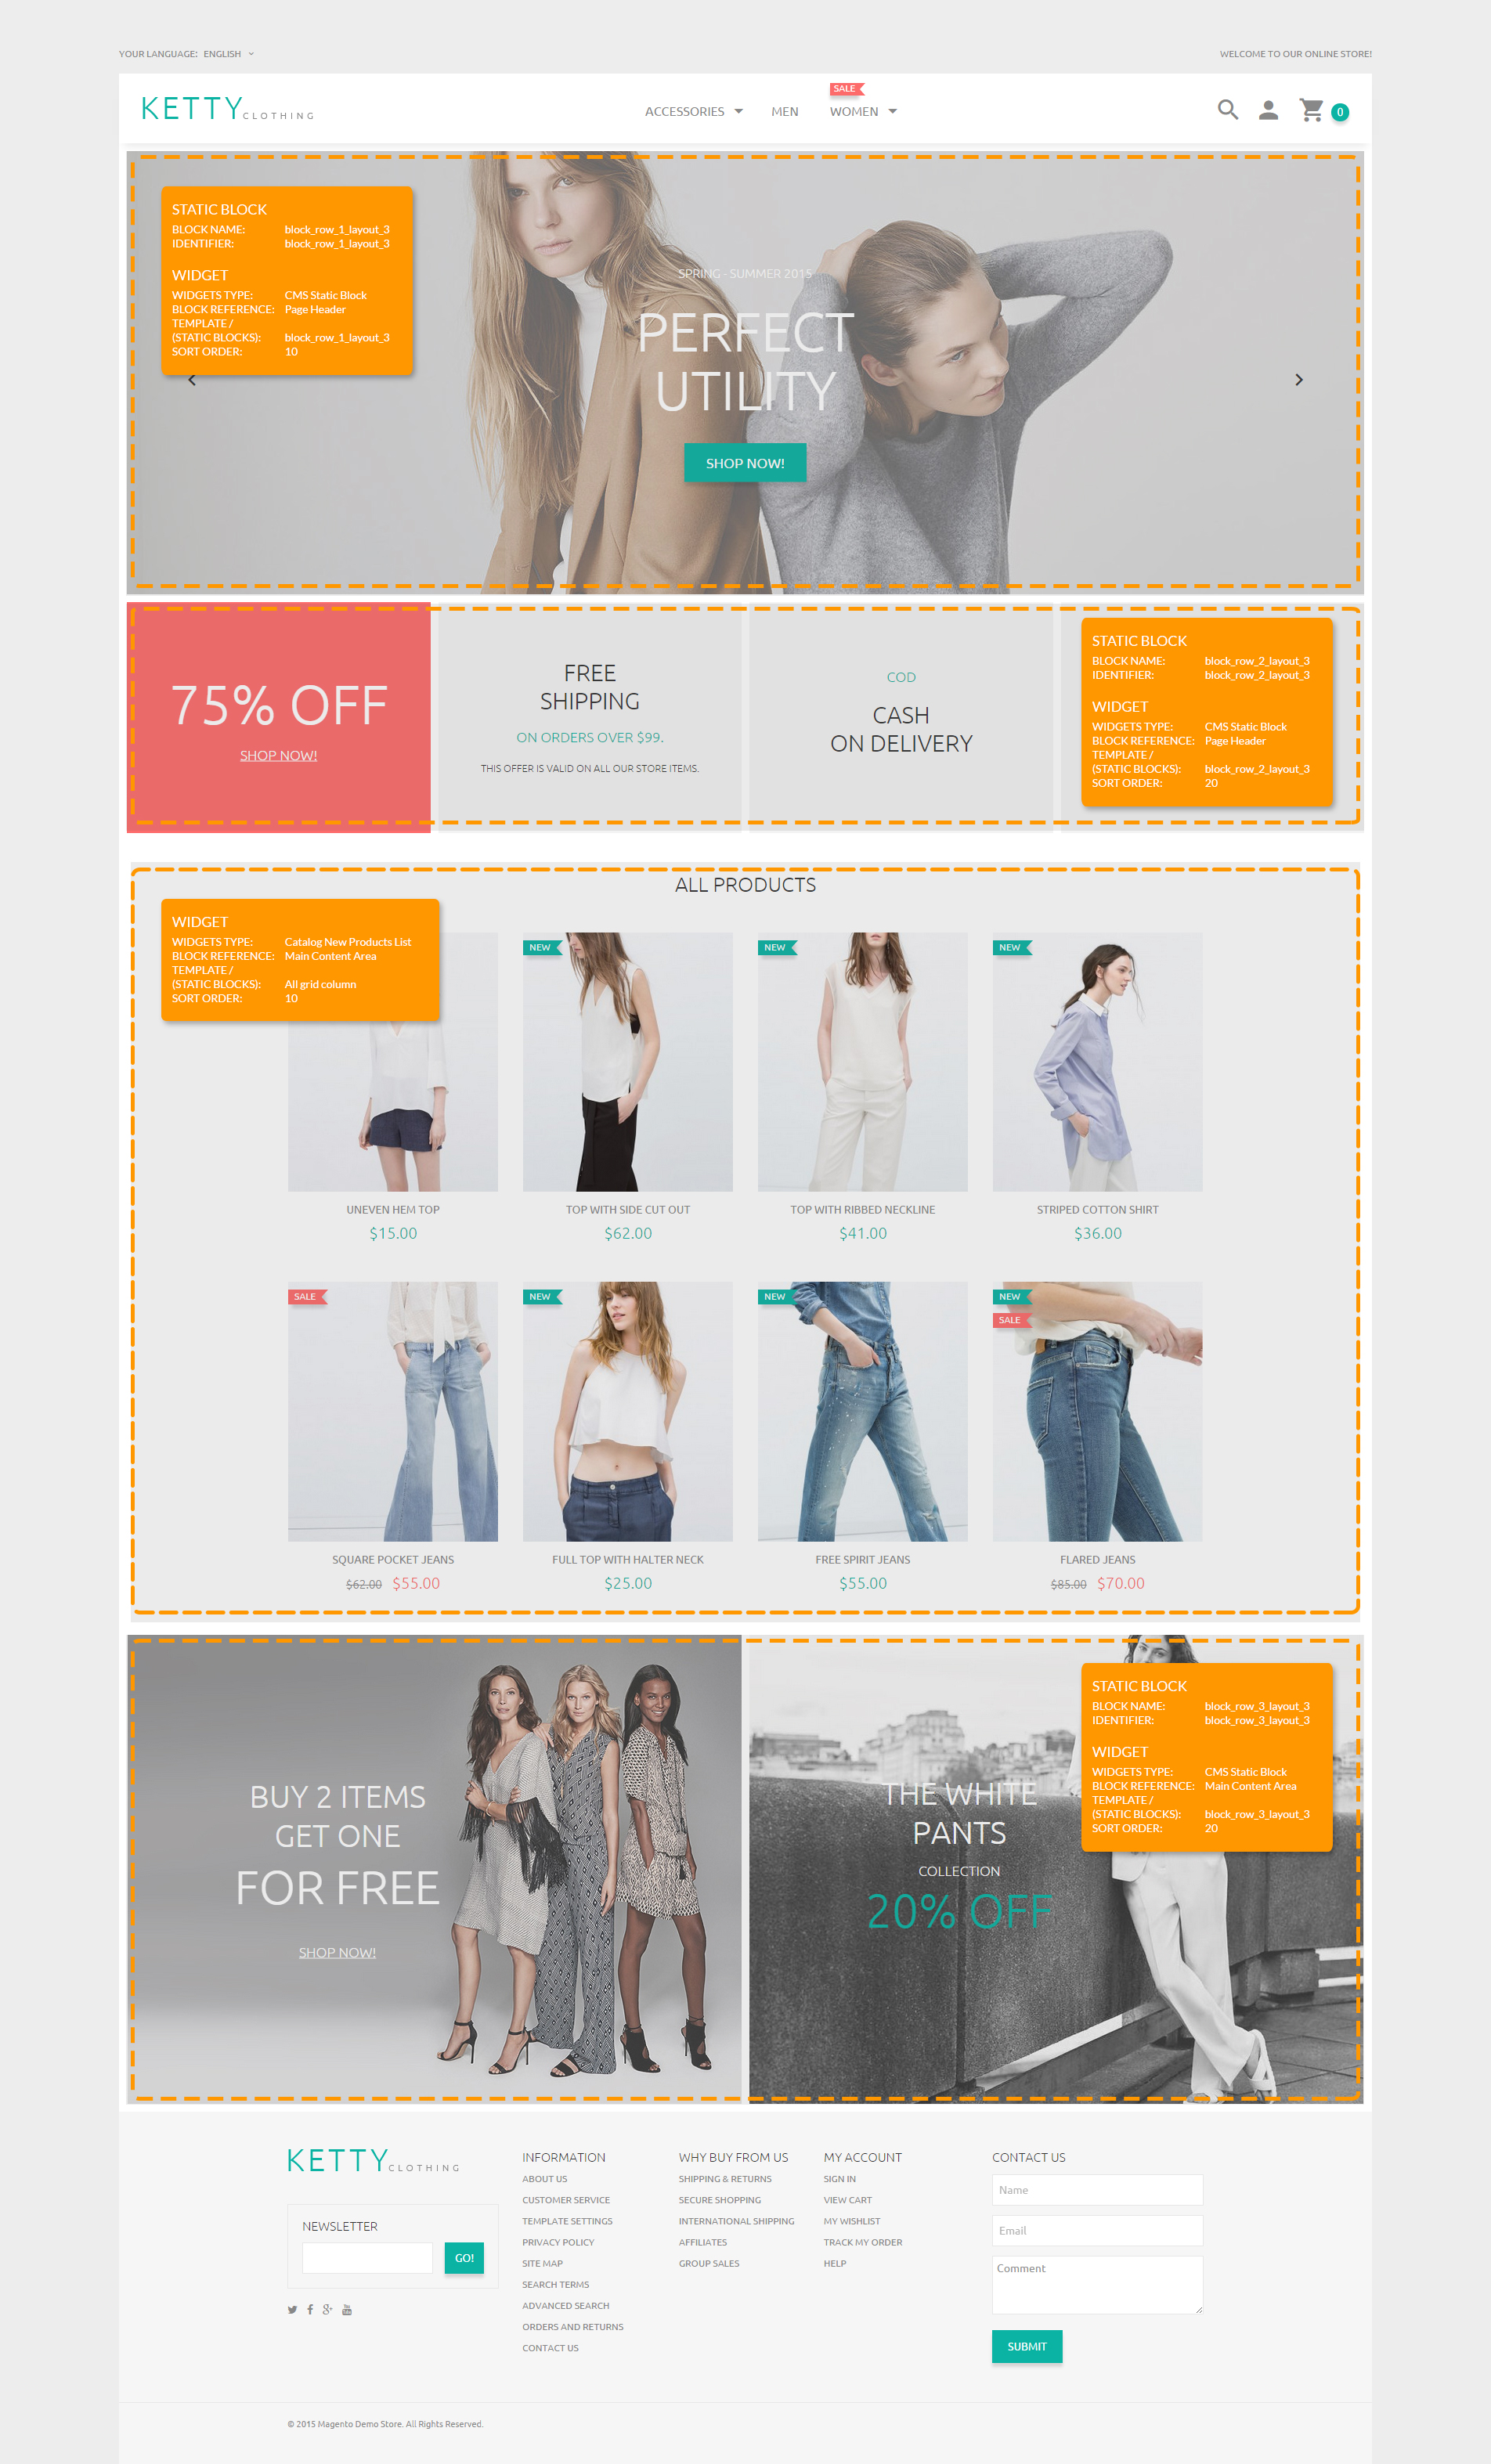
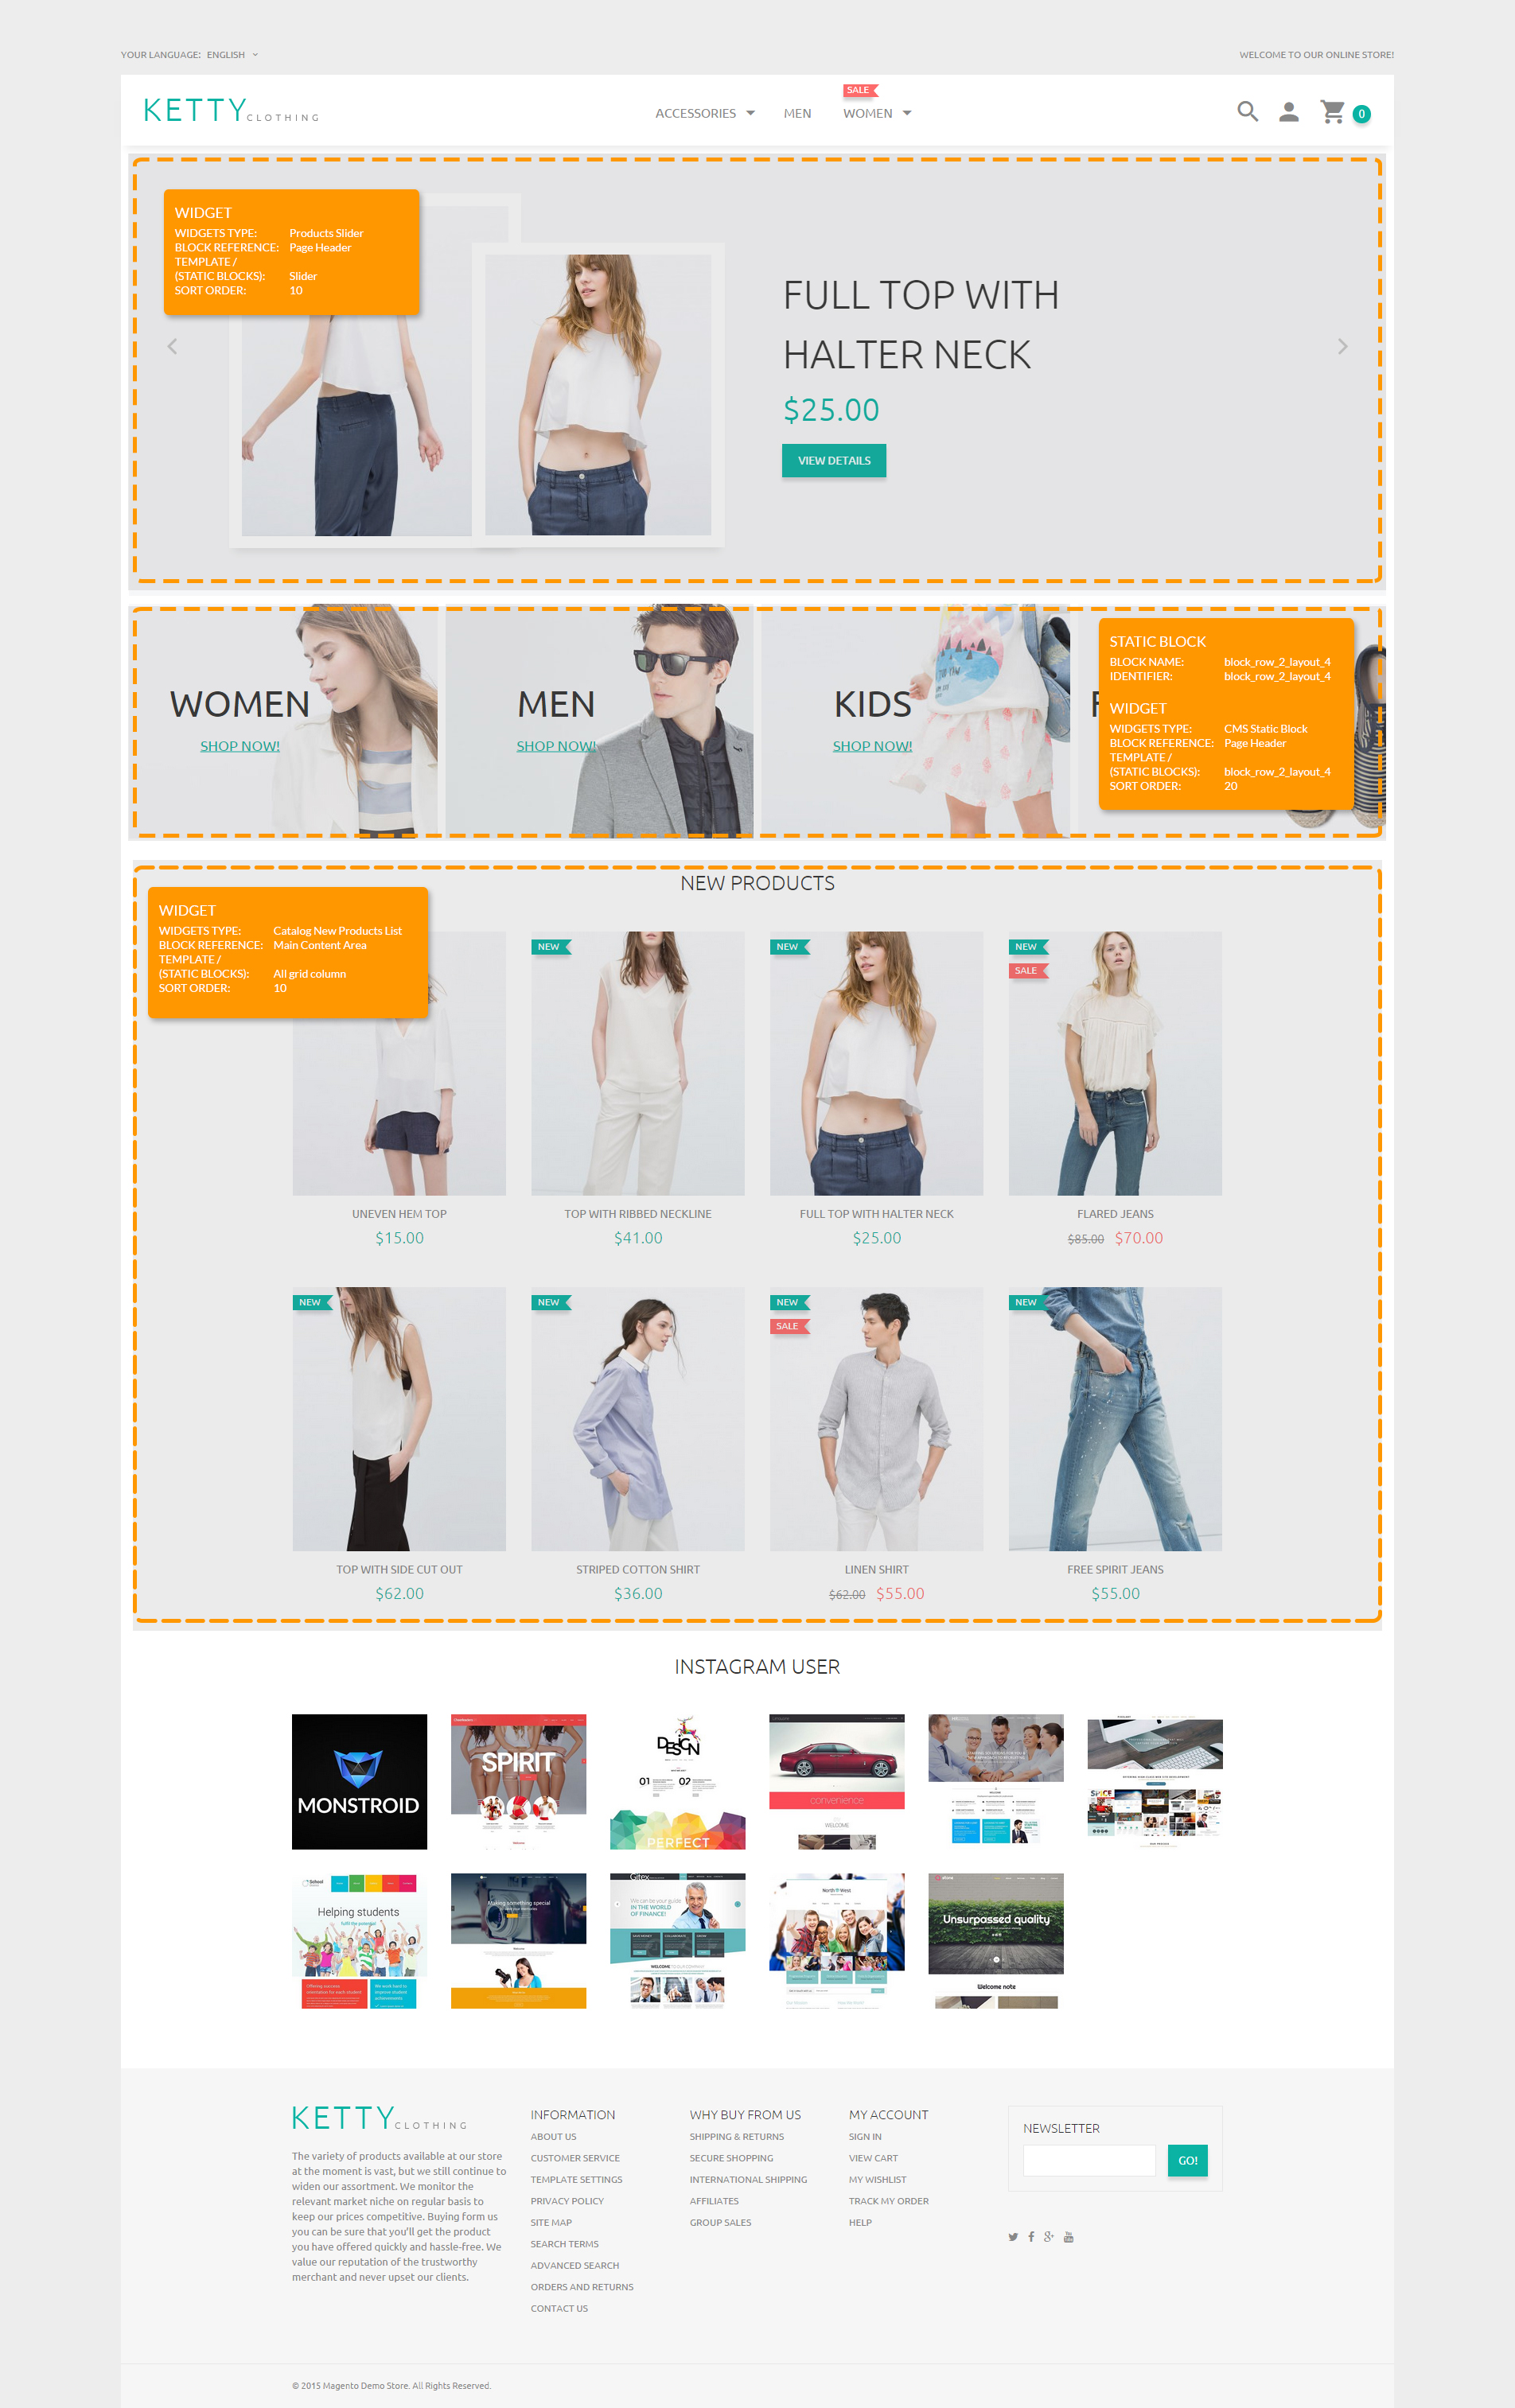
You can select one of the 4 available page layouts.
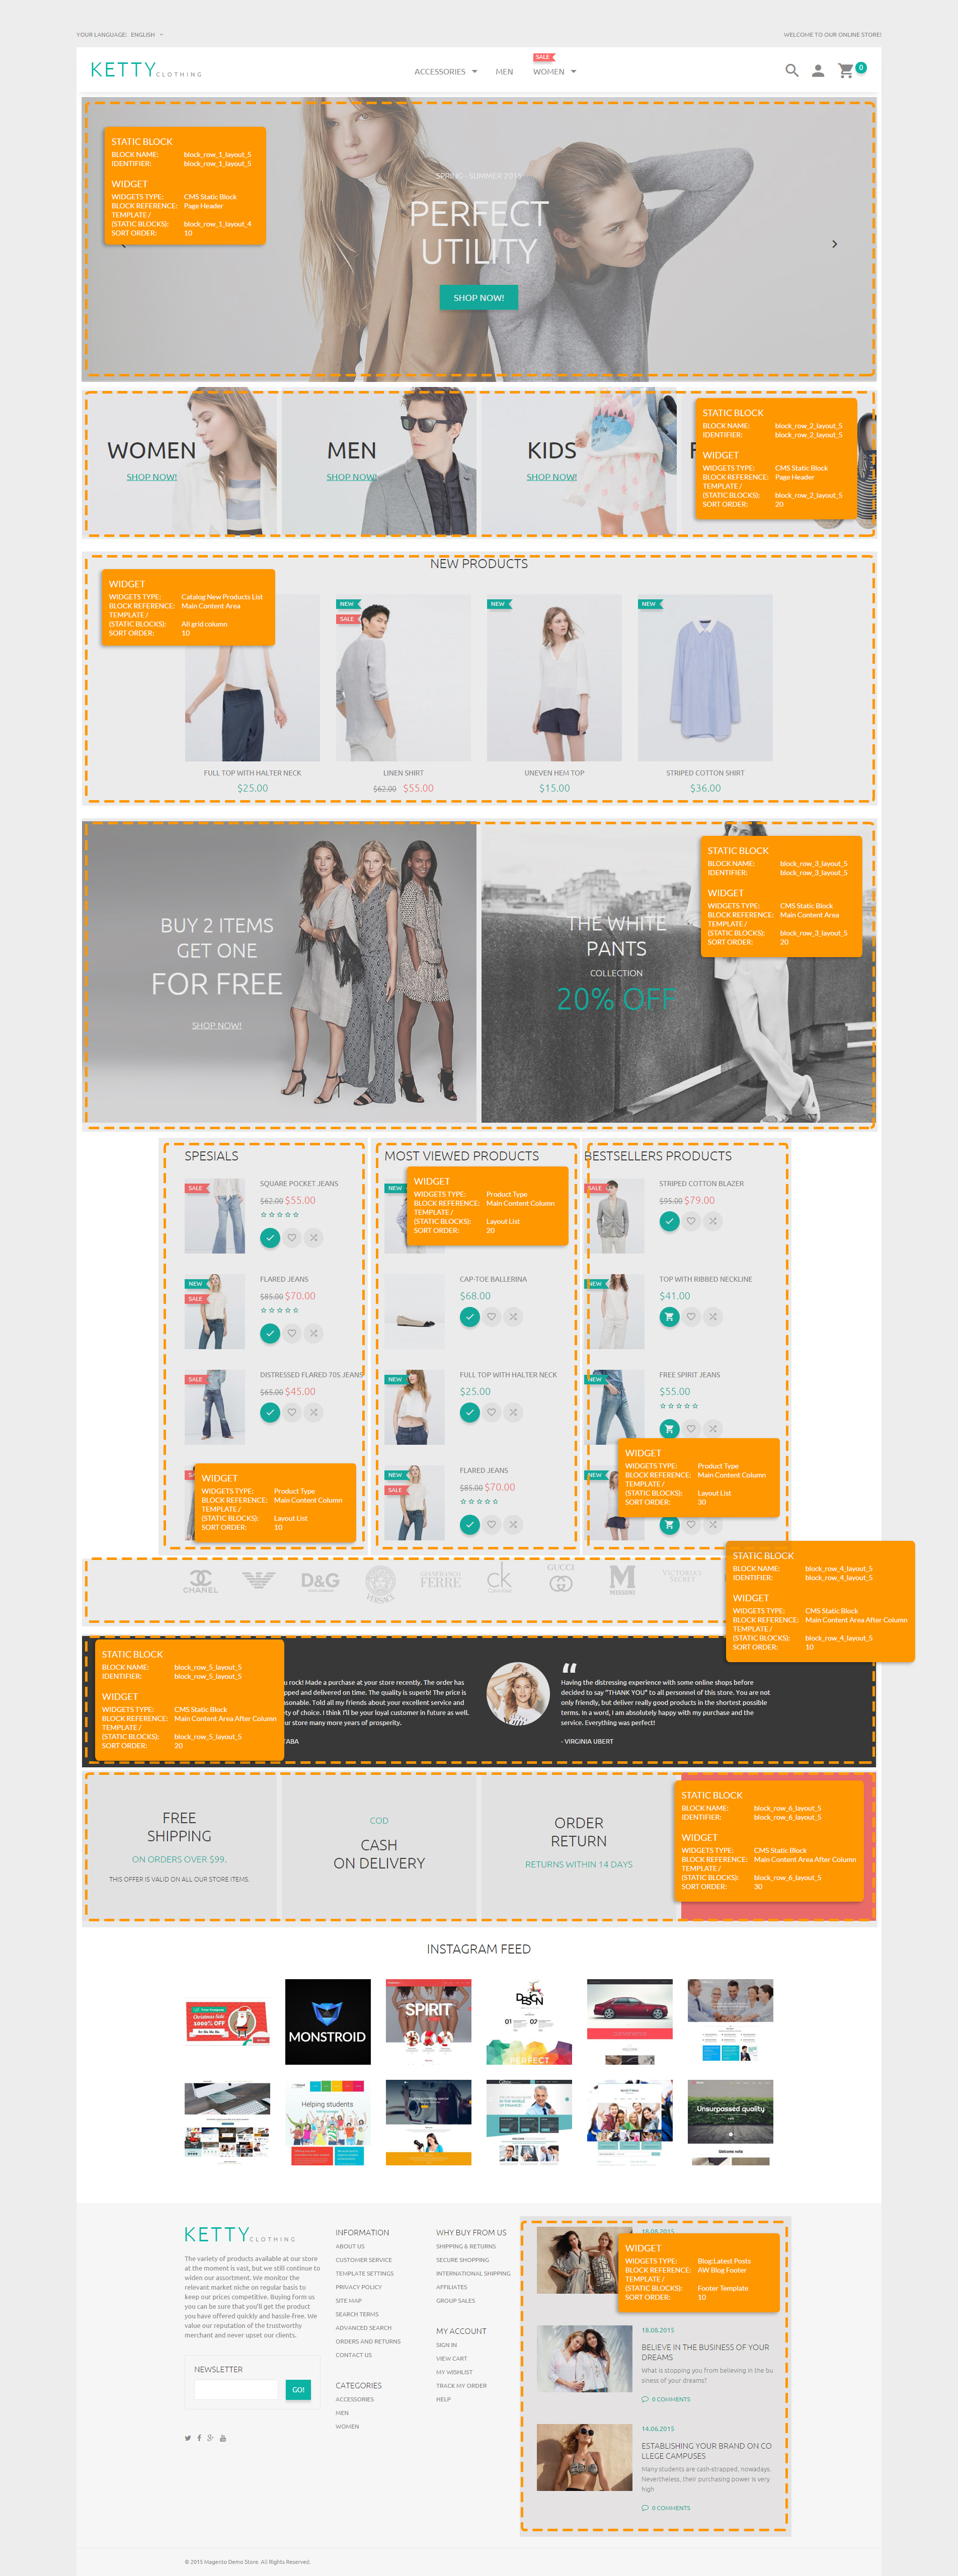
In order to configure the main page layout you need to add static blocks from the sources/demo/static_blocks folder and apply them using widgets.To find out how to add static blocks and apply them using widgets, check the following section Magento theme installation -> Static blocks configuration. Template settings table and images below will also help you with this.
Layout 1
Layout 2
Layout 3
Layout 4
Layout 5
Logo configuration
This theme includes functionality for logo uploading via admin panel.
In order to change logo you should navigate to TM Store settings -> Settings menu. At Custom logo section you will be able to enable module and upload your logo as JPG, GIF, PNG image file. You can also specify alternative text for logo.
The module allows adding text logo.
In Logo Type field select the corresponding option. In the Logo Text field enter a text for the logo.Product slider configuration
Product slider widget is based on Owl carousel.
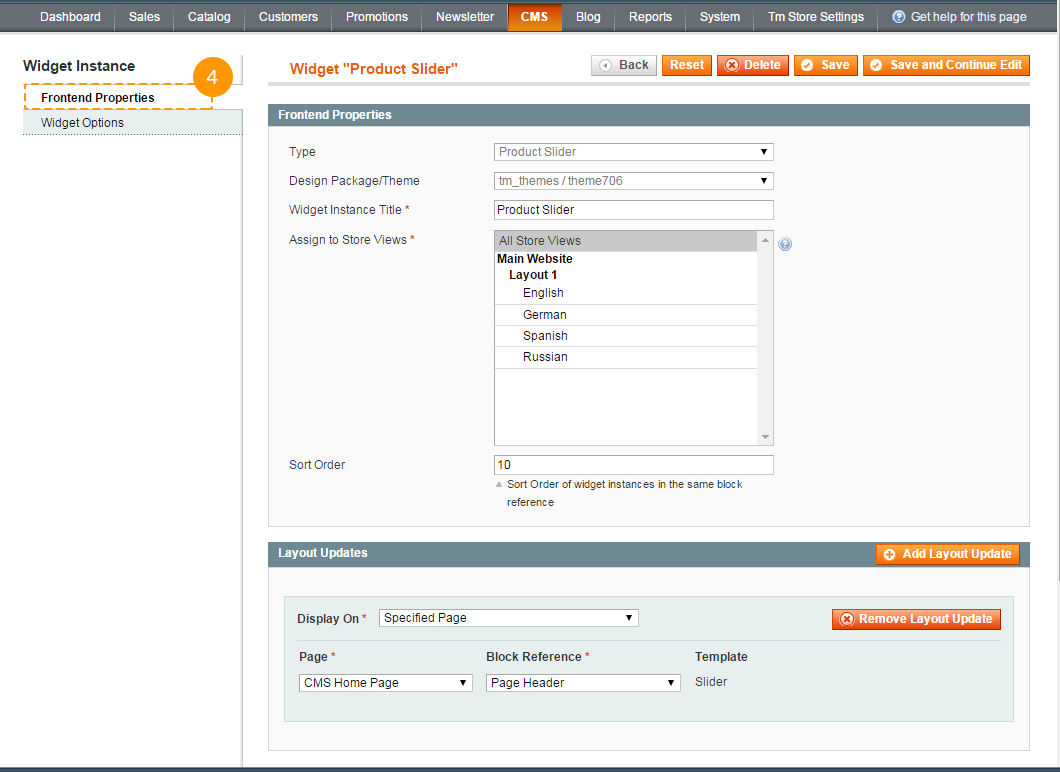
In order to add this widget you should navigate to CMS -> Widgets menu.
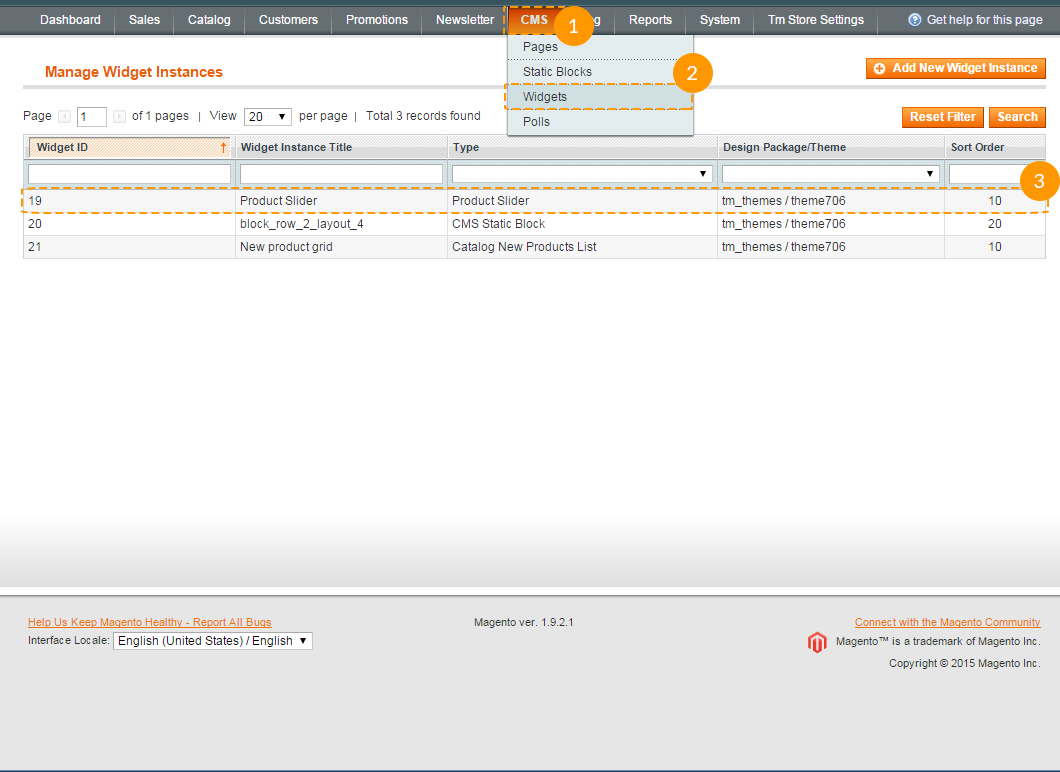
Press Add New Widget Instance button and in the Type field select Product Slider value. At Design Package field specify a theme to apply this slider for.
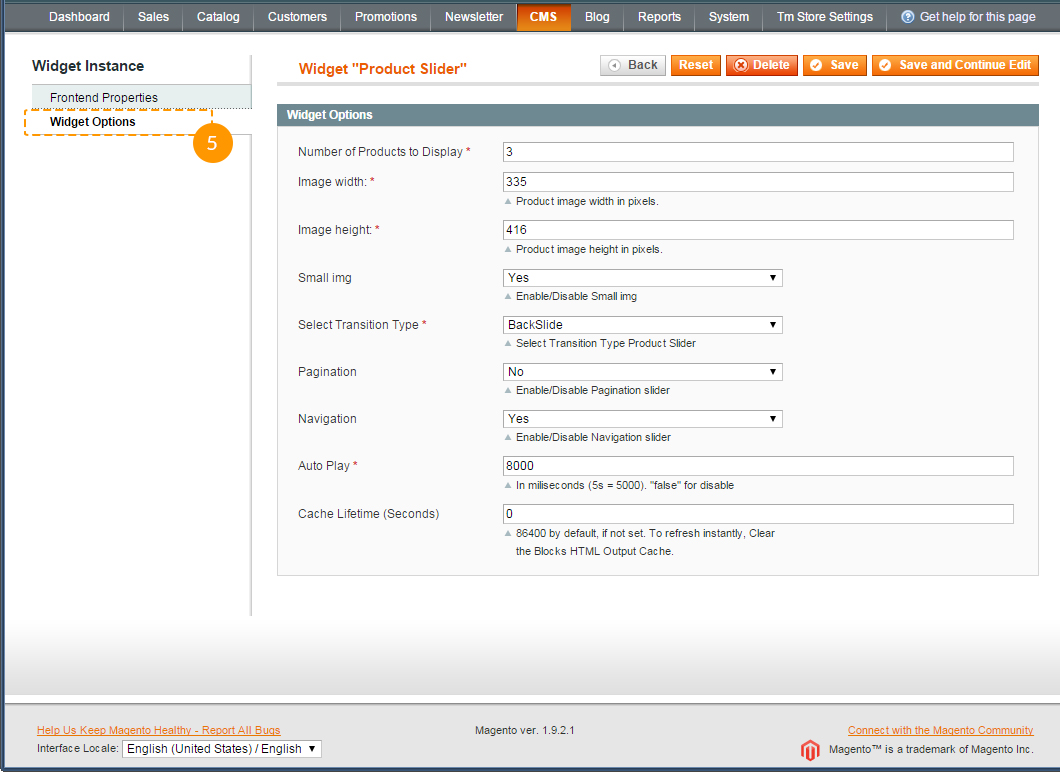
Widget settings are located at Widget Options tab. They allow you to set number of products to display, images size, sliding effect, autoslide speed, pagination and navigation control display.
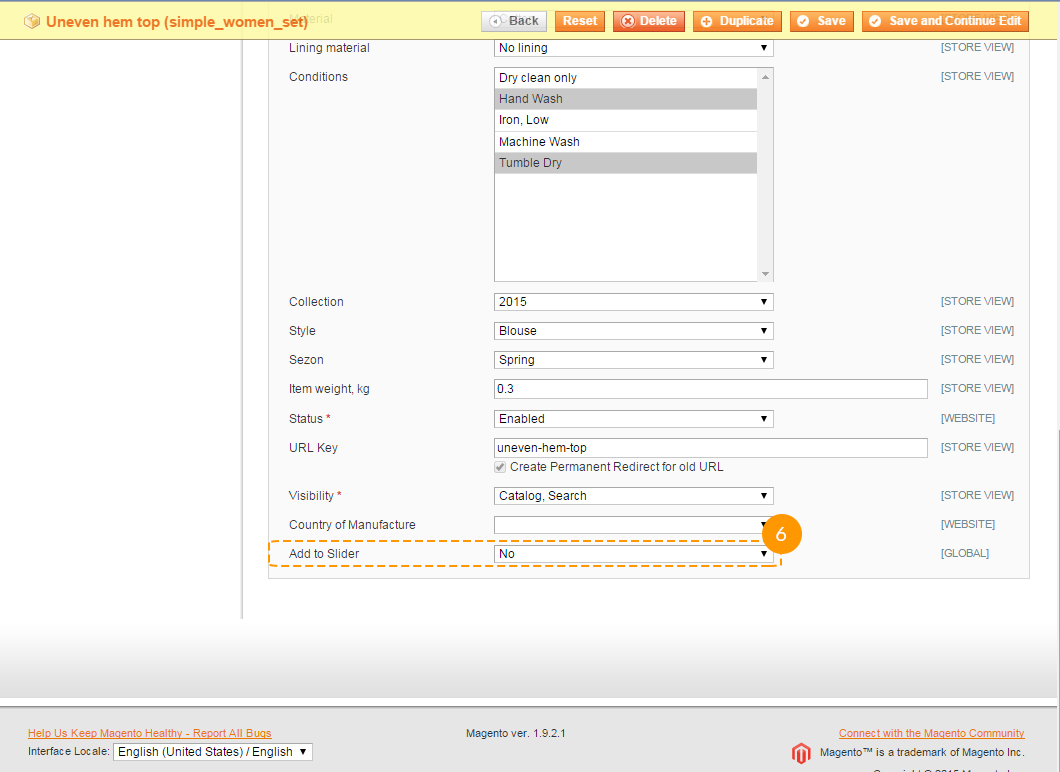
Now we need to specify, what products to show in slider. In order to do this you should open any product (Catalog -> Manage Products) and at General tab select a value at Add to Slider field, located at very bottom of the page.
Changing product image on hover.
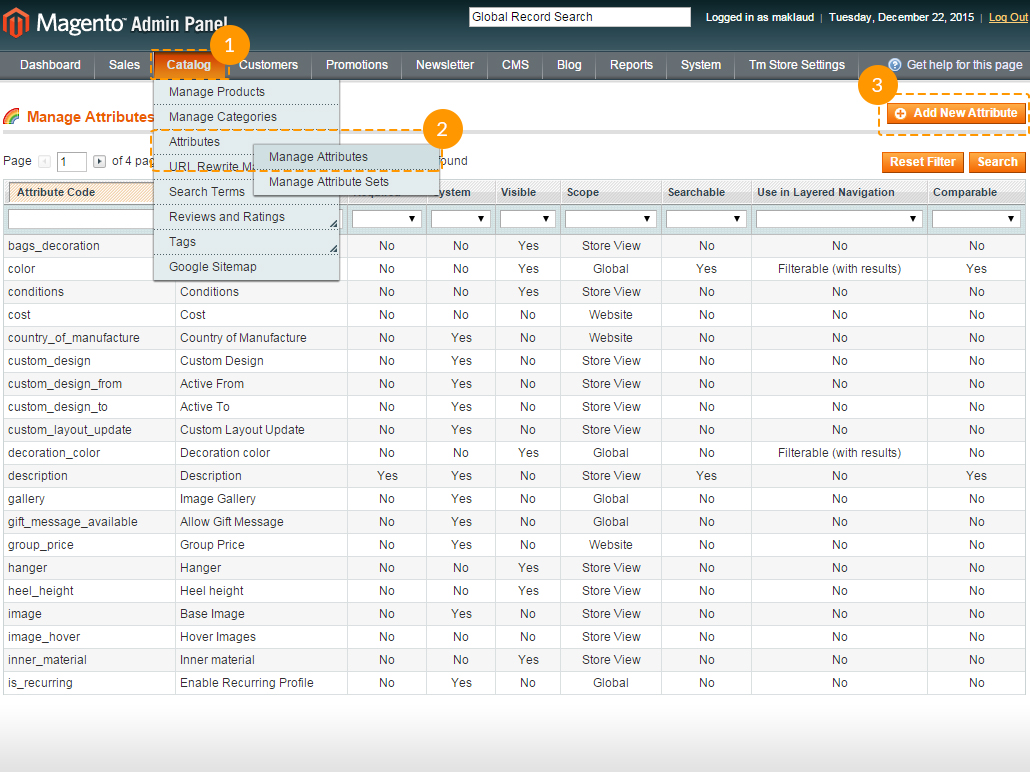
First, you need to add image_hover attribute.
-
Navigate to Catalog -> Attributes -> Manage Attributes and hit Add New Attribute button.
-
In the Attribute Code field enter image_hover value.
Also, in the Catalog Input Type for Store Owner field choose the Media Image option.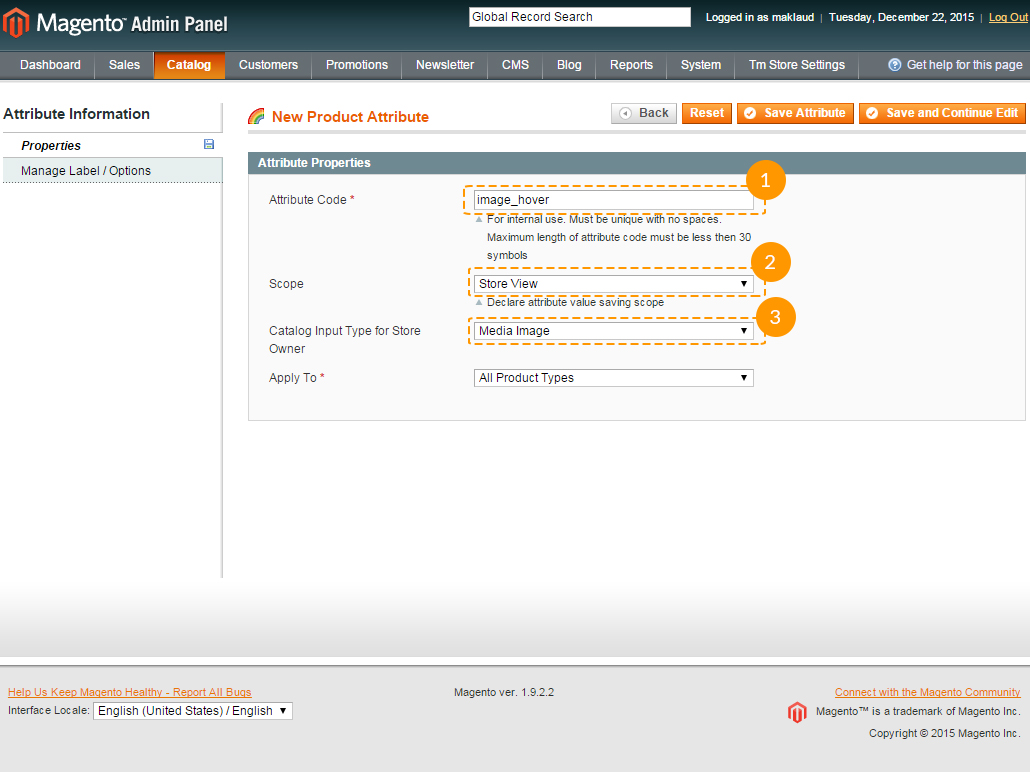
-
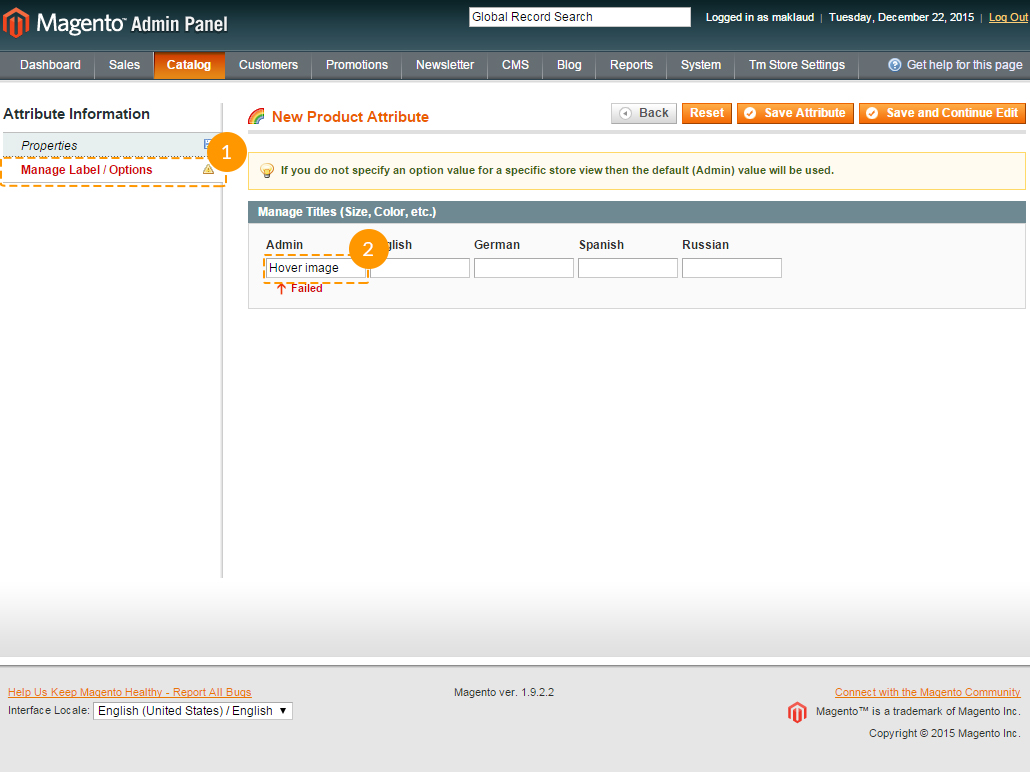
Open the Manage Label / Options tab on the left and enter any value (for example: Hover image) in Admin field.
You can enable the image change on hover for each product individually. In order to do this, you need to open a product and navigate to Images tab. In Hover image column select a picture you want to use.
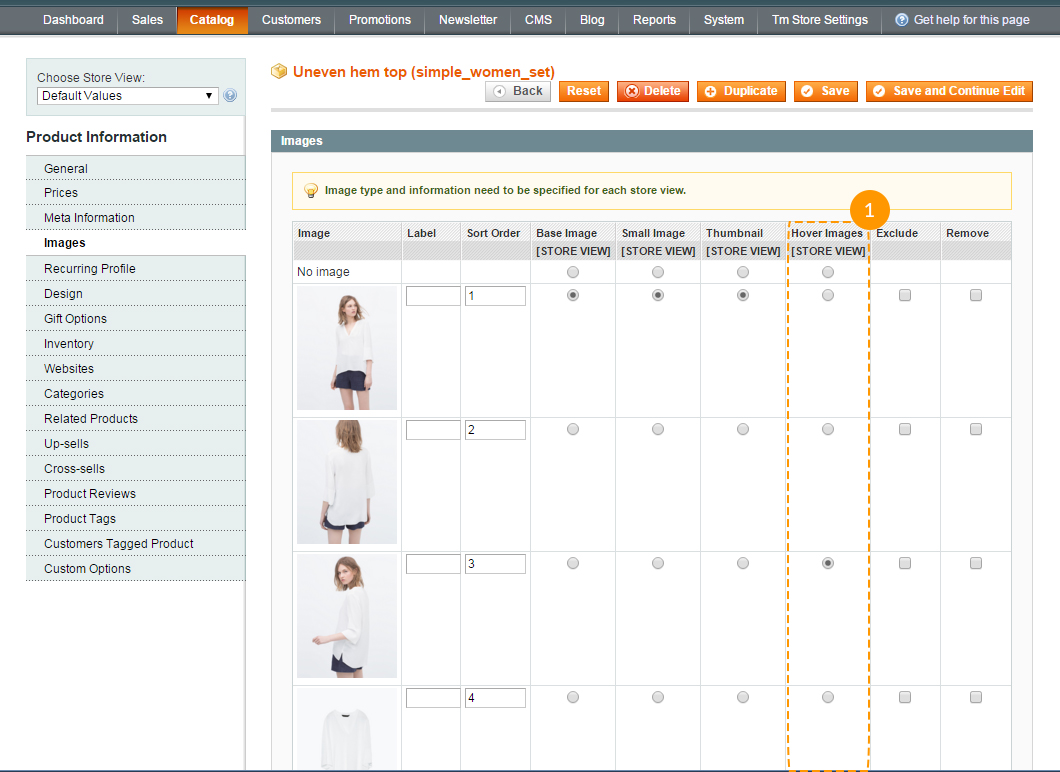
After saving the changes you need to navigate to TM Store settings -> Settings tab. In Grid View and Homepage Grid View sections select the Hover images option in the Type of the product's image preview: field.
Blog configuration
There are 4 blog layouts available. In order to select one of them, follow the instructions below:
-
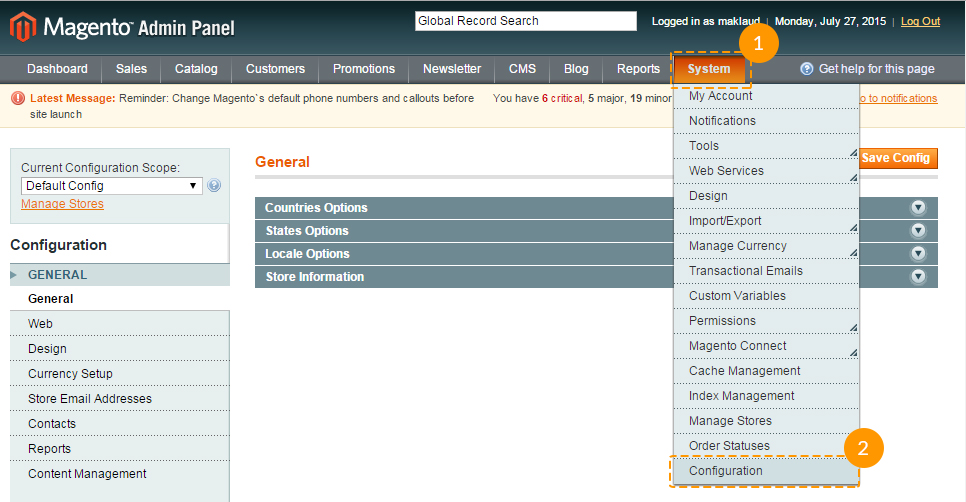
In the top navigation menu go to System > Configuration.
-
Go to the "TM Store Settings" tab. In the "Blog Layout" section select the layout you like.
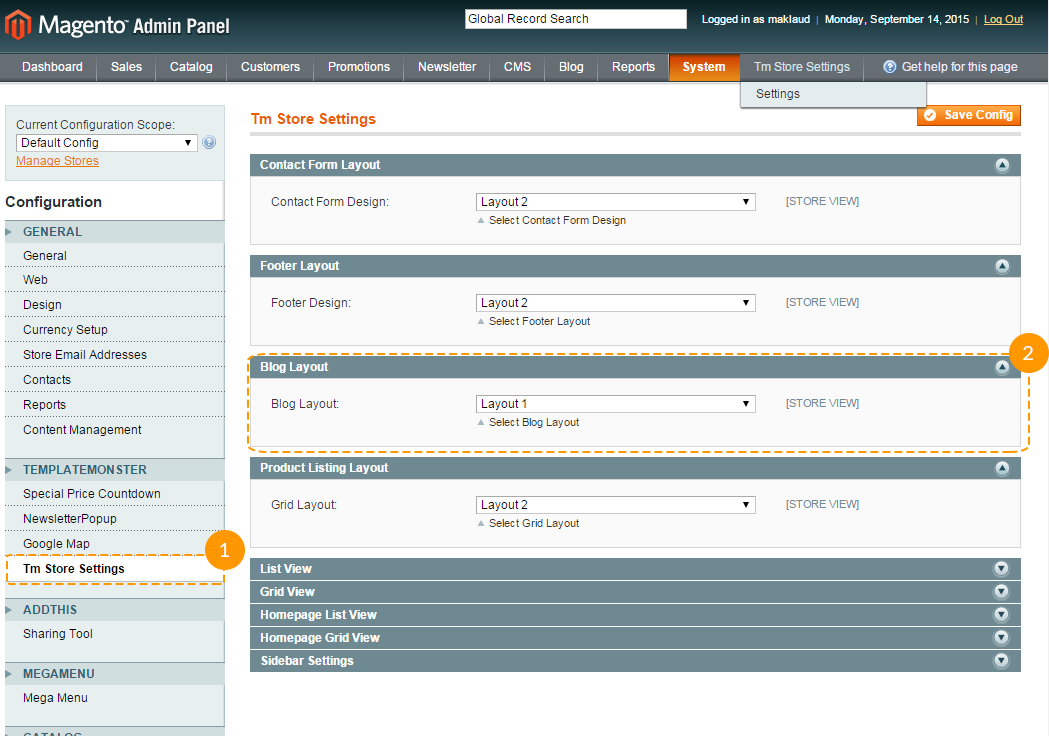
- Click "Save Config".
You can change the layout by turning sidebar off/on in the module settings. Module settings can be found in Extensions settings -> Blog.
Category listing settings
The template includes 4 product listing layouts on the category page.
In order to select the required one:-
In the top navigation menu go to System > Configuration.
-
Go to the "TM Store Settings" tab. In the "Product Listing Layout" section select the layout you like.
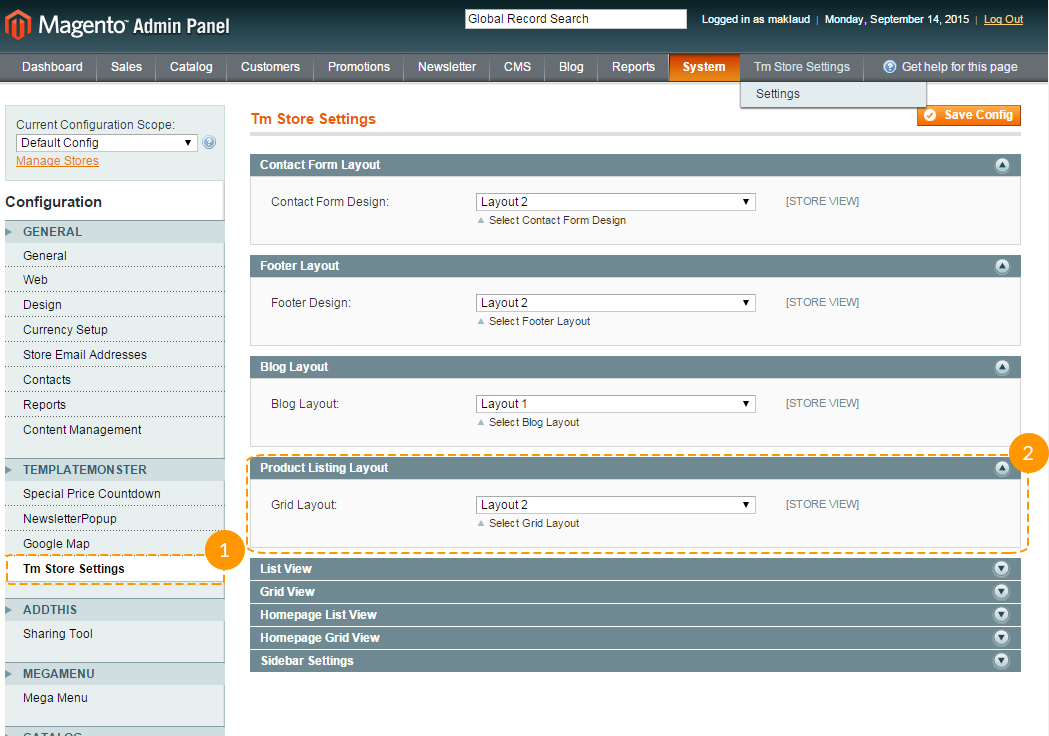
- Click "Save Config".
This option allows to change listing layout only on the product preview in grid view. List view layout has no changes.
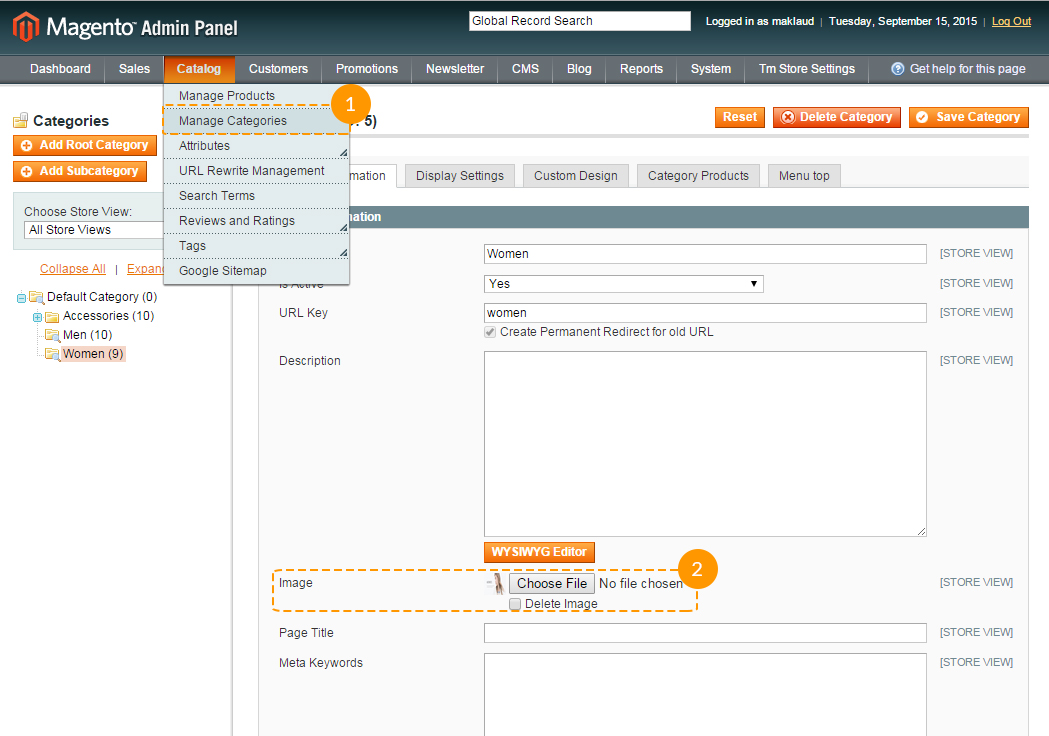
In order to add banner to the category page in the top navigation menu go to Catalog > Manage Categories. Select the required category and in the Image field choose banner image.
About page configuration
You can choose one of the two available design variations for About page. In order to install the page you like, follow the instructions below.
-
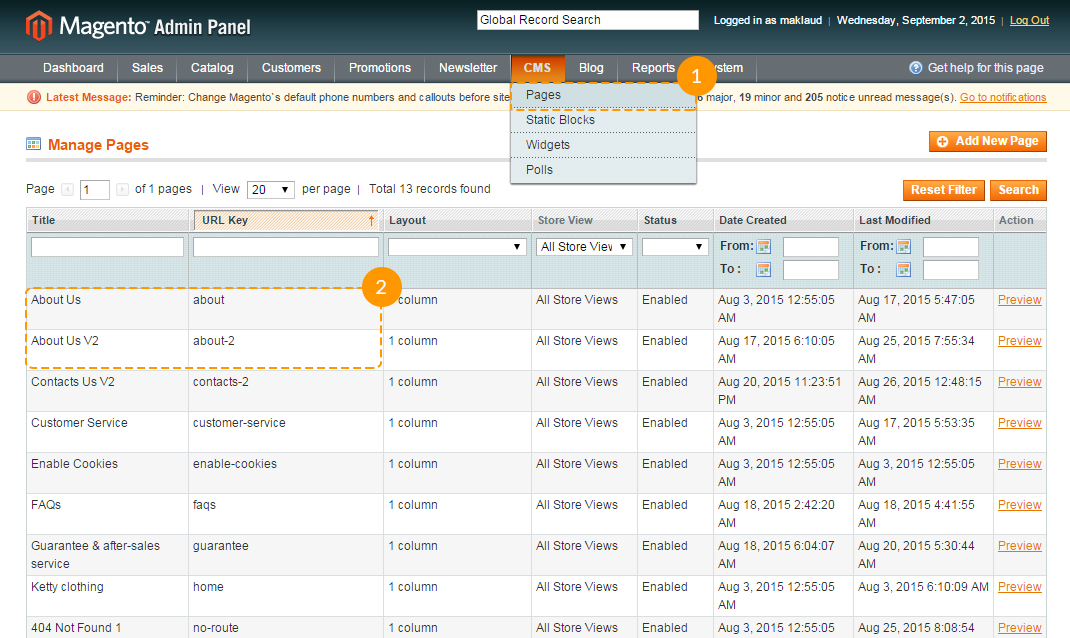
In the top navigation menu go to CMS > Pages. Here you can find all the static pages of the store.
-
In order to change default About us page with the alternative page - About us 2, you need to change URL Key to about in editing mode of the About us 2 page.
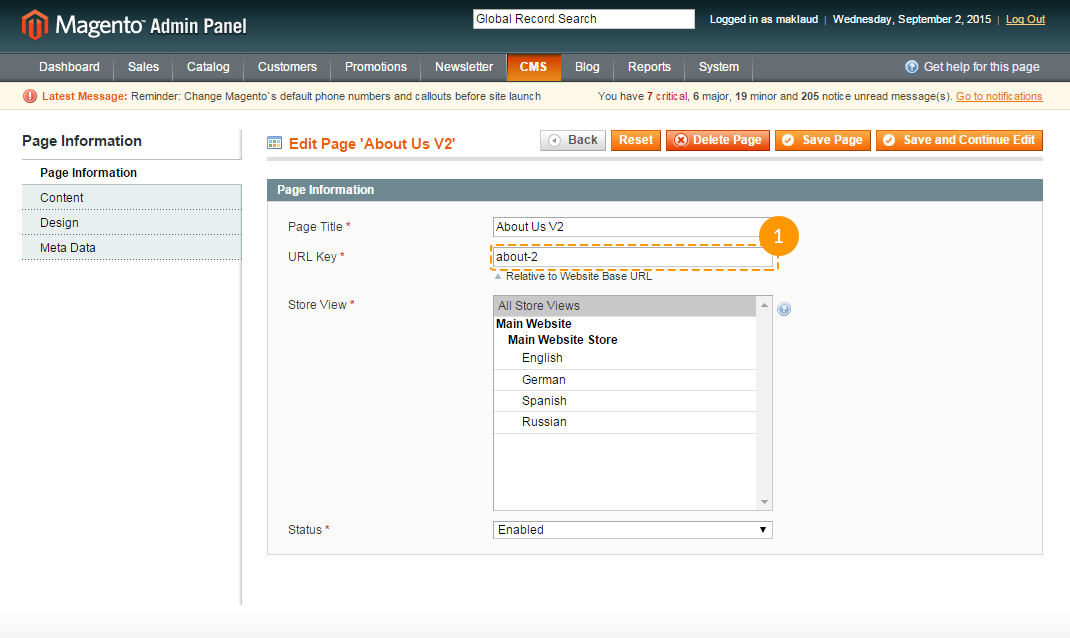
Before applying alternative page design, change URL Key from about to any other in the editing mode of default About page.
Contact page configuration
The template comes with two variations of Contact page design. In order to install the page you like, follow the instructions below.
-
Open Magento administration panel, in the top navigation menu select System > Configuration.
-
Go to "TM Store Settings" tab.
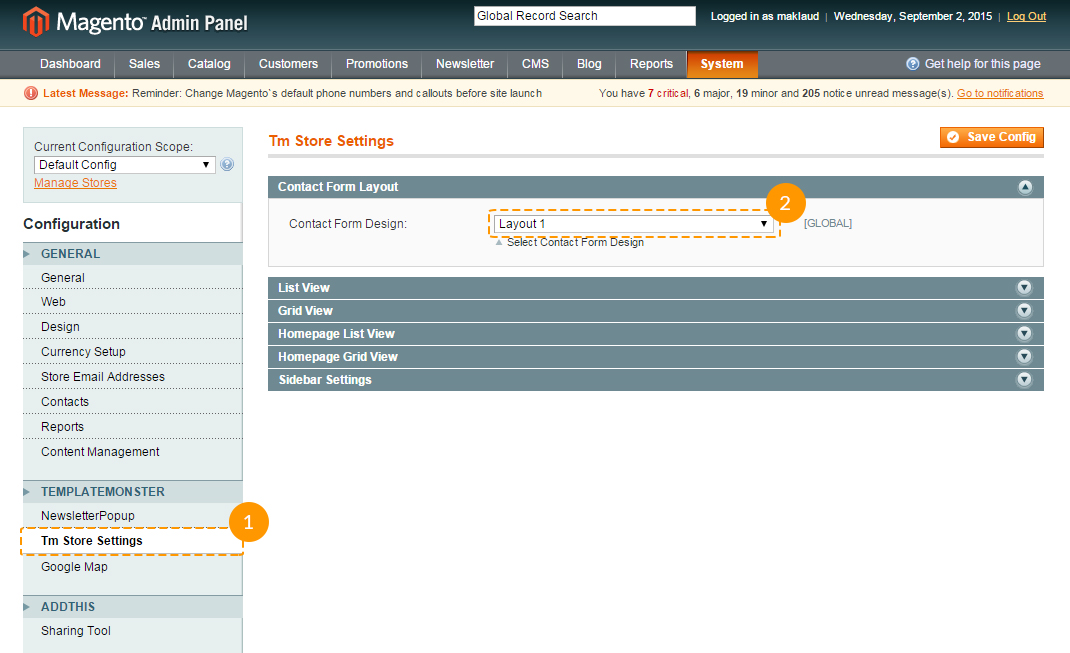
- In the "Contact Form Layout" section select "Layout 1" or "Layout 2" to change Contacts page.
- Click "Save Config".
Footer settings
You can choose one of the 3 available footer layouts.
In order to choose or change one follow the steps below:-
In the top navigation menu go to System > Configuration.
-
Go to the "TM Store Settings" tab.
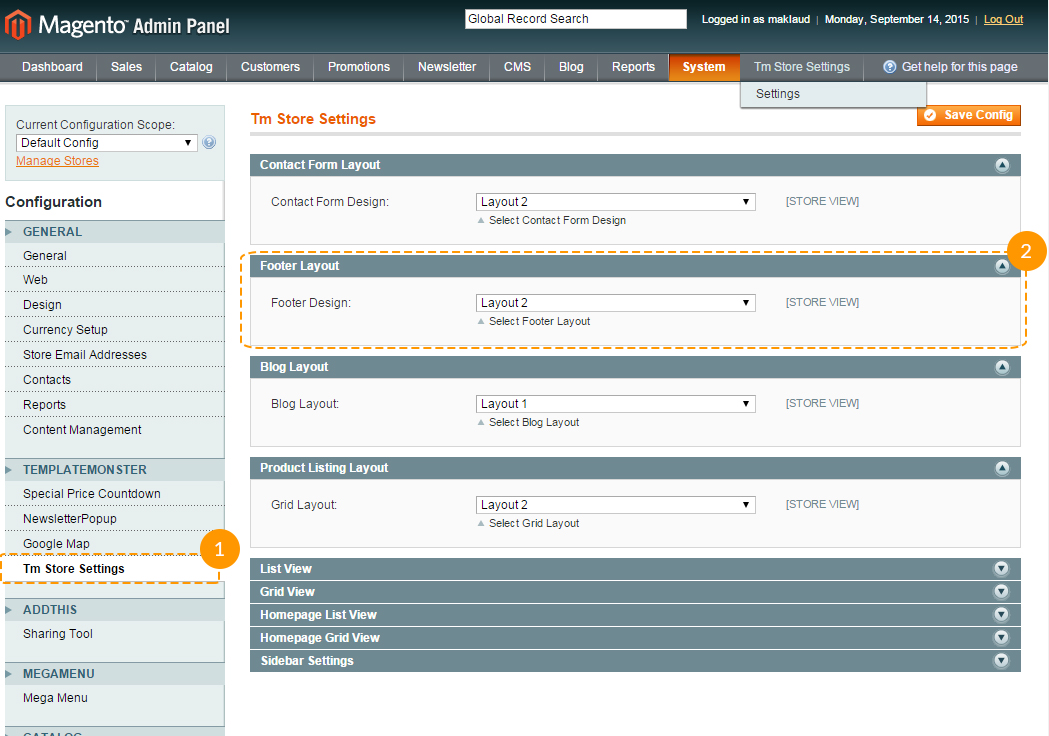
- In the "Footer Layout" section select "Layout 1" or "Layout 2" to change the footer.
- Click "Save Config".
Second footer layout contains Blog widget.
When choosing second layout you will see empty space in the footer. In order to display blog, follow the instructions on adding static blocks in the Magento template installation -> Static blocks configuration section and in the Template settings table.
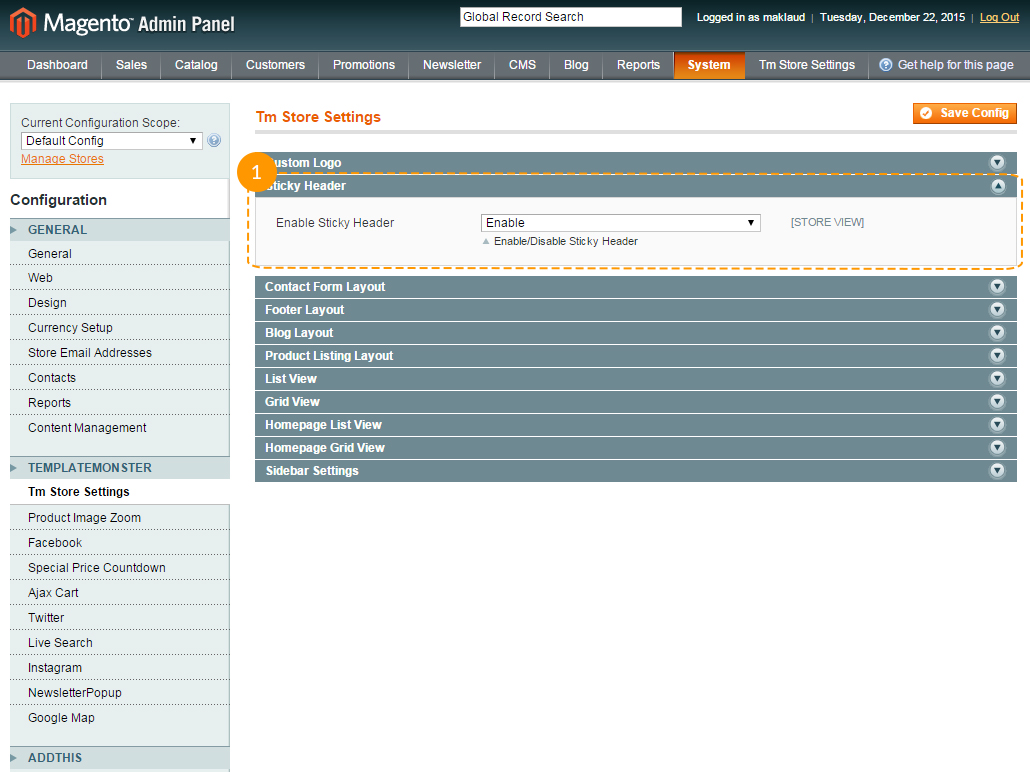
Sticky header
You have the ability to enable/disable sticky header on scroll.
To enable/disable sticky header, you need to navigate to the TM Store settings -> Settings tab. In Sticky Header section you can enable/disable sticky header.
Grid/list image view
To customize product thumbnails in grid/list views of home and categories pages, navigate to TM Store settings -> Settings in the top admin panel menu. In the settings you will find 4 sections:- List view
- Grid view
- Homepage List view
- Homepage Grid view
We have added this feature to cut down the size of images before the pages are loaded. So, do not be surprised if you set the thumbnail width of 500px, and finally you get the same width of 210px for a 4 products layout. The thumbnails width is adjusted by CSS and grid width. The thumbnails height is proportional to the width.
Let's take a look at List view and Homepage List view sections.
They display products in a list view on the home and category pages.
Both sections have the same settings:
| Image width | - | sets the width of the main product image in the list view. Attention!!! The image cannot be wider than the width of the grid in which it is located. |
| Image height | - | sets the height of the main product image. |
| Enable/Disable thumbnails | - | enable/disable the display of thumbnails for other product images. |
| Thumbnail width | - | width of the thumbnail. |
| Thumbnail height | - | height of the thumbnail. |
In this type of listing you can display product thumbnails under the main image.
Let's take a look at Grid view and Homepage Grid view sections.
Both sections have the same settings:| Image width | - | sets the width of the main product image in the grid view. Attention!!! The image cannot be wider than the width of the grid in which it is located. |
| Image height | - | sets the height of the main product image. |
| Type of the product image preview: | - | allows you to choose one of three options to display the thumbnails of product: Thumbnail, Hover Images, Carousel. |
By choosing the Thumbnail type, you will have additional options to specify the width, height and number of thumbnails.
When you choose the Hover Images type, the product image will change on hover. You can choose the image which will be displayed on hover in product settings.
By choosing the Carousel type, you will be able to flip through product thumbnails from the main product preview.
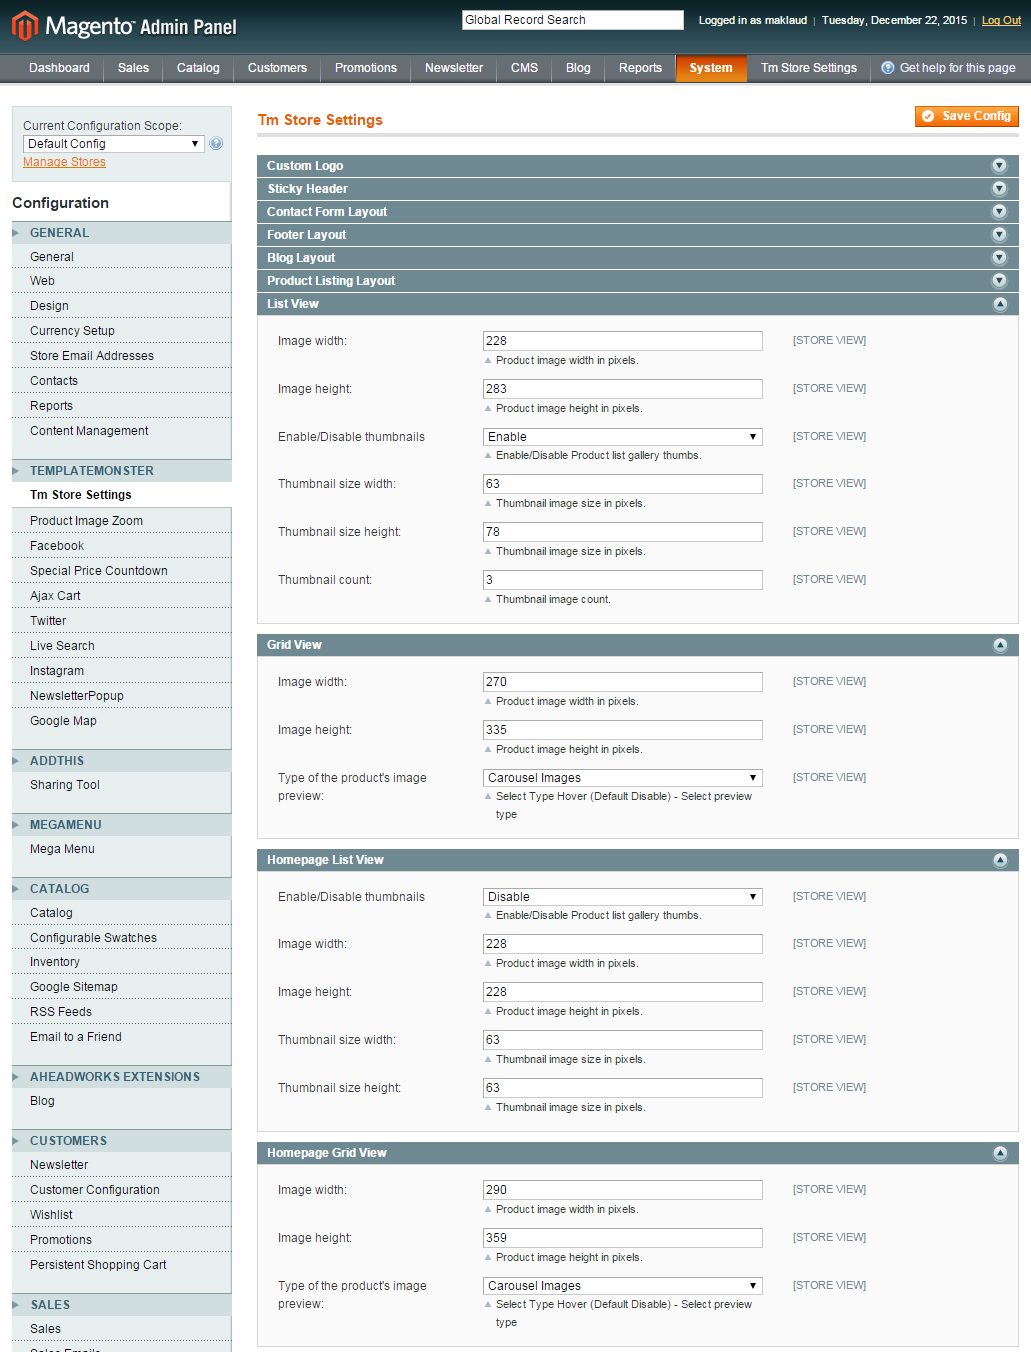
Note! The maximum width of the image is equal to the width of the column in which it is located.