Joomla 3.x Documentation
Getting started
If you don't want to spend your time installing the template, don't hesitate to order installation service using our live-chat.
This method lets you install Joomla CMS engine, Joomla template, sample data and all the necessary extensions.
Creating a database
Once you've completed uploading the files to a hosting-server, you should prepare an empty database for your Joomla website. It should be created with the help of the database management tool in Hosting CPanel [the PhpMyAdmin typically].
Follow the simple instructions to create a new database through the phpMyAdmin [check the slides below]:
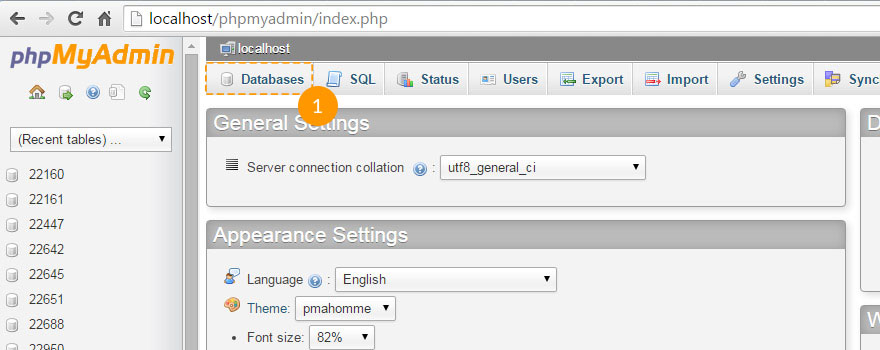
- In order to access the list of databases, press the “Database” button in the top navigation menu.
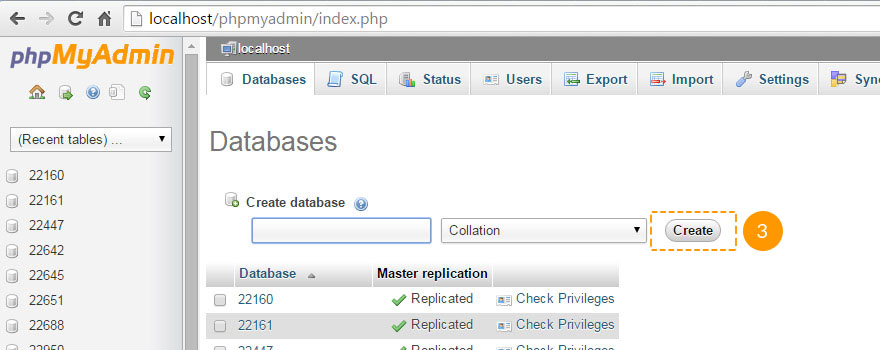
- Input the database name in the "Create new database" field.
- Press the “Create” button.
You will see the new database in the listing. Click on the database name link in order to get access to the one.
Check the instruction accompanied by the illustrations [click on switches to move on]:
1. Open the “Database” tab in order to access the database listing:
2. Enter the database name:

3. Press the “Create” button:
4. You will see the database in the list. Click on the database name link to access the one:

Check out the video-tutorial: How to create a database.
Should there be any issues when database creating, please contact your hosting provider to assist.
Uploading and Unzipping
To start working with Joomla, you need to upload files to your hosting server first. This can be accomplished either by your Hosting CPanel File Manager or FTP-client.
Follow the simple instruction:
- Open the template and access to 'joomla' folder.
- Select the 'unzip.php' and 'fullpackage.zip' files and upload them to your server [for more information check How to upload files to the server].
-
Enter the pass to 'unzip.php' file on the server [http://your_domain_name/unzip.php] in the address bar.
-
You will see the following window:
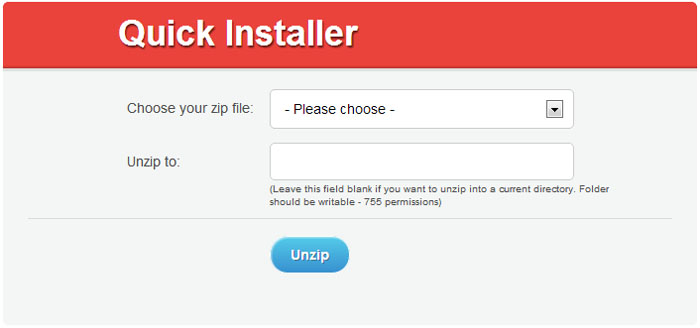
- In the field 'Choose your zip file’ select the uploadedfullpackage.zip file .
- In the field 'Unzip to’ choose the folder to unzip files.
- Press the 'Unzip’ button to unzip files.
Make sure you've set the correct permissions type for the unzipping files folder. The permissions should be CHMOD 755 or 777, depending on the sever configuration.
Joomla CMS Installation
Please, complete all the preparation steps and install all the necessary software.
Open your browser and enter the path to Joomla folder in the browser address bar [for example, http://your_domain_name/joomla]. You will see the Joomla CMS Installation window.
Website configuration
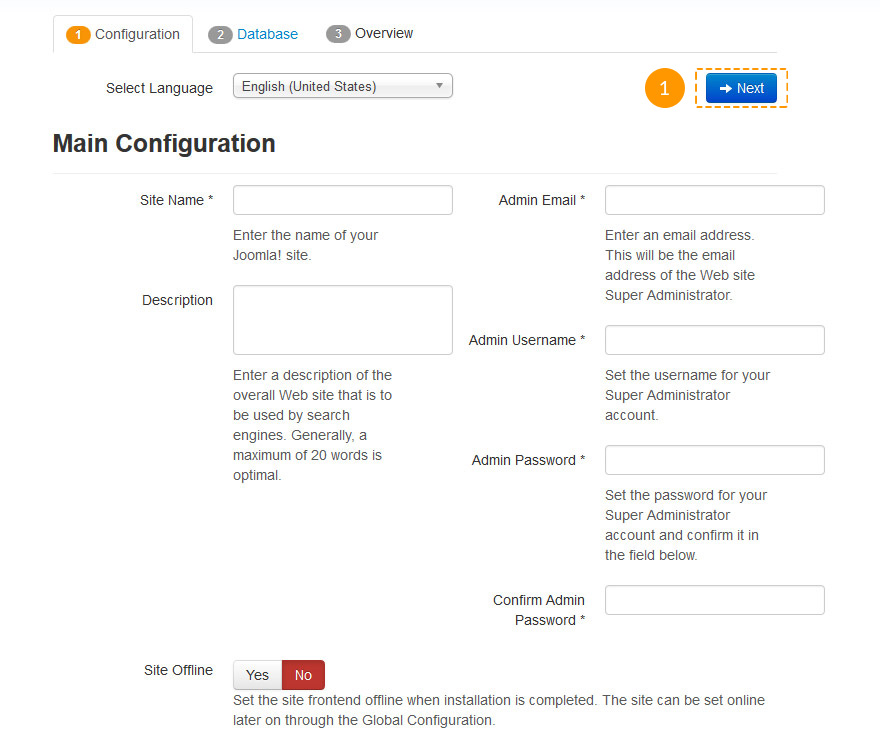
In the “Select Language” dropdown menu , select the language of your Joomla installation-master.
Attention: in the “Select Language” dropdown menu you have an option choose the language of the Joomla installation process only. You not select your website language.
Fill in all the form fields of the “Main Configuration” section. Be sure to complete all fields that are marked with an asterisk [ mandatory field].
Please fill in the fields: "Admin Email", "Admin Username" and "Admin Password" in the right column in order to create a new Joomla website user with admin rights.
"Admin Email", "Admin Username" and "Admin Password" each, is necessary for accessing Joomla website admin panel. Please keep the data confidential.
Once you've entered all the data, press the Next button in the upper right corner:
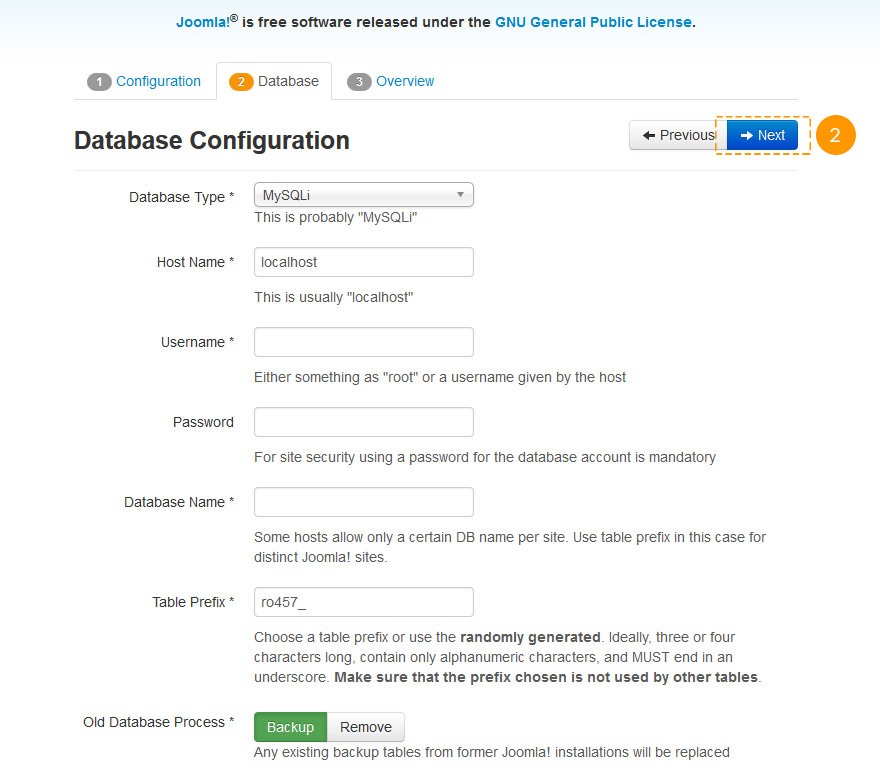
Database configuration
Then you need to input your database details. Please, contact your hosting provider to get the correct details.
Installing Joomla from scratch, you should just enter "Host Name", "Username", "Database Name" and "Password". You can normally leave other options set to Default. However, there can be some differences depending on your hosting provider.
Once you've entered all the details, press the Install button:
Overview
Joomla CMS installation is almost complete now. At the “Overview” stage you need to select, whether you want to install Joomla Sample data or not.
Attention: Sample Data are necessary to make your website similar to the template Live Demo: with all the sample images, texts and saved module settings. To import sample data, please choose Sample Data with the title "sample_theme###", where ### is the theme number.
Please select sample data in case you want to install them or press "None", if you no sample data to be on your Joomla website:

You can check, whether the database configuration and admin panel access details are valid, and e-mail it:

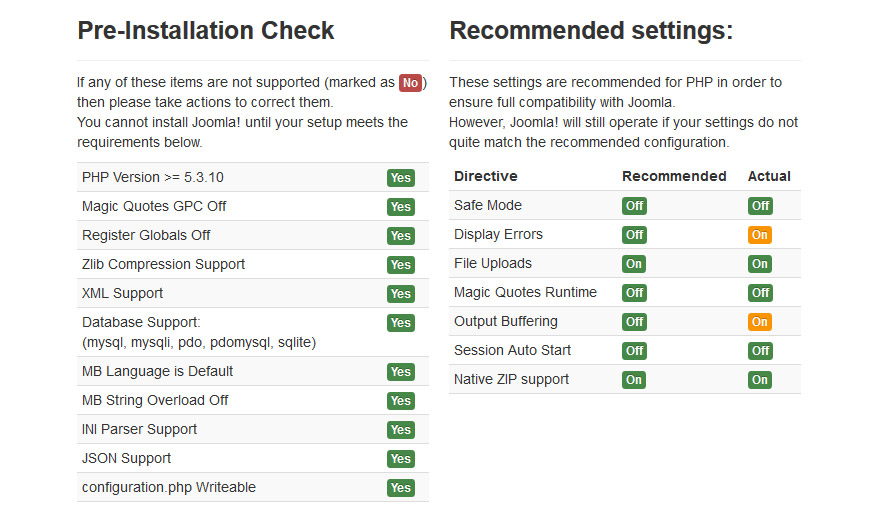
You can verify your hosting server conformity with the Joomla requirement and check your installation settings once again. Should warning notification boxes are displayed on the "Recommended settings" section, please contact your hosting provider for further assistance:
Click the Install button to proceed.
Installation Complete
Congratulations! You have successfully installed Joomla CMS.
As you see, it is not that complicated.
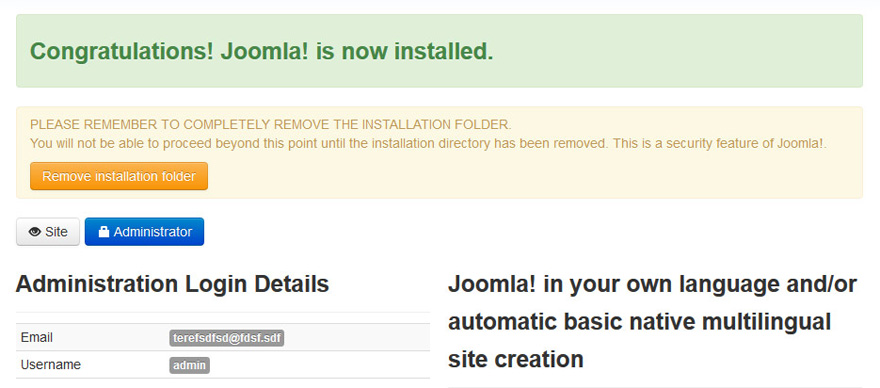
To enhance security level, please delete the "Installation" folder from your Joomla root directory.
Tip: You can check the detailed video tutorial on How to install Joomla 3 engine.
Please note: In case you have performed the Complete installation, you can skip the "Template Installation", "Sample Data Installation" and "Extensions Installation" sections as you have all these elements already installed.
Now you are ready to proceed to your Joomla CMS based website configuring. Click the “Site” button, in order to open your website or press “Administrator" to access your Joomla admin panel.
Template installation
If you already have a Joomla based website and want to change its design, you need to use the template installation method.
This method lets you to install a Joomla template and all the necessary extensions.
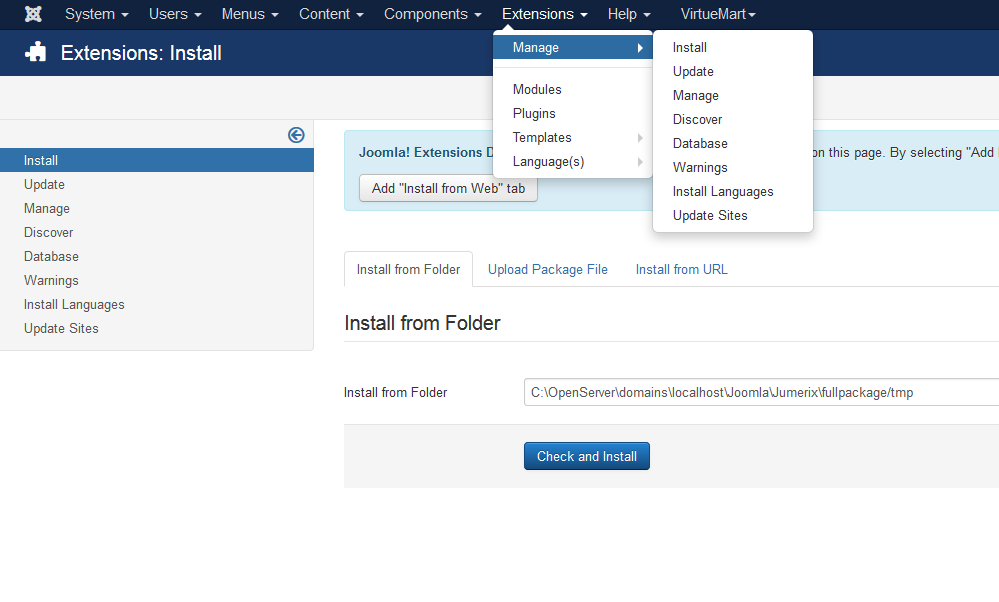
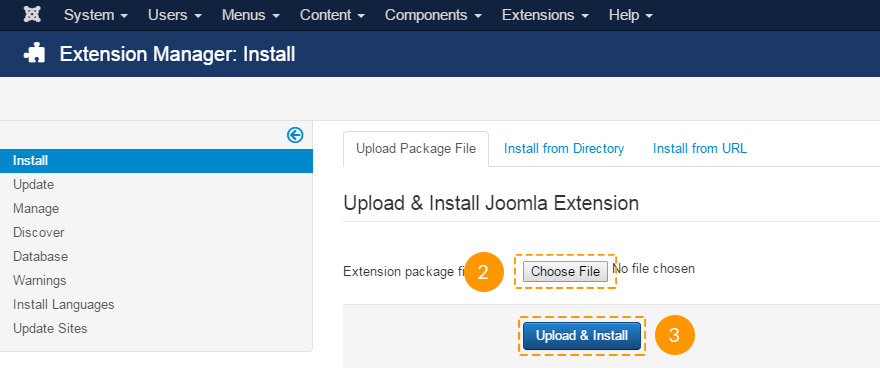
In your admin panel, navigate to "Extensions > Manage" tab:
In "Upload Package File" tab, press the "Choose File" button and choose "theme###.zip" file from the "joomla" folder of your template package. You'll see the installation confirmation massage.
To install the Joomla template, press the Upload & Install button.
Next you need to install all the necessary extensions. The scheme of actions is similar to the previous one.
Press the "Choose File" button. Go to your template package folder and then, to the "sources" folder. There you'll see the extensions' archive files. Choose one and press "Open" button. After this, press the Upload & Install one. You'll see the installation confirmation massage.
You need to install each extension one by one.
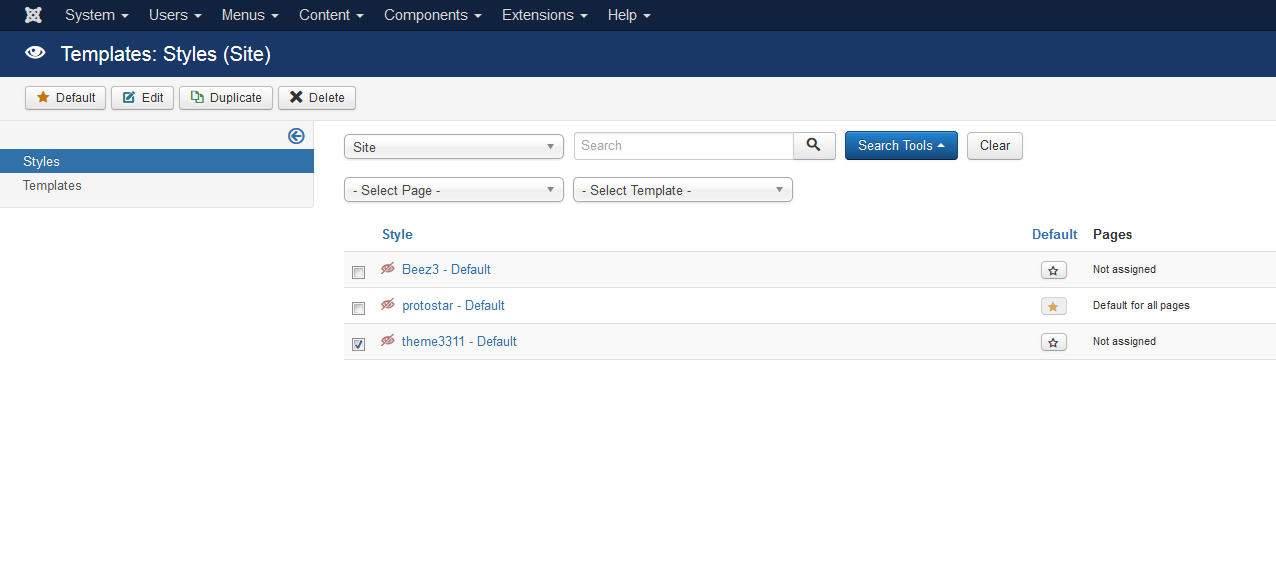
When installation process is complete, please activate the template. In the top menu, navigate to "Extensions > Templates" tab.
Select the new template and press the "Default" button. Now you can check the new appearance of your website:
Sample Data Installation
Sample data are used to make your Joomla website look similar to our Live Demo. It contains sample articles, images, module settings, website settings, etc.
In case, you do not want to use sample images or any other sample content, please skip this step.
Sample Data installation can be achieved in two simple steps:
Uploading sample images
In order to upload sample images, please open the template package and go to "sources" folder. Here you will find "to_root_folder". It contains files that need be uploaded to the root directory of your Joomla engine.
In order to upload files to your server, please use File Manager of your Hosting cPanel.
SQL file import
The last and the most important step of installing Sample Data is SQL file importing. SQL file is the database dump file that contains all the Joomla website data. SQL file [dump.sql] can be imported with the help of database management tool [phpMyAdmin]. The template SQL file "dump.sql" is in the "sources" folder. See the instruction below.
Please DO NOT import the SQL file [dump.sql] to the database if you have a live website as it will completely replace your database contents, and all your website data will be lost.
Please note: before the SQL file [dump.sql] import, please make sure that your database table prefix matches the table prefix. Check this information in the SQL file.
You can check the table prefix directly in the database with the help of a database management tool. Please pay attention to table names. Prefix is a set of symbols before the table names [for instance, in the table "jos_assets" the prefix is "jos_"]. You can also find out the table prefix in the "configuration.php" file in the website root folder. Line 19:
public $dbprefix = 'jos_'; [where the prefix is "jos_"].
If the table prefix differ, please open the "dump.sql" file in any code editor. With the help of "Find and replace" button [or CTRL+F] replace the table prefix "jos_" [it’s used in the SQL file] with your database prefix [the prefix you've set, when installing the Joomla engine].
You can also check the detailed video-tutorial that will show you How to change database prefix in the SQL file.
In order to import sample content [dump.sql ] to the database, please follow the next steps [please check out the slides below]:
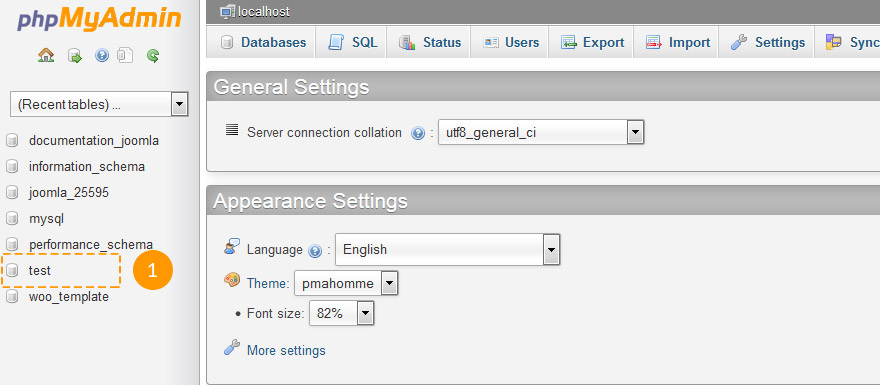
Select your database from the database list in the left column in the phpMyAdmin tool:
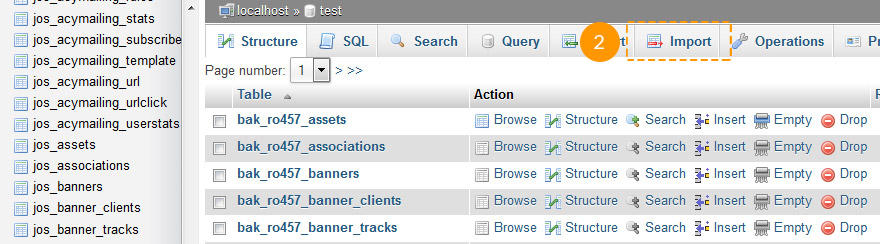
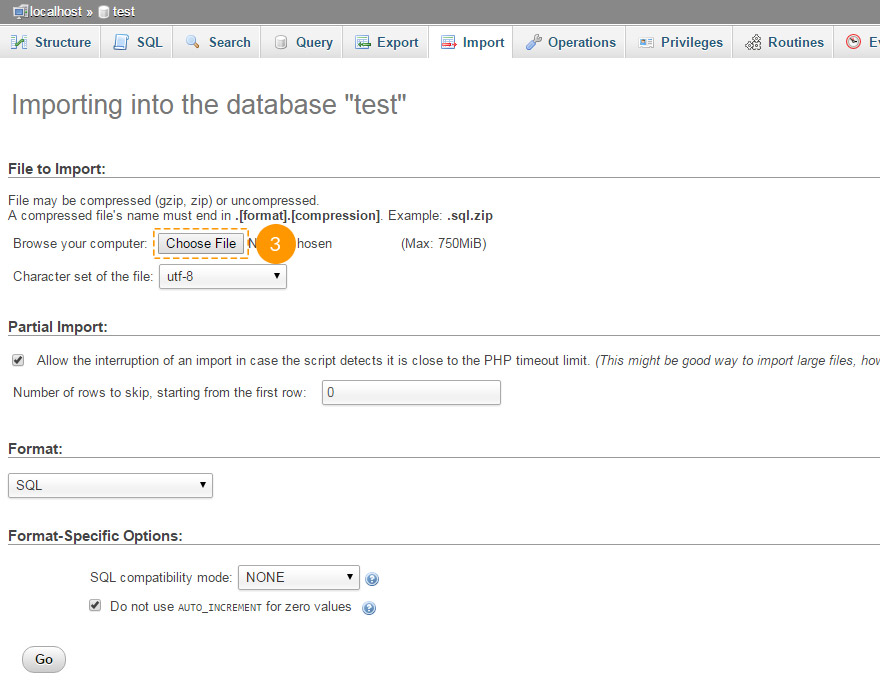
Click the "Import" button in the top navigation menu:
Click "Choose file" and browse for the dump.sql file in the template package "sources" directory:
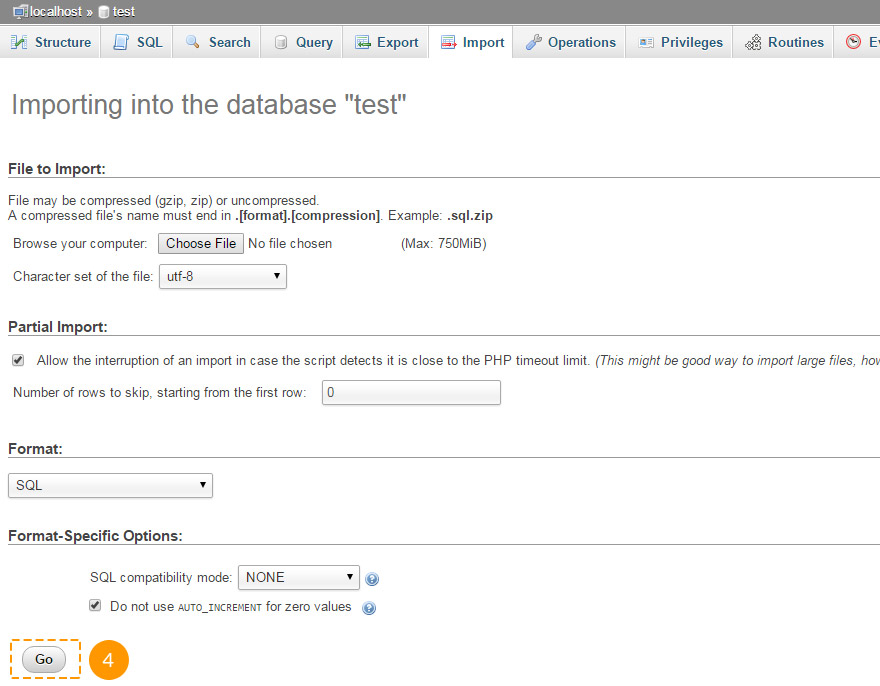
Press "Go" to start importing sample data:
You can also check the detailed video-tutorial on how to import SQL file using phpMyAdmin tool.
Modules installation
Joomla templates contain additional extensions: modules, plugins and components that are used for expanding your website functionality. You can install all the additional extensions with the help of a bundle package provided.
You can find this archive in the ‘sources’ folder of the template. It’s name is 'pkg_bundle_v/.../.zip'. It can be easily installed, as any other extension or theme, with the help of Extensions manager of your Joomla admin panel.
-
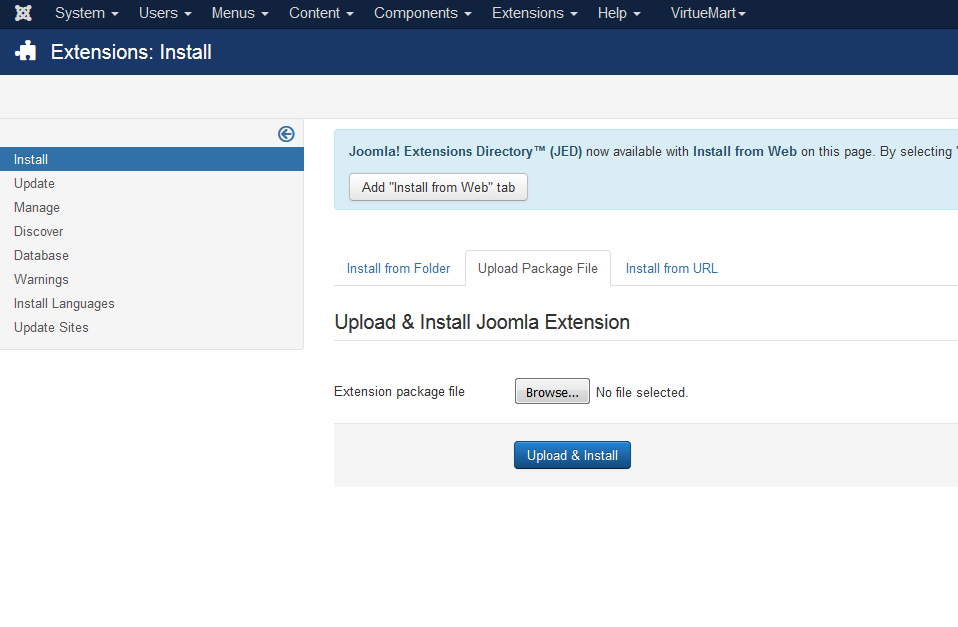
Please open your Joomla admin panel. From the top menu select "Extensions". From the dropdown select the "Manege" button.
- Please select the "Install" option in the left column or in the dropdown list;
- Press the "Browse/Choose file" button and find the 'sources/pkg_bundle.zip' archive;
- Press the “Upload and install” button, in order to install all modules:
If your theme contains some extensions that are not included to 'pkg_bundle.zip', you should install them separately. This should be done just like installing 'sources/pkg_bundle.zip' with the help of “Extensions Manager”.
The file names of extensions archives usually start with 'mod_', 'com_' or 'plg_', so you will easily recognize them.